Showing posts with label crayons. Show all posts

Tuesday, April 22, 2014

Earth Day Crayons

Happy Earth Day! Want to do a fun and easy project with the kiddos to show your appreciation for Big Mama Earth? Forget the tin can pencil holders and the t-shirt grocery bags and go straight to your art supplies. Gather all those broken and unused white, blue, and green crayons, a muffin tin, and make some mini-globe crayons! Today's post comes courtesy of TheGunnySack and would be great if you're an art teacher, an environmentalist, or maybe even a mom who doesn't want to spend more money on crayons!

Start by preheating your oven to 250 degrees. Next, take off all the wrappers on your crayons. The more you have, the more globes you can make!


Next, either break or cut them into pieces and put them in your muffin tin. If you put the white pieces in first, the "clouds" will appear on the top when you flip them over.


Stick the muffin tin in the oven and give them 15-20 minutes (or until the crayons have melted). Be careful removing the tin from the oven, as you don't want to jostle the colors too much.


Let the wax cool on the counter before removing them from the tins (I gave them about 30 minutes, just to be safe). Now maybe the original post had magical muffin tins that just let the globes fall right now but I needed a knife to cut all the way around and when that didn't work, I ended up cutting down the middle in order to get them out! So please, for your sanity's sake, use parchment paper or PAM or something to help get them out easier. Unless you have magical muffin tins.


But there you have it folks, your very own globe crayons!


TOTAL COSTS: Free!
Assuming you have crayons and a muffin tin

TOTAL AMOUNT OF TIME: About 50 minutes
5 minutes to unwrap crayons and cut into pieces
15 minutes to melt wax
30 minutes to let cool

EASY-PEASY SCALE (1 super easy - 5 very difficult): 1 out of 5
This is something the kids could get involved in (assuming you don't let them cut the crayons with a knife). Have them break up the crayons, place however they want in the muffin tins, and draw to their heart's content!

Tuesday, January 14, 2014

Melted Crayon Art with a Disney Twist!

If you're new to Pinterest, chances are you've seen melted crayon art. It's a bunch of crayons lined up in a row, melted onto a canvas. It's a fun rainy-day activity for your kids. SunflowerStoryTime shows the basics of how it's done in this post but I decided to put my own little twist on it. After seeing "Saving Mr. Banks", Mary Poppins had been on my mind and I decided to incorporate her in the design. I just Google-imaged "Mary Poppins silhouette", picked one I liked, and cut it out.

You'll need the basics to make this:

1. Crayons
2. A hot glue gun and glue (I used 1 stick)
3. A hair dryer
4. A canvas
5. A silhouette (optional)

I recommend you remove all the labels from the crayons, though it's certainly up to you. I'm a little OCD and if all the labels weren't perfectly lined up, it would have bothered me so I figured it was easier to remove them altogether. Depending on the size of the canvas, you'll want to lay out all the crayons first before gluing anything down, so you know just how many to use. I ended up using 43 crayons, which was almost the entire box!


Next, take your hot glue, glue right onto the canvas, and then place your crayon on top. I don't recommend doing it the other way around because the glue doesn't stick well and ends up melting the crayon.


Once all your crayons are glued down, take your canvas to an area that you're not afraid of getting wax on. I decided to lean the canvas against the bathroom wall with paper towel underneath, which was a good idea because the wax melted all the way to the bottom and I did get some wax on the tiles by accident. So if you're near expensive furniture, carpet, or animals, you might want to relocate.


Keep the hair dryer roughly 12" above the crayons and after a couple minutes, they will begin to melt. Be careful when moving the hair dryer around or you'll start to spray wax on your walls!


Once you're done melting your wax, take your silhouette and hot glue it to the canvas. I made the mistake of not leaving enough room for Mary so she's a bit cramped in the corner.


Also, if you put a paper towel under the canvas and the melted wax touched the paper towel, you may have some of the paper towel stuck to the bottom of the wax so gently remove that. However, I kinda like it - wherever you sit the canvas, it'll looks like the wax is on that surface!


And voila! Your work of art is complete!


TOTAL COSTS: About $12
$4.11 for a 14x18 canvas panel from Utrecht
$5.99 for 64 Crayola crayons from Vons
Hot glue gun and hair dryer already on hand


TOTAL AMOUNT OF TIME: 1 hour
40 minutes to remove 43 crayon labels
11 minutes to hot glue crayons to canvas
9 minutes to melt wax

EASY-PEASY SCALE (1 super easy - 5 very difficult): 2 out of 5
It's not difficult, per se, but if you're not careful, you could easily get wax everywhere and the clean-up would not be fun. So the one thing you should keep in mind is how close your blow dryer is to the canvas and how many Lysol wipes you have on hand for cleaning up!

Tuesday, December 17, 2013

Crayon Lipstick

Thanks to my sister for suggesting today's post! When I first saw this post by OhSoPrettyTheDiaries, I was both skeptical but intrigued. Can you really make lipstick out of crayons? It seemed too easy not to give it a try!

Here's what you need need:

Crayons
A container to put said lipstick in
Coconut Oil
A pot of hot water

Easy enough, right? Now I couldn't find any empty lip balm containers so I used an Altoids Smalls tin.

Cut or break your crayon(s) into 4 pieces. I really only ended up using the equivalent of 1 crayon because I found out the hard way that too many pieces resulted in my container sinking in the next step.

Take your coconut oil and add 1 teaspoon for every crayon piece you put in the container (so 2 crayon pieces = 2 teaspoons). Put the container of oil into a pot already filled with water and turn it on low heat.

Once the oil has melted, then add your crayon piece(s). It took about 7 minutes for my 2 pieces of crayon to melt so times may vary, depending on the side of the container, the material it's made up, how many pieces you use, how much oil you add, etc.

It didn't say how much time it would take to cool and harden so after 30 minutes of waiting for it to cool at room temperature, I put in the fridge for another 30 minutes and that seemed to have done the trick. However, the color completely changed and it was difficult to get out with a Q-Tip when it was so cold, so I put the tin back in the pot for a minute to let it warm up and check out the change in color:


The results? Well, it's more of a lip gloss than a lipstick but as the original post says, too much crayon = dry lipstick while too little crayon = lip gloss. Guess that's what I made!


TOTAL COSTS: Free!
However, I already had crayons, a container, a pot and water on hand

TOTAL AMOUNT OF TIME: A little over 1 hour
7-10 minutes to cut up crayon, melt oil, and melt crayons in pot
1 hour to cool

EASY-PEASY SCALE (1 super easy - 5 very difficult): 3 out of 5
I'm sure with more practice and better containers, you get into the rhythm of what gloss texture looks like versus lipstick texture but I can tell you, it's super easy to make it glossy! Just... don't lick your lips... blech...

Sunday, December 15, 2013

How to Make 15 Different Ornaments

Maybe you're putting up your first Christmas tree, or maybe you're tired of the old ornaments and want something new. Well, I've put together a bunch of different ornaments I found online and put them to the test:


#1 - Wedding Invitations

If you've got a lot of wedding invitations laying around and you're not sure what to do with them, cut them into strips and put them inside a clear ball, so you'll always be reminded of your big day!


#2 - Sheet Music

Find your favorite Christmas carol, cut it into slices, and put inside a clear ball. Put a red ribbon around it or leave it as is and enjoy your festive ornament!


#3 and #4 - Pages from a book

Perhaps you have a favorite book, or you know of someone that has written a book this year. Why not make an ornament out of their words? You can either glue the pages of their book to the outside, or take pages, crinkle them into balls, and put them on the inside! Granted, they may not like their work being crumpled up so keep that in mind if you know the author...


#5 - Christmas List

A good way to remember what you or your kids wanted in years past is to put a Christmas list in an ornament. That way, years down the road, you can look at them and fondly remember what a "Furby" was... oh wait, they're back, aren't they? Hmmm... well, you get the idea!


#6 - Photo in Snow

This one is quite simple, really. Just print out a photo (I used an old wedding photo), throw in some sugar as "snow" and some pine needles from your tree and voila! A wintertime ornament, perfect for your tree. I also threw in some fake berries, in case you're wondering what those red things are!


#7 - The Melted Snowman

Speaking of sugar, you can use sugar to be the "snowman", throw in a paper "nose" and something for the eyes and buttons (I used the top of whole cloves) and now you have a melted snowman on the tree... poor little guy...


#8 - A Ball of Yarn


This one is quite easy -

Step 1 - Wrap yarn around ball
Step 2 - Put toothpicks in yarn

You're done! I recommend having a little piece trail out, to make it look a little more realistic. But quite easy and perfect for the knitter in your life!


#9 - The Moustache

My husband pointed out to me that it should be "staching" instead of "stashing" but I was taking this from Wanelo's post. People have been a bit mustache-happy lately so if your man has a soup-strainer, a flavor-saver, a crumb catcher... well then, this is the ornament for him. Take some white acrylic paint and pour a little bit inside a clear ornament (or just buy a white ornament). Roll the paint around until it covers the entire ball, then with a black Sharpie, write on the outside. Bada-boom bada-bing, now THAT is how you decorate a tree!


#10 - A Map

Maybe you took a big trip this year and you want to remember it - why not remember it on an ornament? You'll have to bear with me and my sloppy attempt, but if you Mod Podge a map of where you went or where you plan on going, it will be a nice reminder for you year after year.


#11 - Superhero Ornaments

I found this post on HappyLooksGoodOnYou and thought it was so clever. Put paint inside of an ornament, just like the Mustache example, and then print out the superhero's symbol and glue to the front. I used yellow paint and printed out Batman's symbol because, well, my cat's named Batman so it seemed appropriate, but you could use any color/symbol combination you choose!


#12 - A Snowball

Here's another easy one for ya - take an ornament, cover it with glue (or Mod Podge) and then roll it in epsom salts. The result? A snowball!


#13 - The Glitter Ball

This is pretty self-explanatory - put glue inside of a clear ornament (I used clear Elmer's glue), pour some glitter inside, and roll the ornament around until it's completely covered! I suppose you could glitter the outside but then you run the risk of glitter getting everywhere...


#14 - First-Time Homebuyers

If you bought a house this year and you want to commemorate it, you can make a salt-dough ornament (like the Hand Santa Ornament post) and either imprint the key into the dough before putting in the oven (like this) or tracing around the key and dating the ornament with the date of sale. Sometimes it's the small, personal memories that make the tree special.


#15 - Scrabble Tiles, c

If you don't mind ruining your Scrabble game, pick out a few letters and using the stands the game provides, use that to glue all the letters together, glue a ribbon to the top and you're set! I recommend sawing the stand in half if you want to display shorter words.


Here's one big fail I found roaming around Pinterest - using crayons to melt the inside of an ornament. Here's what it should look like vs. what it actually looks like:


And this was after 5 straight minutes of using a blow dryer to the ornament. Your hands will get hot, the ornament will become difficult to hold, and the crayons will barely melt. If you want a cool effect like the photo above, use paint, not crayons.

The other fail? Well, even plastic balls can shatter, so be very careful!


Some other projects that I recommend you try include:

1. Painting an ornament with chalkboard paint (and not spending $9 on one from Etsy!)
2. Cutting up an old DVD or CD and gluing the pieces to the ornament like this
3. If you have a newborn, paint their hand and have them transfer their handprint to the ornament for their first Christmas

TOTAL COSTS: Depends on the project
You could spend anywhere between just $2.99 the on the 6-pack of ornaments from Michael's, or you could spend much more, depending on which project you choose and what you need to buy.

TOTAL AMOUNT OF TIME: Depends on the project
All of these were quite fast, the only thing that took a while was waiting for the Mod Podge to dry.

EASY-PEASY SCALE (1 super easy - 5 very difficult): Depends on the project
Most of these were so easy, your kids could get involved. None of them were difficult - the map ornament looks sloppy because I rushed but if you use smaller pieces and take your time, it could looks as good as this one, I'm sure!

Tuesday, December 10, 2013

11 Different Ways to Wrap a Present

We're getting to that point where post offices have 30 minutes waits, all that's left is the tacky wrapping paper, and you're running out of creative ways to wrap a simple box. Need some help? Here are 11 wrapping ideas I've gathered from different sites and have compiled into one post. Hopefully there's an idea here for everyone on your Christmas list!

Idea #1: The Wordsmith

If you have a friend who loves word searches, you can either make one of these on the computer or get some blank paper, wrap the gift, then draw 1/4" lines vertically and horizontally with a pencil. Write in the words you know you want to include in marker (like "TOJOHN" or "FROMJANE") and then circle them in a bright color so they're easily found. Once those are done, write in a bunch of hidden words for fun! Fill in the rest of the boxes with random letters and you're all set. It's a gift that'll keep them guessing but also entertained!


Idea #2: The Music Lover

This is an easy one, all you need is some sheet music! You can either print some out for free online (just Google image search "sheet music") or you can buy Mod Podge "podgeable papers" made to look like sheet music, which is what I had on hand. See bonus instructions below on how to make the bow!


Idea #3: The Artist

Another idea from At Creative Home that's not terribly complicated. Plain paper + crayons = they gets to decorate their own gift! I recycled the paper that I received from IKEA when purchasing mugs, hence why it's a bit wrinkled.


Idea #4: The World Traveler

Find an old atlas or print out a map and use that as wrapping paper! Be creative with it - you could print out a map of where you're from, where the recipient is from, where the gift is from, and draw stars or hearts over certain locations! I also decided to make a mini bow - see bonus instructions below on how to make it yourself!


Idea #5: The Weaver


Ok, maybe you don't have that many friends who are weavers but this is still a creative idea I originally saw on MinieCo. Now you can do it all the way around the gift like they did, or you could just do it on top like I did. It's quite simple - take strips of paper and put them under, over, under, over and then over, under, over, under. It's a little time consuming and I used Elmer's glue which took a while to dry, so you might be better off using a hot glue gun to secure it.


Idea #6: The Reader


Using book pages, magazines, or leftover newspaper, use that as your wrapping paper for the person who loves to read! They might not appreciate pages being ripped out of a book so newspaper might be your best bet or find text online and print that out. I used a Mod Podge "podgeable papers" newspaper and it worked great!


Idea #7: The Teacher

This would be creative way to wrap a gift for a teacher (or a student for that matter). No, not with dry erase but with chalkboard liner! That way you can decorate it however you like and if you mess up, that's ok, just erase it and start over! Going Home to Roost's post used a chalk marker to design the packages but I'm old school, I like the feel of chalk dust between my fingers.


Idea #8: The Recycler


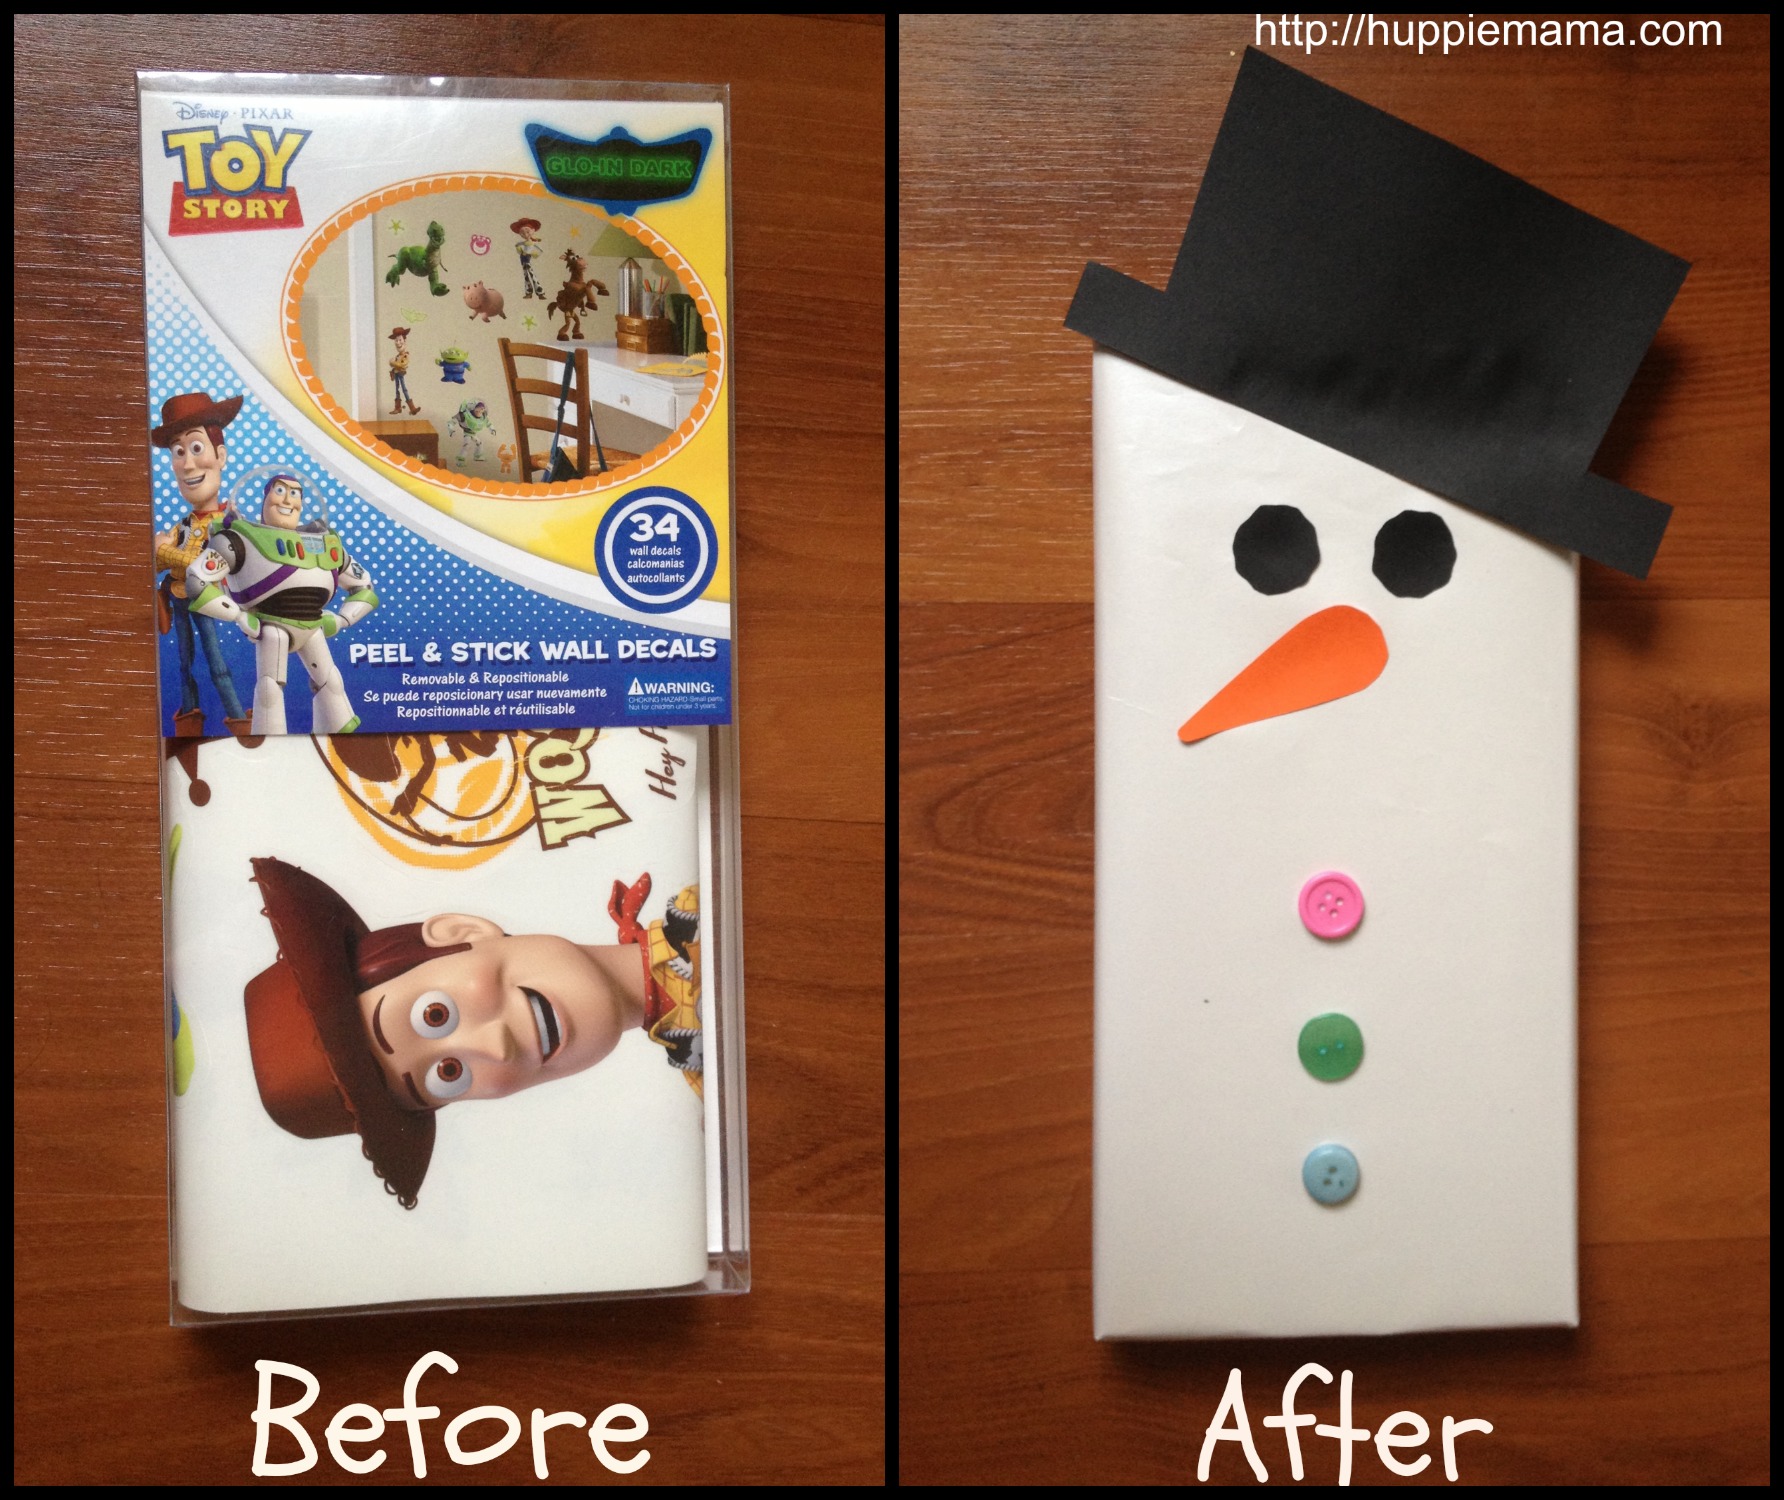
Do you know someone who likes to find multiple purposes for something? Well, here's one way to decorate a gift or wine bag and they can reuse it with a touch of festive flair! I originally saw this post by Huppie Mama, who decorated a box instead of a bag, so it's versatile!


Idea #9: The Noise Maker

Nothing says the holidays like jingle bells! Attach some bells to a gift to make it more festive, though make sure if the gift is for a child there is an adult nearby to make sure the bells aren't ingested. I don't think the ER would be a great place to be on Christmas morning...


Idea #10: The Nerd


Now I am a self-proclaimed nerd, so that word isn't meant to offend. If you're a fan of comic books, then wouldn't you love getting a gift wrapped in your favorite comic? I chose Batman for this one because that's my cat's name. Yep. Big nerd. So just Google image your favorite comic strip, print it out, and use that as your wrapping paper!


Idea #11: The Photographer

On Minted.com, you can pay $15 to have wrapping paper with your own photographs on it... OR, you could just print out your own photos and use that paper to wrap your gifts! Seems like a no-brainer to me! I just opened up a Word doc, inserted a bunch of different photos, and then printed it out.


Bonus tip #1: How to make a traditional bow out of paper
This comes to us from Studio Calico. Cut four long strips of paper (mine were 12" x 1/2" but you experiment with the width).

Cut three of those strips in half and mark an x in the middle of those 6 strips.


Then take one end of a strip and twist and glue it on top of the x.

Take the other end, twist and glue it on top, almost making a figure 8.

Do this for 4 strips. For the final two, cut them 1/2"-3/4" shorter and twist and glue, just like you did the others.

Then start stacking! Glue one on top of the other, until all are on except there that one long strip. Cut it to a 2.5" long strip, glue it into a loop, and glue it in the middle of your bow. Ta da!

Bonus tip #2: How to make a mini bow
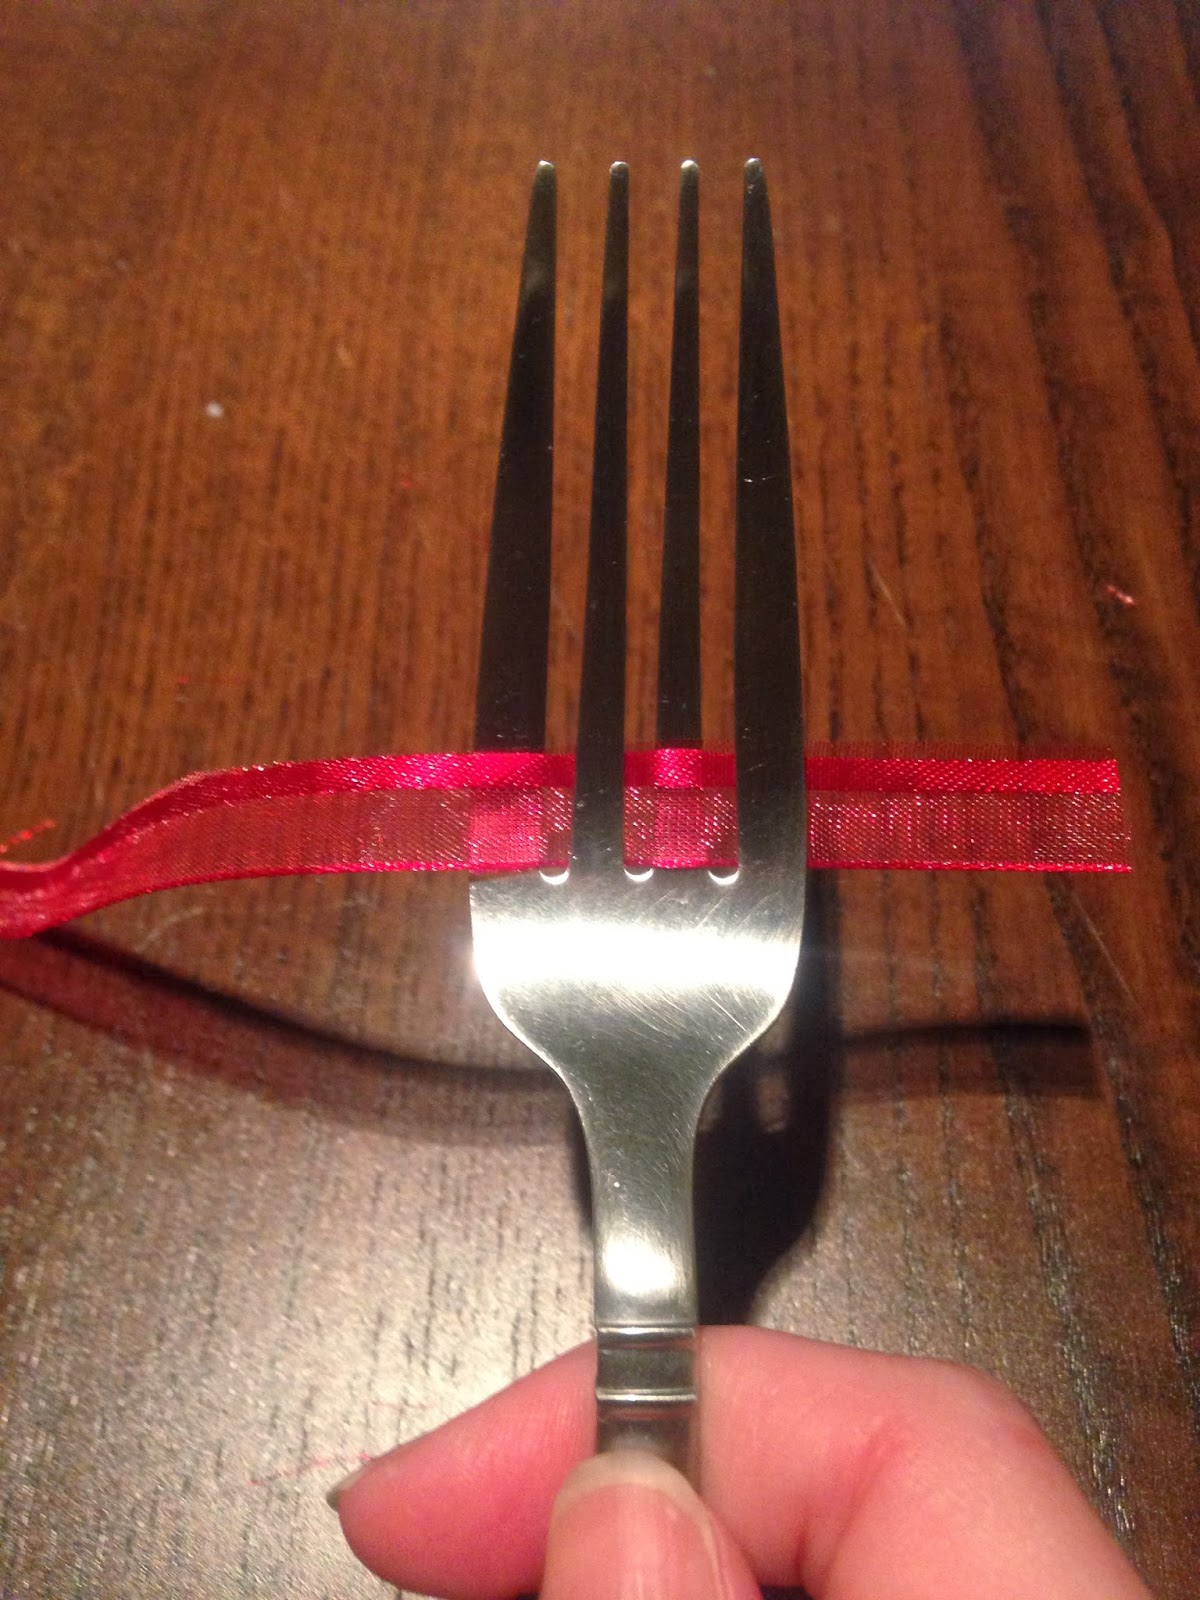
I originally saw the photos here on Fun Substance but since the photos were backwards it was hard for me to follow so hopefully my photos and explanation below will make things a little easier for you!

First, have the short end of the ribbon on your right and the long end on your left. Go over the first and third tongs with the ribbon.

Then, wrap the long end around the first tong and go over the second and fourth tongs.

Keep going back and forth until you have five rows of ribbon on the tongs.

Take another separate piece of ribbon and between the second and third tongs, tie the top and bottom rows together.

Make a knot

Slip the ribbon off, cut of the ends and ta da! You've got a little bow!

TOTAL COSTS: Varies with each wrapping project
You could spend nothing because you have a printer, paper, scissors and tape or you could spend up to $6 on chalkboard liner, $4 on jingle bells, etc.

TOTAL AMOUNT OF TIME: Varies with each wrapping project
Again, it's hard to give you a set amount of time. I can tell you the fastest project was "The Reader" because all it required was newspaper!

EASY-PEASY SCALE (1 super easy - 5 very difficult): Varies with each wrapping project
I found the easiest project was again "The Reader" because it was just wrapping a box with newspaper. The most difficult was probably "The Photographer" only because I had a hard time picking out the right photos! Be creative and have fun!