Wednesday, February 26, 2014

Newspaper (or book) Nail Art

I'm not a big fan of painting my own nails, however I think I've had maybe 3 professional manicures in my life. When I saw this idea on Pinterest for newspaper art, I thought it was simple and easy enough for an amateur like me. I made a few mistakes here and there that I wouldn't want you to make, but for $2, this project is worth a try!

You'll need:

1. White nail polish 
2. Clear nail polish
3. Rubbing alcohol
4. Newspapers, phone book pages, etc. I don't recommend using book pages because I found the actual paper sticks to your nail instead of just the ink from the text (see below)

First, and this is optional and I didn't do it, put on a base layer of polish. If you want to skip this like I did, paint on your layer of white (mine was actually for french manicure tips, according to the bottle, but it worked perfectly). Wait for it to dry before applying another coat if needed.


Once it's dry, dip your finger into rubbing alcohol for 15-20 seconds.
 

Then immediately apply your newspaper/phone book pages/maps/whatever you want. I tried using old pages from a Harry Potter book that I had saved from my hollow book post. I waited for about 20 seconds before removing it.


As you can see, the book page didn't work so well...


So I tried again with pages from a phone book.


And voila! It worked!

Make sure to apply a clear top coat to all your nails so the ink doesn't come off.


And you're done! You could do crosswords, maps, receipts, whatever you like (so long as the paper isn't thick)! Be creative and enjoy this cheap and easy DIY!


TOTAL COSTS: About $2
$.99 for rubbing alcohol from Vons
$.99 for clear polish and white polish from Rite Aid (2 for 1)

TOTAL AMOUNT OF TIME: 1 hour
Keep in mind, I spent 20 minutes trying to make the book pages when I just should have given up!

EASY-PEASY SCALE (1 super easy - 5 very difficult): 2 out of 5
It's not hard, it just takes a couple of nails to get the process down pat. 

Tuesday, February 25, 2014

Cupcake Onesie Gift Box

Perhaps you've seen this floating around Pinterest when trying to search for a creative way to gift onesies. Sure, you could just wrap them and hand them over, but where's the fun in that? If your mother-to-be has a sweet tooth, she'll definitely enjoy this creative approach to gifting onesies. Note that it took me less than a minute per onesie so it's a simply and fast approach to gift wrapping!

All you need are:

1. Onesies (as the "cupcake")
2. Baby socks (as the "cherry" on top)
3. Cupcake liners
4. Cupcake box (optional - you could just use a regular box)


It's quite easy so don't be afraid! Step one: fold the sides of the onesie to the middle.


Step two: fold bottom over the top so it's half as wide.


Step three: take a sock, fold it however you like, and starting at one end of the onesie, start rolling it up.


Step four: place your onesie in cupcake liner.


Ta-da! See, I told you it was easy! Do this for however many onesies you have, put a ribbon on the box, and you're good to go!


TOTAL COSTS: About $20 (hey, I said it was easy, not cheap!)
$1.99 for Disney Cuddle Bodsuits 4-pack on Amazon
$8.00 for juDanzy 4-back of solid socks on Amazon
$4.29 for 24-pack of Wilton baking cups from Vons
$4.99 for 3-pack of cupcake boxes from Michael's

TOTAL AMOUNT OF TIME: Less than 5 minutes

EASY-PEASY SCALE (1 super easy - 5 very difficult): 1 out of 5
You're just rolling up onesies and putting them in cupcake liners - doesn't get much easier than that!

Monday, February 24, 2014

Four Ways to Decorate a Onesie

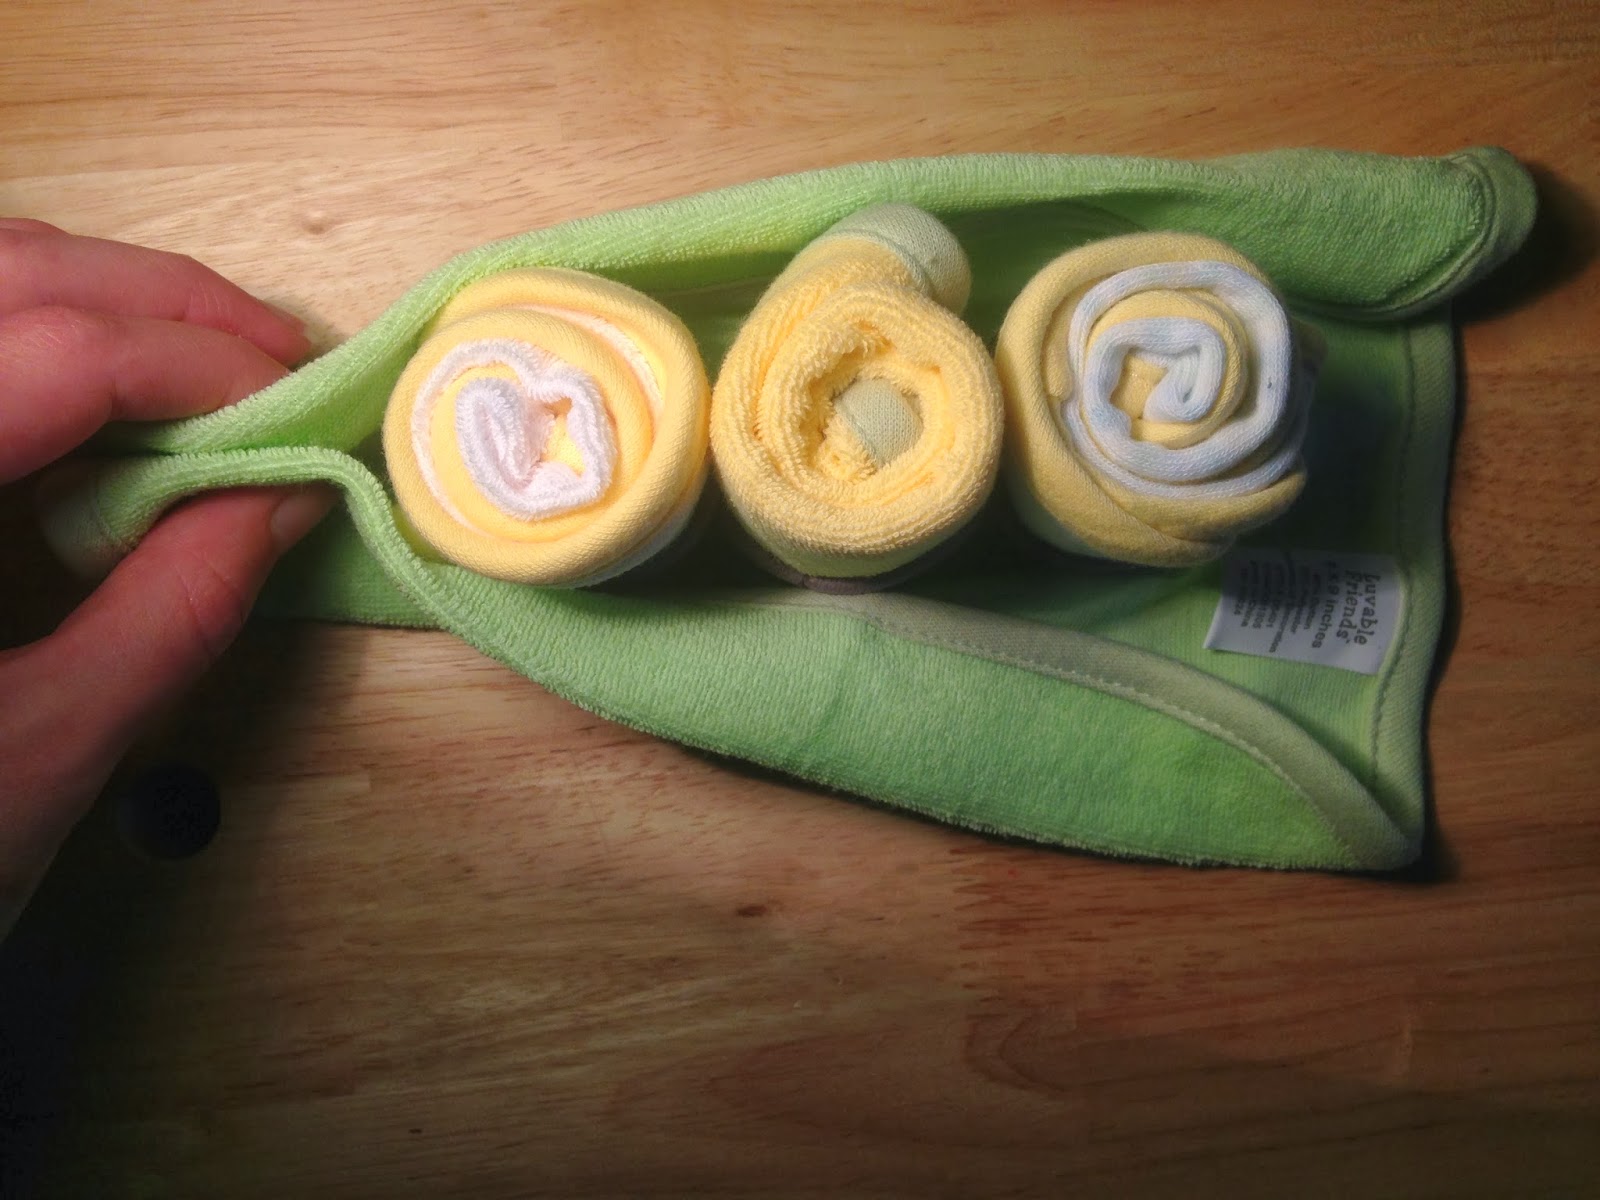
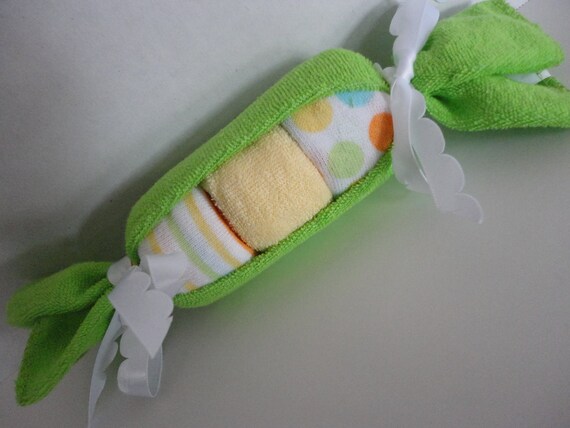
Recently I posted an easy, yet creative, yet affordable baby shower gift called Peas in a Pod with baby washcloths. Today, I'm keeping with the theme of babies and baby showers. I wanted to show four easy and creative ways to decorate a onesie that will save you a lot of money if you just make it rather than buy a similar one online! Two are gender neutral and two are for boys (though honestly, if I were a baby, I'd want to wear all four).

Onesie #1 and #2 - The Moustache and The Crescent Moon

When I saw this baby gift set, I thought it was adorable until I saw the price tag. The onesie alone could be between $18-$37 for a freakin' moon on it?! No. Way.

For the moustache onesie, I saw this one on Etsy for $13 and again, I thought the price tag was ridiculous.

Here's how to make the exact same onesies. You'll need:

1. A bodysuit/onesie
2. Fabric paint
3. Freezer paper
4. X-acto knife
5. Paintbrush

Print out your moon, moustache, whatever you want on the onesie on the dull side of freezer paper and cut out the inside of the pattern with your x-acto knife. If you choose not to print onto the freezer paper itself, you can print your moon/moustache/etc. on regular paper, put it under freezer paper, and then trace the outline with a marker so as to cut it out.


Here's where I recommend putting a piece of paper or cardboard inside the onesie so paint doesn't seep through. Iron the outline onto your onesie shiny side down for a few minutes. I did it for 3 minutes, just to make sure it was completely stuck. Make sure the edges are ironed flat to the bodysuit, otherwise paint will seep out and it will look unprofessional.


After you've ironed, paint on a layer inside the template and let dry for 2-4 hours. Add another layer of paint if necessary.


Once dry, slowly remove the template, then take a towel or washcloth and place it on top of the onesie. Take your iron and "set" the pattern in for a few minutes. This will guarantee the pattern won't fade away after the first wash.


And you're done! Enjoy the money you saved by making another one!


Onesie #3 - The Home State

This is much like the first two, however the word "home" ups the difficulty level. Note that it's still cheaper than buying it for $28 online (if it looks familiar, it's the same company that Kristin Cavallari wore when she debuted her baby bump... why do I know this?...)

Just like before, find an outline of the state of your choice, print it out on freezer paper, and cut it out with your x-acto knife. I found it was easiest to print out "home" on freezer paper and cut out each letter individually.


Just like before, iron the freezer paper to your onesie and make sure there's a piece of paper or cardboard inside the onesie.


Paint over the word "home" and wait until the paint dries. Try not to paint off the freezer paper (I did a little at the top... whoops!)


Once it dries, add another layer of paint if you wish (I kept with 1 layer since it was a light-colored onesie). Slowly remove the paper and the letters. Hopefully you ironed it down well enough so it didn't bleed too bad!

Original for $28 versus what I made... I didn't keep the period after "home" but other than that, can you tell any difference?


Onesie #4 - The Switch-Out Bow Ties

This is a little different... you're going to be making bow ties that can be switched out with the help of some snaps or, in this case, velcro. An easy way to dress up a onesie and a versitile option too!

Here's what you'll need:

1. A bodysuit/onesie
2. Felt
3. Needle and thread or glue
4. Velcro or snaps
5. Ruler
6. Scissors
7. Pen or marker

First, measure and cut two strips of felt. Strip #1 should be 3/4" x 2 1/2". Strip #2 should be 3/4" x 9 1/2". Fold Strip #2 into thirds - fold one end in about 2/3 of the way, then fold the other side on top.


Pinch in the middle to make the center fold.


Take Strip #1 and tightly wrap it around the center. Either sew or glue the ends together in the back.


Take your velcro and apply one side to the tie and the other to the onesie. Make sure if you're making multiple ties to apply the correct side to the tie every time.


And that's it! I only made two ties but the possibilities of color are endless!


And there you have it! Four onesies for the price of one you would buy online. Go out there and be creative!


TOTAL COSTS: About $25 to make 4 onesies
$1.99 for Disney Bodysuit 4 Pack for on Amazon
$7.99 for freezer paper from Vons  (for 150 sq. ft!)
$5.99 for fabric paint from Michaels
$6 for felt from Fiddlesticks in San Francisco (click here for another baby project with felt)
$2.75 for velcro from Vons
X-acto knife, paint brush, ruler, scissors, needle & thread, and pen on hand

TOTAL AMOUNT OF TIME: Depends on project
Depending on the amount of paint you use and the color of the bodysuit, it varies how long it might take for the paint to dry. 

EASY-PEASY SCALE (1 super easy - 5 very difficult): Depends on project
The tie is the easiest to make (especially if you don't know how to sew, you can just use glue). I'd rate that a 1 out of 5. 

#1 and #2 are the second easiest, I'd rate them 2 out of 5. 

The home state is the hardest but you just need to go slow and steady when cutting, ironing, and painting. Even still, I'd rate it a 3 out of 5. Not hard at all but not a walk in the park.

Saturday, February 22, 2014

How to NOT Make a Bleach Pen

To celebrate my 100th post, I thought I'd do a major Blog Fail, one almost as epic as this gingerbread TARDIS (it's hard to compete with the catastrophe of that project, but I put up a good fight). When I saw a beautiful shirt on Etsy plus this post from MeandMyDIY on how to make your own bleach pen, I knew I could combine the two to make an awesome shirt for myself. Instead, I made shirt to remind myself that after 100 posts, I can still make epic mistakes.


To make a bleach pen, you need:

3/4 C of water

3 T of cornstarch

1 empty glue bottle

4-7 T of bleach

Something to bleach (t-shirt, bandana, etc.)


First, combine the cornstarch and water in a small pot and bring to a boil. I found it was really liquidy at first, so I kept it on longer until (as the original post says) it should be "translucent and pudding-like." Honestly, if you let it get as thick as pudding, you're in for a lot of trouble...


...because when it comes to putting it in your bottle, it's going to be too thick to want to go in easy...


...which will result in you having to hit the bottle on the table a lot in order for it to get down enough to pour the bleach in.


Now to pour the bleach in, I recommend covering a mason jar with a plastic bag and pouring the bleach in the plastic bag.

Then you can remove the bag and cut the corner to easily pour the bleach in the bottle.


However, if your bottle is completely full, like mine was, the bleach won't be able to get in and therefore you're going to go through half a roll of paper towels cleaning up the bleach on your table and you'll probably end up throwing out half of the cornstarch mix in the bottle!

It'll still be too thick to get out of the bottle, so it won't so much as pour out in a nice even line but more splatter out. Try practicing on a paper towel first. Otherwise you might get some of this.


And this.


Needless to say, my bleach pen failed. Miserably. Oh well, happy 100th blog post!


TOTAL COSTS: Almost $4
$1.80 for cornstarch
$1.99 for bleach
Empty glue bottle and t-shirt already on hand

TOTAL AMOUNT OF TIME: About 7 hours
2 minutes on stovetop
20 minutes to let cornstarch cool
10 minutes to add cornstarch to bottle
30 minutes to clean up spilled bleach and try to get mixture out of bottle
6 hours to set

EASY-PEASY SCALE (1 super easy - 5 very difficult): 4 out of 5
If you make sure the cornstarch mixture isn't thick, you have a fighting chance. Otherwise, just go out and buy a $6 bleach pen and save yourself the headache.

Friday, February 21, 2014

Peas in a Pod (Baby Shower Gift)

It's almost springtime and you know what that means? Everyone is pregnant! I feel like my social media feeds have been filling up with baby bumps and sonograms these past few months. Was there something in the water? In any case, trying to come up with fun, yet creative, yet affordable baby gift ideas would be more difficult if it weren't for Pinterest. In my search for a great gift I kept coming across this idea for Peas in a Pod washcloths and figured it couldn't be that hard to make, it's gender-neutral, and it's something a mother will really need!

All you need is:

* 4 washcloths (preferably one that's green for the "pod")

* Something to keep the washcloths rolled up (elastic hair ties, tape, rubber bands, ribbon,
etc.)

* Something to tie the ends with (elastic hair ties, tape, rubber bands, ribbon, etc.)


First, fold and roll up your 3 (the "peas") washcloths. I found it was easiest to fold, then fold again, then roll. Tie something around them, or tape them, to keep them in tact - in this case, I used elastic hair ties.


Once all three washcloths are folded, lay out your green (the "pod") washcloth. Place the three "peas" in the middle and tie off the ends of the pod. In this case, I used a rubber band, then covered it with a ribbon. I found I needed to fold the sides of the pod a little, otherwise they were too long.


And that's it! Give it to your mother-to-be and she'll be thankful for a creative presentation to a much-needed gift!


TOTAL COSTS: About $6
$6.06 for Luvable Friends 4 Pack of Washcloths in Green from Amazon
Ribbon, rubber bands, and elastic hair ties on hand

TOTAL AMOUNT OF TIME: 10 minutes
And that includes the time to take the photos!

EASY-PEASY SCALE (1 super easy - 5 very difficult): 1 out of 5
Even if you don't consider yourself a "creative" type, you can easily pull this off!