Showing posts with label book. Show all posts

Wednesday, August 6, 2014

How to Make Origami Monster Bookmarks!

One of my favorite memories about being a kid during the summer was the summer reading program put on by the Kalamazoo Public Library. The Bookmobile would come by my house every week and if you read so many books, you would win erasers, pencils, all sorts of cute little toys and treats (I spent a lot of time with R.L. Stine, if that tells you anything about my personality).

Books are incredibly important for a child's development but taking care of books is also important. You should never dog ear a page (ask any librarian). So how can you keep track of your spot in a book if you don't want to use a boring 'ol bookmark? Why not make an origami monster bookmark?? These by CTBakerintheAcres are easy to make, your kids can have fun and be creative, and may even excite them to read more if the monster "eats" the pages! Even if you don't know a single thing about origami (like me), I guarantee you can knock this one out in 10 minutes or less!


To start, gather your supplies. You'll need:


* Construction paper in various colors
* Scissors
* Glue or tape
* Marker (if you want to draw on eyes)
* Hole punch (optional)


#1 - Start by cutting a 6" x 6" square.

#2 - Fold the bottom to the top so as to make a triangle.

#3 - Fold the left corner to the center point.

#4 - Fold the right corner to the center.

#5 - Open up your triangle.

#6 - Fold the top flap of the center to the bottom.

#7 - Take the left corner and tuck it into the middle "pocket".

#8 - Take the right corner and tuck it into the "pocket".

Now you have the head of your monster! Turn it 180 degrees so the folds are at the top, as that's where the eyes can be placed. All that's left is to take a smaller square (a little less than 3" x 3") and stick it inside so as to make the inside of the mouth.


Make pointy teeth, wiggly teeth, red eyes, a blue tongue, whatever you want to make your monster your own. Once it's ready, just stick it on the corner of the page you want to save and voila! Your monster bookmark is all done!


My monster like to take a big bite out of the book but I know he's harmless since not a single dog ear will touch these pages!


Note: the pages in the photos are from, "World War Z", which is not a kid-friendly book. I didn't realize the profanity on the page until after the photos were posted. Unless you want the kid to learn very colorful language, it's probably best to not show them my close-up photo!

TOTAL COSTS: Free!
However I had paper, tape, glue, and scissors readily available

TOTAL AMOUNT OF TIME: 8 minutes per monster

EASY-PEASY SCALE (1 super easy - 5 very difficult): 2 out of 5
The first time I made the monster, it took me a little bit to understand but after that, it was a piece 'o cake. Just like with anything, it takes a little practice, but it's easy enough for even your kids to perfect! Now grab those scissors and enjoy making your monsters!

Thursday, June 12, 2014

Book Cupcakes

My little niece has become an avid fan of any and all books, though her mother is a children's book librarian and author, so it should come as no surprise. So when she had a birthday coming up, I wanted to incorporate her love of books with the birthday treats. The result? Little books on cupcakes! These are a very easy and unique way to incorporate books for any party, whether it be for your library, your birthday, or even your book club!

I started by collecting .jpegs of different book covers from Google searches. Just look under "Images" of the book you want and save the photo to your desktop.

Once you've collected all the photos, I found it was easiest to work in Microsoft Word. Paste the photo to the Word document, format the picture so it's "Behind Text", change the size (all of mine were 1.5" in width), and draw a white square of the same size next to the photo. That way, when you cut them all out, the white square will serve as the back cover.


Once they're all ready, print and cut them out.


Fold them along the edge so they form little books and tape a toothpick to the inside of the book.


All that's left is decorating the cupcakes! I used a #22 Wilton tip and starting in the middle, squeezed the frosting around and around until I hit the edges. But you can decorate however you like, of course.


Stick the toothpicks in the center and voila! It doesn't get much easier than that, folks. All the kids in my niece's daycare gobbled them up and she was happy to see all of her favorite books on her cupcakes, pointing out which were her favorites to her classmates.


TOTAL COSTS: Free!
However, I had a printer, white card stock paper, and toothpicks readily available

TOTAL AMOUNT OF TIME: 1 hour, 25 minutes
45 minutes to pick out book covers and resize
25 minutes to cut out 20 books
15 minutes to tape toothpicks inside 20 books

EASY-PEASY SCALE (1 super easy - 5 very difficult): 1 out of 5
Just be careful that you don't cut off the white square. I was cutting these out while watching TV and had to tape the back and front covers together for a few because I didn't pay attention!

Wednesday, February 26, 2014

Newspaper (or book) Nail Art

I'm not a big fan of painting my own nails, however I think I've had maybe 3 professional manicures in my life. When I saw this idea on Pinterest for newspaper art, I thought it was simple and easy enough for an amateur like me. I made a few mistakes here and there that I wouldn't want you to make, but for $2, this project is worth a try!

You'll need:

1. White nail polish 
2. Clear nail polish
3. Rubbing alcohol
4. Newspapers, phone book pages, etc. I don't recommend using book pages because I found the actual paper sticks to your nail instead of just the ink from the text (see below)

First, and this is optional and I didn't do it, put on a base layer of polish. If you want to skip this like I did, paint on your layer of white (mine was actually for french manicure tips, according to the bottle, but it worked perfectly). Wait for it to dry before applying another coat if needed.


Once it's dry, dip your finger into rubbing alcohol for 15-20 seconds.
 

Then immediately apply your newspaper/phone book pages/maps/whatever you want. I tried using old pages from a Harry Potter book that I had saved from my hollow book post. I waited for about 20 seconds before removing it.


As you can see, the book page didn't work so well...


So I tried again with pages from a phone book.


And voila! It worked!

Make sure to apply a clear top coat to all your nails so the ink doesn't come off.


And you're done! You could do crosswords, maps, receipts, whatever you like (so long as the paper isn't thick)! Be creative and enjoy this cheap and easy DIY!


TOTAL COSTS: About $2
$.99 for rubbing alcohol from Vons
$.99 for clear polish and white polish from Rite Aid (2 for 1)

TOTAL AMOUNT OF TIME: 1 hour
Keep in mind, I spent 20 minutes trying to make the book pages when I just should have given up!

EASY-PEASY SCALE (1 super easy - 5 very difficult): 2 out of 5
It's not hard, it just takes a couple of nails to get the process down pat. 

Friday, January 10, 2014

How to Make a Book Purse

I thought this might make a nice gift - a book converted to a purse (or clutch if you remove the handles). I had given one as a gift off of Etsy in the past for $51 and I thought, "I could make one of these for a heck of a lot cheaper!" Little did I know, this would be  one of the largest projects I've ever tried to undertake. I followed this post I found on Instructables and the list of things you'll need is a bit long:

* A book (hardcover with a great cover!)
* Needle/thread or sewing machine (HIGHLY recommend a sewing machine... I don't have one and the sewing took forever)
* X-acto knife
* Ruler
* Tape
* Scissors
* Glue (I used the same as what the original post recommended - E6000)
* Fabric
* Velcro
* Paper
* Pen or marker
* Handles (optional - if you're making a clutch, you won't need them)

Step 1: Take your book and your x-acto knife and cut out all of the pages of the book. In my case, it was a new book so the glue holding down the pages was still fresh and easy to rip off.


Step 2: Take your fabric and cut out a piece the size of the book. Once it's cut out, measure 1/2" around the borders and iron them down.


Step 3: If you're making a clutch, you can glue the fabric to the book and let dry. If you're making a purse, grab your handles and some extra fabric, put the fabric through the handle slits, and sew the bottoms to create straps that will be glued to the inside of the book.


Step 4: Glue the straps to inside of the book


 and then glue the fabric you cut and ironed to the inside of the book as well, on top of the straps.


I put something heavy on top of the fabric and let it dry overnight, just to make sure there wouldn't be any problems. The original post doesn't call for it to dry overnight but they do emphasize not moving forward until it's completely ready.

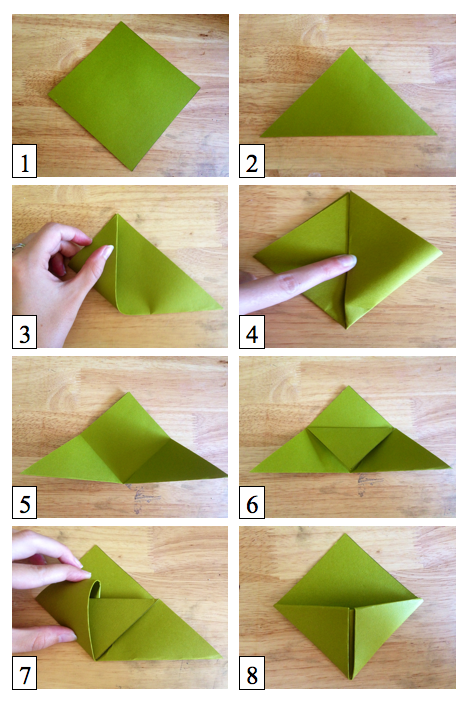
Step 5: Next, you need to make a template so you know how to cut the fabric for the inside of the purse (all you've done is cut the fabric for the lining underneath!). Using four pieces of paper taped together to make a giant square, put your book in the middle and trace around it, making sure to mark where the spine starts and ends.


Step 6: Measure the width of one side of the book (mine happened to be 5 3/4") and "at a 75 degree angle" (which of course I eyeballed), draw a line of that measurement from where you marked the beginning of the spine. The smaller the angle, the wider the purse will open.


Step 7: Cut out the bottom of the square and the line you just drew and fold the paper over width-wise. By doing so, you're creating a duplicate line on the other side. Make sure the squares line up and trace the line created by the triangle. Once traced, unfold and cut out the top of the square and the line you just drew.


Step 8: Now fold the pattern over length-wise, trace the line created by the triangle, and cut out the bottom of the square and the line you just drew. Make sure to make the triangle on the other side, just like before.


Step 9: Once your design is completely cut out, it will look like a rectangle with two triangles attached. Put the pattern on top of your fabric and cut out two of these.


Step 10: Take one of the designs you just cut out and with the right sides facing each other, sew the edges of the triangle to the edges of the square. This is going to feel awkward but trust me on this. You're going to be doing this 8 times - twice for each triangle. This is where a sewing machine would really come in handy. If you don't have one, like me, get ready to do a lot of sewing! If you don't know how to sew, take a look at this post I did, as this is the same exact stitch I used this time around.

Once you're done, flip one of the patterns inside-out.


Step 11: Take the pattern you just flipped inside-out so the right side is facing out, and put it inside the wrong-side out piece. Sew around the top edges, but leave a hole big enough put your hand through, as you'll eventually be flipping this inside-out.

If you find that your sides (the triangles) came out much longer than the joining sides, you can trim them down and sew them together.


Step 12: Once all the sides are sewn together, place your hand inside the hole you left and flip the pattern inside out. You'll need to fold it on top of itself to make it the appropriate size. Sew the hole together.


Step 13: This is where I not only love the invention of velcro, but the invention of adhesive as well. I found this stick-on velcro at the store and I'm so glad I did, because otherwise I would have had to sew the velcro to the inside and I was not having that!


Step 14: You're almost done - just grab the book and some glue and adhere the pocket you sewed to the book. Again, I'm giving it some time to dry before putting anything inside, just to be safe.


And there you have it kids! Your very own book purse!


TOTAL COSTS: About $32 (still cheaper than what Etsy offers!)
$10 book from Wacko's
$7.99 for fabric from JoAnn's Fabrics
$5.75 for handles on Amazon (but now they're on sale for $4.19!)
$5.80 for glue from Michael's
$2.75 for velcro from Vons
Paper, scissors, pen, tape, ruler, needle and thread already on hand

TOTAL AMOUNT OF TIME: About 4 hours plus 2 nights to let glue dry
30 minutes to pull pages, cut fabric, and iron
20 minutes to make and sew strips
15 minutes to glue strips and fabric backing to book
(dry overnight)
20 minutes to make template
25 minutes to cut out fabric from template
22-24 minutes/triangle to sew by hand (and there are 4 triangles = about an hour and a half)
35 minutes to sew two patterns together along top
15 minutes to sew hole, add velcro, and glue to book
(dry overnight)

EASY-PEASY SCALE (1 super easy - 5 very difficult): 4 out of 5
If I didn't know how to sew, it may have been more difficult but as it was, I had no idea there were going to be so many steps involved! Overtime and with practice I'm sure they turn out better but for a first go, the results aren't too bad! Just find a hardcover book that has a great cover, grab some fabric, and make something unique!