Sunday, August 10, 2014

S'mores Cups

Happy National S'mores Day! Ok, so it's probably not a national holiday, but I like to pretend everyone gets the day off to enjoy the deliciousness of sugar and carbs. Unfortunately, I don't go camping and I'm nowhere near a bonfire. You aren't either, huh? That's ok, you don't have to in order to eat these mini s'mores cups! My husband said they're the best thing I've ever made and he'd pay to eat them again, they're that crazy good. However, they are the messiest thing I have ever made, from beginning to end. You have been warned.


If you like s'mores, here's what you'll need to make s'mores cups:

* Graham crackers (I used 8 long pieces which probably could have made 10 or 11 mini s'mores but I just made 6)
* 1/2 cup of milk chocolate chips
* Marshmallows (since I made 6 cups, I only needed 3 marshmallows)
* 2 Tablespoons of butter


Start by crushing your graham crackers. Don't have a food processor? Neither do I. I prefer hammers.


Once they're thoroughly crushed, melt your butter and combine the two in a bowl. Here's where the messiness began.


Attempt to pour in the crumbs into your greased up mini muffin tin and make a little divot in each with your fingers. You will most certainly make a mess, but it's ok. Messes are fun. And delicious.


Brush off the excess and stick in the oven for 10 minutes at 350 degrees. While they're baking, prepare your chocolate chips and marshmallows. Each cup will get 4 chocolate chips and half of a marshmallow.


Once they're done baking, put 4 chocolate chips in the center and then place your half marshmallow (sticky side down) directly on top of the chocolate chips (which are probably starting to melt).


Stick the pan back in the oven for another 3 minutes. When you take them out, your marshmallows will have grown in size and will be nice and fluffy. Let them cool for 15 minutes before removing from the pan.


Melt your remaining chocolate chips in the microwave for 30-45 seconds, drizzle over the marshmallows, and top with your extra graham cracker crumbs. Warning: you will want to eat these over a plate, a napkin, or something because even eating them will be very messy but oh so gooey and delicious!


Why can't we have more holidays like this?

TOTAL COSTS: About $8 (if you don't have any ingredients - prices from Vons)
$1.67 for marshmallows
$2.50 for graham crackers
$2.50 for chocolate chips
$.99 for butter

TOTAL AMOUNT OF TIME: About 30 minutes

EASY-PEASY SCALE (1 super easy - 5 very difficult): 2 out of 5
I wouldn't say they're difficult, they're just very messy. Be careful not to burn the cracker crusts, or burn the chocolate while it's melting in the microwave. Other than that, they're easy enough and, dare I say, more delicious than a conventional s'more!

Saturday, August 9, 2014

Pancake Bites (Banana, Strawberry, Blueberry, and Chocolate Chip!)

I get up every morning at 6:25am so I can be ready for work at 6:30am. I work from home, did I mention that? Well, even in my half-awake state, I hate making breakfast. I'm lucky if I'm able to get a bowl of cereal together without forgetting an ingredient (you laugh but it has happened). I saw this Pancakes Bites idea floating around Pinterest and everyone seems to have their own take on it (gluten-free, vegan, etc.) so I decided to make try these out and see which flavor tasted the best. Now I challenge you to do the same - the best part? If you can't eat them all, stick 'em in the fridge and have 'em for breakfast tomorrow!

I wanted to try different filling ingredients (even though I prefer my pancakes plain) so here's what I tried:

*Bananas
*Strawberries
*Blueberries
*Mini chocolate chips

Start by preheating your oven to 350 and make your pancake mix however you like (here is a gluten-free and vegan-friendly recipe, if that's your thing). I wanted to make 12 mini pancake bites so I used 1 Cup of Bisquick, almost 1/2 Cup of milk, and 1 egg. Once it's whipped together, grease up your mini muffin pan and fill as equally as possible.


Next, add your fillings without overflowing. The key is to push them all the way to the bottom but also leave some on top.


Bake for 12 minutes (or until you think they're ready) and if you filled them to the top, they're going to puff up like little muffins.


Be sure to have some maple syrup on hand for dipping, otherwise they're a little bland. Here are my notes after trying them all:

*Banana = with maple syrup, really freakin' good, which surprises me. Husband agrees. Both say this is #1
*Blueberry = not bad but my least favorite. Husband says this is his #2 favorite.
*Chocolate = also really freakin' good. This is my #2. Husband not in the mood for chocolate. I say he has no soul.
*Strawberry = juicy inside, wish I added more strawberries to make even juicier


And there you have it kids - an easy, no mess solution to breakfast. Now I'm off to my fridge to make some more!

TOTAL COSTS: About $20 (if you don't have any ingredients - prices from Vons)
$3.50 for Bisquick
$2.29 for milk
$2.79 for eggs (though I only used 1)
$.69/lb for bananas
$3.99 for strawberries
$3.99 for blueberries
$2.50 for mini chocolate chips

TOTAL AMOUNT OF TIME: 22 minutes
10 minutes of prep (though if you don't use 4 different flavors, it'll go by faster!)
12 minutes of baking

EASY-PEASY SCALE (1 super easy - 5 very difficult): 1 out of 5
They're so easy to make, you have no excuse not to try them. Seriously, if you have leftovers, you can stick 'em in the fridge and save 'em for when you're too lazy to make breakfast!

Friday, August 8, 2014

The Fudgiest Brownies You've Ever Tasted... with Avocado??

"Brownies with an avocado in them? Are they going to be green?", I asked myself. This post from SouthernInLaw makes them sound delicious but c'mon, lets be honest, it also sounds slightly disgusting. No one dips a Hershey's bar into guacamole for a reason. However, just because it sounds odd, doesn't mean it's necessarily bad. I gave this one a shot and if you're a chocoholic, you're in for helluva treat. If you don't have that much of a sweet tooth, this might not be the recipe for you. But it's gluten free, low fat, low in sugar, and grain free so for all of those with specific dietary needs, this might be a good dessert option!

To make these you'll need:

1 ripe avocado
2 eggs
2 teaspoons of vanilla extract
1 Tablespoon of water
3.5 oz of dark chocolate (bar or chocolate chips, up to you!)
1 cup + 1 Tablespoon of cocoa powder
1/4-1/2 cup of sugar (I used 1/2 cup and should have used more, however if you want this to not be as sweet, then go for 1/4 cup)
1/2 teaspoon of baking soda
Pinch of salt


Not sure if you picked a ripe avocado? Take off the tip - if it's green underneath, it's ripe. If it's brown, it's not. Also, give a squeeze. If it gives a little but doesn't leave an impression on the avocado, that's another sign it's ready to be cut open!


Start by preheating your oven to 355 and either in a food processor or mixer, combine your avocado, eggs, vanilla, and water until all lumps are gone.


In a separate bowl, melt your dark chocolate in the microwave (mine took about 1 minute), add to your avocado puree and mix until just combined.. I think next time I make this I'm going to try with milk or semi-sweet chocolate, as it was more bitter than sweet.


Next, add in your cocoa (I think the recipe is asking for a lot but that's just me), sugar (again, up to you on how sweet you want to make these), baking soda, and salt. Be careful adding the cocoa powder, as it can make quite a mess if it's all dumped in at once!


If you think it's too thick, add another Tablespoon of water. I didn't and yeah, these puppies were definitely thick!

Pour the mixture into a greased up 8"x8" pan and smooth the mixture out before baking for 20-25 minutes. Be sure to do the toothpick test (stick a toothpick in and if it comes out clean, it's all done!)


Let it cool in the pan before removing and let it chill in the fridge before serving. I've got to say, these are the fudgiest brownies I've ever had! Not cakey, very dense. You can't taste the avocado at all (and they're certainly not green) but my gosh are they chocolatey. Not for the faint of heart, these brownies are most certainly thicker than your average brownie but in small amounts, definitely fulfill your sweet tooth cravings!


And as my mother would say, "Have a glass of milk with that!"

TOTAL COSTS: About $18 (if you don't have any ingredients - prices from Vons)
$1.99 for an avocado
$2.79 for eggs
$3.49 for bag of dark chocolate chips
$3.99 for cocoa powder
$2.69 for sugar
$1.59 for baking soda
$.99 for salt
Homemade vanilla extract from scratch

TOTAL AMOUNT OF TIME: 50 minutes + overnight
30 minutes to prep
20 minutes to bake
Cool and chill overnight

EASY-PEASY SCALE (1 super easy - 5 very difficult): 1 out of 5
The hardest thing is picking an avocado that's ripe enough! Other than that, it's just a matter of throwing things in a bowl and then into a pan. Simple enough for even the non-baker in your family to accomplish.

Thursday, August 7, 2014

Wine Cork Magnets

I love poking around Pinterest and finding links to overly priced items on Etsy. Seriously, would you pay $9 + $2.50 in shipping for cork magnets?!


Of course not! Why buy the milk when you can get the drunk cow for free, ammiright? These are incredibly easy to make for the lush... I mean, wine "appreciator" in your life and would make a nice housewarming gift, birthday gift, or, "Your fridge is boring and I like merlot!" gift -


So grab those corks from your empty wine bottles as well as:


* Magnet tape
* E6000 glue (not pictured here but highly recommended)
* An x-acto knife or box cutters
* A vice or really heavy books


Carefully cut your cork in half with your x-acto knife but make sure you don't cut through whatever words or design you want to feature on your fridge. I don't recommend this if you just topped off your bottle, as sharp objects + alcohol = a stupid combination.


Grab your magnet tape and cut to the width and length of your cork. If you want to make sure the magnet doesn't peel off, use your smelly E6000 glue. It might stink but it'll do the job!


Place your cork magnets in a vice or under really heavy books for at least a half hour, to ensure the magnet isn't going anywhere. To be safe, I kept them in the vice overnight (it's not like I'm going to be staring at my fridge at 3am).

And there you have it kids! Now aren't you glad you spent your money on another bottle of wine rather than shipping and handling?


TOTAL COSTS: $4.99
$4.99 for magnet tape from Michael's
Corks for free... ::hiccup::...

TOTAL AMOUNT OF TIME: 10 minutes/cork + overnight

EASY-PEASY SCALE (1 super easy-5 very difficult): 1 out of 5
This is such an easy project, you just cut and glue. I mean, it might be a little difficult to cut through the cork but I wouldn't say it's hard or impossible. Heck, you could open up your own Etsy store with these and charge only $8 if you want!

Wednesday, August 6, 2014

How to Make Origami Monster Bookmarks!

One of my favorite memories about being a kid during the summer was the summer reading program put on by the Kalamazoo Public Library. The Bookmobile would come by my house every week and if you read so many books, you would win erasers, pencils, all sorts of cute little toys and treats (I spent a lot of time with R.L. Stine, if that tells you anything about my personality).

Books are incredibly important for a child's development but taking care of books is also important. You should never dog ear a page (ask any librarian). So how can you keep track of your spot in a book if you don't want to use a boring 'ol bookmark? Why not make an origami monster bookmark?? These by CTBakerintheAcres are easy to make, your kids can have fun and be creative, and may even excite them to read more if the monster "eats" the pages! Even if you don't know a single thing about origami (like me), I guarantee you can knock this one out in 10 minutes or less!


To start, gather your supplies. You'll need:


* Construction paper in various colors
* Scissors
* Glue or tape
* Marker (if you want to draw on eyes)
* Hole punch (optional)


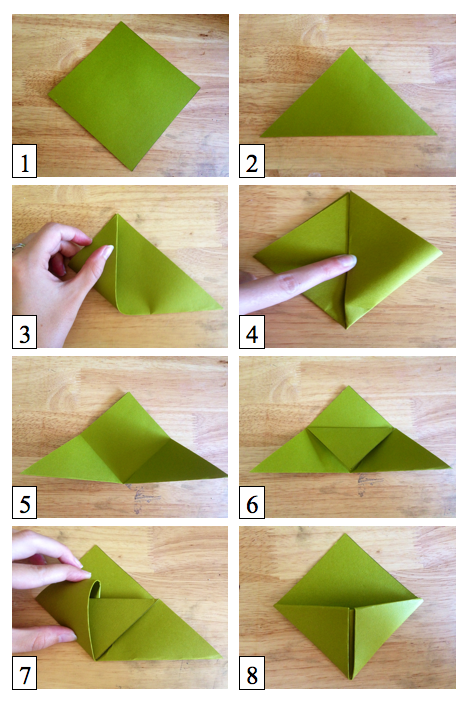
#1 - Start by cutting a 6" x 6" square.

#2 - Fold the bottom to the top so as to make a triangle.

#3 - Fold the left corner to the center point.

#4 - Fold the right corner to the center.

#5 - Open up your triangle.

#6 - Fold the top flap of the center to the bottom.

#7 - Take the left corner and tuck it into the middle "pocket".

#8 - Take the right corner and tuck it into the "pocket".

Now you have the head of your monster! Turn it 180 degrees so the folds are at the top, as that's where the eyes can be placed. All that's left is to take a smaller square (a little less than 3" x 3") and stick it inside so as to make the inside of the mouth.


Make pointy teeth, wiggly teeth, red eyes, a blue tongue, whatever you want to make your monster your own. Once it's ready, just stick it on the corner of the page you want to save and voila! Your monster bookmark is all done!


My monster like to take a big bite out of the book but I know he's harmless since not a single dog ear will touch these pages!


Note: the pages in the photos are from, "World War Z", which is not a kid-friendly book. I didn't realize the profanity on the page until after the photos were posted. Unless you want the kid to learn very colorful language, it's probably best to not show them my close-up photo!

TOTAL COSTS: Free!
However I had paper, tape, glue, and scissors readily available

TOTAL AMOUNT OF TIME: 8 minutes per monster

EASY-PEASY SCALE (1 super easy - 5 very difficult): 2 out of 5
The first time I made the monster, it took me a little bit to understand but after that, it was a piece 'o cake. Just like with anything, it takes a little practice, but it's easy enough for even your kids to perfect! Now grab those scissors and enjoy making your monsters!

Monday, August 4, 2014

Mini Egg and Spinach Quiches

So I bought this mini muffin tin from Bed, Bath & Beyond and was trying to think of what I could use it for. The mini donuts post I did was a big hit, but what would be a healthier breakfast item? I stumbled upon this post from TwoPeasAndTheirPod and thought it was perfect - mini egg quiches! It's so versatile because you can add/remove whatever ingredients you like.

To start things off, gather your ingredients. I used:


4 egg whites (instead of 5)
2 whole eggs
1/4 cup of milk (I used 2% but skim works too)
1/4 cup of chopped spinach
1/4 cup of shredded cheese (Cheddar, Mexican blend, you name it!)
Salt and pepper
2 red potatoes (I added this instead of adding a meat, like sausage or bacon)

Note that this will be enough to make 12 mini quiches or 6 regular muffin tin quiches.


Start by preheating your oven to 350 and whisk together your egg whites, eggs, milk, salt, and pepper.


Chop up your spinach and add it to your egg mixture, then pour into your mini muffin tin (I found it worked best to use the 1/4 cup or a spoon to pour into the tin). Try not to have them filled to the top, since you're going to be adding more ingredients and you don't want them to spill over!


Next, sprinkle cheese on top. The more cheese, the better I say!


Feel free to add chopped up pieces of potatoes, sausage, peppers, onions, whatever your heart desires! Be careful, though, not to let it spill over.


Stick in the oven for 20 minutes and very carefully remove them from the tin using a knife or fork (so you don't burn yourself). My husband and I decided to eat these for dinner one night and we were full, so 12 mini quiches can definitely fill up 2 people!

Add some hot sauce, ranch, or ketchup or put them in a plastic bag and stick them in the freezer for later so you can pop in the microwave for an easy breakfast anytime!


TOTAL COSTS: $10 (+ 2lbs. of potatoes - optional)
$2.79 for eggs
$2.29 for milk
$1.99 for spinach
$2.99 for shredded cheese
$4.49 for 2 lbs. of red potatoes (and I only used 2 potatoes)

TOTAL AMOUNT OF TIME: 35 minutes
15 minutes of prep
20 minutes of baking

EASY-PEASY SCALE (1 super easy - 5 very difficult): 1 out of 5
This is something I could easily make again and save for later - they're not messy to eat, a great source of healthy vegetables and protein, and are quick and easy to make!

Sunday, August 3, 2014

Rose Covered Book

Have you ever been given roses, only to throw them in the trash after they've wilted? Why not save some of the petals for your sketch book, journal, or even a postcard? This post on Craftbits demonstrates how it would look if you used dried rose petals but I opted for fresh ones, just to see how it would turn out!

Start by gathering your supplies. You'll need:

1. Rose petals 
2. Mod Podge or craft glue
3. A foam brush (or you can use your fingers)
4. A notebook/journal/book/etc. to cover

Start by removing the petals from your rose. I found 1 rose = a 6"x8" book.


Place glue on your notebook where you want the petal to sit.


Place your petal and push out any bubbles that might be underneath it. Then apply the same glue to the top of the petal, securing it in place.


Now place more glue and more petals. Do this over the entire book cover. 


Yes, you'll have a lot of white glue but don't worry, if it's not applied in thick globs, it'll dry completely invisible. Here's what it looks like when I was done covering it...


...and here's what it looked like after just an hour!


I let mine dry overnight (about 12 hours) and here's how it turned out. You can see that some of the glue, where it was the thickest, was still visible so I just glued some more petals over it.


Now it was interesting to see how the petals changed over the next few days... the color faded but the texture stayed the same.


 The last picture was taken 5 days after the petals were first glued on. If you want your book to be covered with bright red petals forever, you're better off getting some fake petals from the craft store!

TOTAL COSTS: $3.50
$3.49 for 4oz. of Mod Podge at Michael's
Rose petals and journal prices vary per person

TOTAL AMOUNT OF TIME: 20 minutes + overnight
20 minutes to add petals to 6"x8" cover
Overnight to dry

EASY-PEASY SCALE (1 super easy - 5 very difficult): 1 out of 5
If you know someone who loves to write or paint, this would be a nice handmade gift for them - it's something they could use daily for their personal work but would think of you every time they saw it! It's quite easy so if kids wanted to make these for their parents, they definitely could, however I would recommend adult supervision because it can get quite messy!