Books are incredibly important for a child's development but taking care of books is also important. You should never dog ear a page (ask any librarian). So how can you keep track of your spot in a book if you don't want to use a boring 'ol bookmark? Why not make an origami monster bookmark?? These by CTBakerintheAcres are easy to make, your kids can have fun and be creative, and may even excite them to read more if the monster "eats" the pages! Even if you don't know a single thing about origami (like me), I guarantee you can knock this one out in 10 minutes or less!

To start, gather your supplies. You'll need:
* Construction paper in various colors
* Scissors
* Glue or tape
* Marker (if you want to draw on eyes)
* Hole punch (optional)

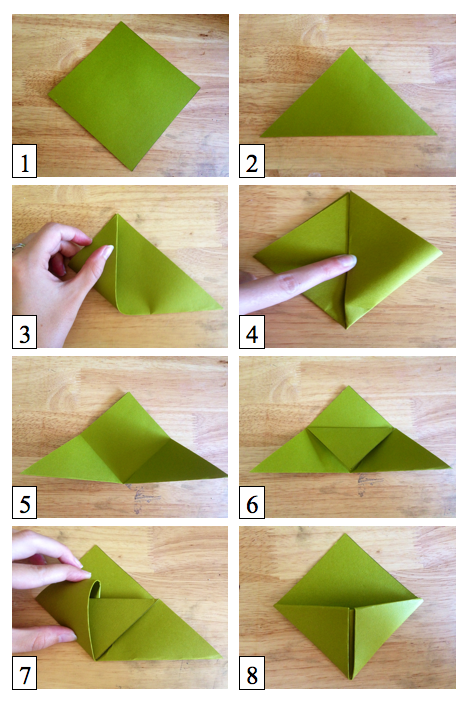
#1 - Start by cutting a 6" x 6" square.
#2 - Fold the bottom to the top so as to make a triangle.
#3 - Fold the left corner to the center point.
#4 - Fold the right corner to the center.
#5 - Open up your triangle.
#6 - Fold the top flap of the center to the bottom.
#7 - Take the left corner and tuck it into the middle "pocket".
#8 - Take the right corner and tuck it into the "pocket".
Now you have the head of your monster! Turn it 180 degrees so the folds are at the top, as that's where the eyes can be placed. All that's left is to take a smaller square (a little less than 3" x 3") and stick it inside so as to make the inside of the mouth.
Make pointy teeth, wiggly teeth, red eyes, a blue tongue, whatever you want to make your monster your own. Once it's ready, just stick it on the corner of the page you want to save and voila! Your monster bookmark is all done!
My monster like to take a big bite out of the book but I know he's harmless since not a single dog ear will touch these pages!
Note: the pages in the photos are from, "World War Z", which is not a kid-friendly book. I didn't realize the profanity on the page until after the photos were posted. Unless you want the kid to learn very colorful language, it's probably best to not show them my close-up photo!
TOTAL COSTS: Free!
However I had paper, tape, glue, and scissors readily available
TOTAL AMOUNT OF TIME: 8 minutes per monster
EASY-PEASY SCALE (1 super easy - 5 very difficult): 2 out of 5
The first time I made the monster, it took me a little bit to understand but after that, it was a piece 'o cake. Just like with anything, it takes a little practice, but it's easy enough for even your kids to perfect! Now grab those scissors and enjoy making your monsters!


