Showing posts with label gift. Show all posts

Tuesday, August 26, 2014

Interlocking Felt Coasters

Coasters are not something every household has. Most people either use whatever is already on the table (like a book or a cable bill), have plastic/granite/linoleum tables, or they choose to accept the water rings that will ultimately be on their wood table. Coasters can also be ridiculously expensive... I mean, these coasters from Crate and Barrel will set you back $20! So when I found this post on HowAboutOrange on how you can make your own felt coasters AND have them look cool, I tested them out to see just how easy they were to make. Anything that looks like that must take hours, right? Wrong. They're quick, they're easy, and would make great housewarming gifts, stocking stuffers, even a graduation gift for your college-bound kid (can you imagine the kid placing their cheap PBR on a coaster? Ok, maybe not...)

Start by downloading this template (which will make two coasters) and gathering your felt, scissors, and an x-acto knife.


Next, cut out the perimeter of the template, place the template on top of the felt, and pin it down. Every place you see a diagonal line, cut it out with your x-acto knife.


Once you're all done, cut out the 8 individual rectangles, remove the pins, and remove the paper. The left column is one coaster, the right column is another.


Next, take four pieces and interlace them like what you see below. You'll want the four pieces overlapping each other with four little triangles "chasing" each other, kind of like a pinwheel. At this point, make sure all the slits that are in the center of the square are cut all the way through to the edge. This will help you down the road, I promise!


Now here's where it can get a little tricky. You see those four little triangles? Well, you're going to want to pull them ALL the way through the opening. If your original slit isn't big enough for you to pull the triangle through, you can always cut the opening a little bigger but be careful!


Here's what it should look like once all four triangles are pulled all the way through.


And here's what the back will look like (the side that will lay against the table).


Take your scissors and cut two triangles on the front side in the middle of each side. Trim the sides so that your square is even.


And there you have it folks! Your very own unique, simple, yet functional (and inexpensive!) felt coasters!


TOTAL COSTS: $.33
$.33/color of felt at Michael's (the stiffer the felt, the better!)
Scissors & x-acto knife already on hand

TOTAL AMOUNT OF TIME: 25 minutes/2 coasters

EASY-PEASY SCALE (1 super easy - 5 very difficult): 2 out of 5
It look me a while to figure out that the tiny triangles have to be pulled all the way through the slits but once I figured it out, it was a piece of cake!

Thursday, August 7, 2014

Wine Cork Magnets

I love poking around Pinterest and finding links to overly priced items on Etsy. Seriously, would you pay $9 + $2.50 in shipping for cork magnets?!


Of course not! Why buy the milk when you can get the drunk cow for free, ammiright? These are incredibly easy to make for the lush... I mean, wine "appreciator" in your life and would make a nice housewarming gift, birthday gift, or, "Your fridge is boring and I like merlot!" gift -


So grab those corks from your empty wine bottles as well as:


* Magnet tape
* E6000 glue (not pictured here but highly recommended)
* An x-acto knife or box cutters
* A vice or really heavy books


Carefully cut your cork in half with your x-acto knife but make sure you don't cut through whatever words or design you want to feature on your fridge. I don't recommend this if you just topped off your bottle, as sharp objects + alcohol = a stupid combination.


Grab your magnet tape and cut to the width and length of your cork. If you want to make sure the magnet doesn't peel off, use your smelly E6000 glue. It might stink but it'll do the job!


Place your cork magnets in a vice or under really heavy books for at least a half hour, to ensure the magnet isn't going anywhere. To be safe, I kept them in the vice overnight (it's not like I'm going to be staring at my fridge at 3am).

And there you have it kids! Now aren't you glad you spent your money on another bottle of wine rather than shipping and handling?


TOTAL COSTS: $4.99
$4.99 for magnet tape from Michael's
Corks for free... ::hiccup::...

TOTAL AMOUNT OF TIME: 10 minutes/cork + overnight

EASY-PEASY SCALE (1 super easy-5 very difficult): 1 out of 5
This is such an easy project, you just cut and glue. I mean, it might be a little difficult to cut through the cork but I wouldn't say it's hard or impossible. Heck, you could open up your own Etsy store with these and charge only $8 if you want!

Wednesday, July 16, 2014

DIY Bleach T-shirts

A few months back I attempted to make a bleach pen and the results were... disastrous, to say the least. I veered away from any projects that involved bleach and t-shirts because I was sure I was just going to screw them up. Well, I came across this post from PracticallyFunctional and this post from Brit.co and thought, "You know what? One Pinterest fail isn't going to stop me!" so I tried these two and you know what? They actually turned out ok! So if you think you're just going to screw it up... trust me, coming from a master failer, you'll be fine.


Bleach Striped T-shirt:

To get started you'll need the following:

1. A t-shirt
2. Some bleach
3. Some water
4. Masking or painter's tape
5. A spray bottle (I just recycled an old one I had on hand)

To begin, start by laying out your shirt and placing your masking or painters tape across the shirt. If you want to use a ruler to get perfect stripes, you can, but I just eye-balled it. Make sure the strips of tape are long enough to wrap around the other side.

Once the shirt is covered in tape stripes, flip it over and continue the lines on the other side with tape.


Try to overlap the tape perfectly, otherwise your lines won't look at seamless.


Next, pour 1 part water and 1 part bleach into a bottle (I did half and half) and place your shirt in a place where you're not afraid to get bleach on it. I opted for the bathtub... figured bleach could only make things better in there! Spray the front, flip it over, and spray the back.


How long you want the bleach to sit is entirely up to you. I opted for 10 minutes but should have done 5 minutes because I got blurred lines (::insert Robin Thicke reference::).


Once your 5-10 minutes are up, remove the tape and rinse the shirt under cold water.


Hang dry for 24 hours before showing off your work! Now aren't you glad you didn't spend $25 on something you could just as easily make yourself? I know it's not perfect but I kinda like it better this way!


Bleach Stencil T-shirt

Now I used this stencil of a cute little owl, cut out all the white parts with an x-acto knife, and taped it to a tank top (if you print out your stencil on transfer paper with spray adhesive, that works too, but I just used card stock and Scotch tape).


Just like before, spray with your 50/50 bleach/water mixture and let it sit for 5-10 minutes.


Rinse it out with cold water and let it air dry for 24 hours before wearing.


Because my owl wasn't completely flush with the shirt, there are some areas around the eyes that didn't turn out as well but overall, I think he's adorable!


A couple things to keep in mind:

#1 - Wherever the bleach water touches, it will stain, even if it's not part of your design (make sure your bottle doesn't leak).

#2 - The longer you wait for the bleach to set, the lighter the color.

#3 - This is a smelly project - wherever you are, you'll smell bleach so please be in a well ventilated room! And yes, the shirts will have a faint smell of bleach when dry so don't be surprised.

Have fun making your shirts your own! Or better yet, make some as gifts for family, for Halloween, for your company softball team... the possibilities are endless!

TOTAL COSTS: About $10
$3 for t-shirt from Goodwill (tank top already on hand)
$5.87 for Frog Tape from Home Depot
$1.79 for bleach from Vons
Bottle already on hand (recycled)

TOTAL AMOUNT OF TIME: 20-30 minutes + overnight
15 minutes to make the stripes/cut out the owl
5-10 minutes to spray bleach and let sit
Overnight to dry

EASY-PEASY SCALE (1 super easy - 5 very difficult): 3 out of 5
To get perfectly straight lines without any bleeding takes practice and you might not get it on the first try (like me) but keep at it and you'll get into a rhythm. If you're using a stencil, make sure it's centered exactly where you want it, otherwise it might look a bit... off.

Sunday, May 11, 2014

Recipes on Tea Towels - Perfect for Mother's Day!

Happy Mother's Day to everyone today! I'm quite fortunate to still have my mother around and I asked her to scan some of her mother's recipes to me, because I knew when I saw this post from Sometimes Handmade, I wanted to give it a shot. I can tell you if you skip the first step, it's not too late to give as a Mother's Day gift! It'll last longer than flowers, it's something you made, it's inexpensive, and it's generational - what more could you ask for in a gift?

If you want to prep the towels (so the ink doesn't fade when washing), you'll need:

* 1/2 teaspoon of fabric softener
* 2 1/2 teaspoons of Arm & Hammer Washing Soda
* 2 Tablespoons of Alum (found in the seasonings aisle)
* 1 Cup of HOT water

If you are short on time, then just gather:
* Flour sack tea towels
* A black Sharpie (or fabric pen, but I doubt most people would have one on hand)
* Print outs of your favorite recipes

If you want to prep your towels, start by combining all of the ingredients together and letting it sit for 15 minutes so the bubbles can minimize.


Once the bubbles go down, dip your tea towels in until they're completely soaked.


Note that I only used two 30" x 30" tea towels (which is WAY too big, by the way!) and they soaked up every last drop, so if you're making more or have bigger towels, you might want to double the recipe. Give them about 10-15 minutes to set before rinsing and air dry them for 24 hours (or overnight, however long it takes).


Once the tea towels are dry, I recommend ironing them before you add the recipe (it'll be easier to transfer over the text on a flat surface).


Now some of you could:
a.) print out the recipe directly on the towel (but I'm too afraid to ruin my printer that way!) or
b.) could use freezer paper to transfer the image.

However, I'm going to stick with the original post and simply transfer the handwriting over... by hand.

Start by tracing over the recipe with your Sharpie (especially if it's an old recipe). That way, it'll be easier to see the words through the towel.


Place a tea towel over your recipe, make sure it's securely attached to the paper (I recommend taping it down so it doesn't move around during the transfer process).


If you still can't see the words through the towel, try taping it to a window. That's what I did and it worked perfectly!


Very slowly and carefully, trace the words of the recipe with your Sharpie. Don't rush it or it will look sloppy.


Once you're done tracing, take off the tape, fold it, and present to your Mom for Mother's Day or maybe even give to a bride as a bridal shower gift - it will last a lifetime!


TOTAL COSTS: $3.99 (or about $20 if you want to prep the towels)
If you want to prep the towels:
   $2.99 for fabric softener from Vons
   $4.99 for Alum from Vons
   $9.16 for Arm & Hammer super washing soda (for 55 oz. worth) on Amazon
If you want to skip the prep:
   $3.99 for tea towels from Target
   Sharpie and recipes on hand

TOTAL AMOUNT OF TIME: Varies on how many recipes, how long they are, and if you're prepping the towels
15 minutes to prep the towels & overnight to dry
10 minutes to trace each recipe
10 minutes to transfer recipe to towel

EASY-PEASY SCALE (1 super easy - 5 very difficult): 2 out of 5
The hardest part of this is having the patience to go over the text without rushing. You want to be sure to include every nuance of the original writer's text, as those are what make the recipe so special.

Sunday, March 16, 2014

Black & Tan Brownies

With St. Patrick's Day around the corner, black and tan brownies are a great holiday treat! Now I'm not a fan of beer, and the recipe does call for Guinness, but I promise you can't taste it one bit. I found this recipe on FloridianWeddings (as they would make great groomsmen gifts!) so whether you're celebrating the groom or celebrating the holiday, make up a batch and enjoy!

For the Tan brownies:
* 6 Tablespoons of softened butter
* 1 1/2 cups of lightly packed brown sugar
* 2 eggs
* 1 teaspoon of vanilla extract
* 1 C of all-purpose flour
* 1 teaspoon of baking powder
* 1/4 teaspoon of salt

For the Black brownies:
* 3 ounces of dark or bittersweet chocolate
* 4 Tablespoons of butter
* 1 C of granulated sugar
* 2 eggs
* 1 teaspoon of vanilla extract
* 1 C of Guinness Stout
* 1 C of all-purpose flour
* 1/4 teaspoon of salt

Preheat your oven to 350 and butter the bottom and sides of your 9x13 pan. Take a piece of parchment paper, lay it down, and butter the top of it. The point of this is to not burn the Tan brownies because they'll be in the oven twice and that will prevent that from happening. Hopefully.

To make the Tan brownies, combine your brown sugar and butter until it's light and fluffy (I gave it ample time - about 5 minutes in the mixer). Then add your eggs and vanilla. While those are mixing, combine your dry ingredients in a small bowl (the flour, baking powder, and salt). Add the dry ingredients to the mixer, beating until just combined.

Pour out the mixture into your greased-up pan and using a knife or spatula, try to make the batter as flat as possible (since you'll be adding the Black brownie mixture on top later). The original recipe suggested 15 minutes in the oven on the lowest rack but I had to double the time to 30 minutes because the batter wasn't completely baked. Every oven will be different, so be sure to stick a toothpick in the middle and if it comes out clean, then you're ready for the Black brownie mixture to be laid on top.

While the Tan brownies are baking, melt your chocolate and butter in the microwave in 10-15 second intervals until completely melted. If it helps, you can chop the chocolate before placing in the microwave. It only took me 45 seconds total - keep a watchful eye on the chocolate because you definitely don't want to burn it! 
Once it's smooth, add your sugar, eggs, vanilla, and Guinness. Be sure to stir with a whisk until it's well combined!

In a small bowl, combine your flour and salt, then add your chocolate/Guinness mixture until it's well combined.

Pour the mixture over the Tan brownies (once they're completely baked, as you don't want to mix layers) and put it in the oven on the middle rack for at least 30 minutes. The original post says 30, but I had to put them in for almost 45 before they were completely done!

Let them cool before cutting into squares and voila! Your black and tan brownies are complete! No, you won't be able to get drunk off of them (I didn't even use a full bottle!) but they will be a delicious treat for the leprechaun in your family!


TOTAL COSTS: About $30 (assuming you don't have any ingredients - prices from Vons)
$.79 for butter
$2.49 for sugar
$2.99 for eggs
$4.99 for vanilla
$1.99 for baking powder
$3.29 for flour
$2.50 for chocolate
$5.77 for Guinness 6-pack
$2.99 for parchment paper
$1.99 for salt

TOTAL AMOUNT OF TIME: About 1 hour, 45 minutes

EASY-PEASY SCALE (1 super easy - 5 very difficult): 2 out of 5
If you have a difficult time making regular brownies, then this probably isn't the recipe for you. However, if that's no problem, all you're doing is making two types of brownies on top of each other. Relatively easy, looks cool, and tastes good too!

Tuesday, December 10, 2013

11 Different Ways to Wrap a Present

We're getting to that point where post offices have 30 minutes waits, all that's left is the tacky wrapping paper, and you're running out of creative ways to wrap a simple box. Need some help? Here are 11 wrapping ideas I've gathered from different sites and have compiled into one post. Hopefully there's an idea here for everyone on your Christmas list!

Idea #1: The Wordsmith

If you have a friend who loves word searches, you can either make one of these on the computer or get some blank paper, wrap the gift, then draw 1/4" lines vertically and horizontally with a pencil. Write in the words you know you want to include in marker (like "TOJOHN" or "FROMJANE") and then circle them in a bright color so they're easily found. Once those are done, write in a bunch of hidden words for fun! Fill in the rest of the boxes with random letters and you're all set. It's a gift that'll keep them guessing but also entertained!


Idea #2: The Music Lover

This is an easy one, all you need is some sheet music! You can either print some out for free online (just Google image search "sheet music") or you can buy Mod Podge "podgeable papers" made to look like sheet music, which is what I had on hand. See bonus instructions below on how to make the bow!


Idea #3: The Artist

Another idea from At Creative Home that's not terribly complicated. Plain paper + crayons = they gets to decorate their own gift! I recycled the paper that I received from IKEA when purchasing mugs, hence why it's a bit wrinkled.


Idea #4: The World Traveler

Find an old atlas or print out a map and use that as wrapping paper! Be creative with it - you could print out a map of where you're from, where the recipient is from, where the gift is from, and draw stars or hearts over certain locations! I also decided to make a mini bow - see bonus instructions below on how to make it yourself!


Idea #5: The Weaver


Ok, maybe you don't have that many friends who are weavers but this is still a creative idea I originally saw on MinieCo. Now you can do it all the way around the gift like they did, or you could just do it on top like I did. It's quite simple - take strips of paper and put them under, over, under, over and then over, under, over, under. It's a little time consuming and I used Elmer's glue which took a while to dry, so you might be better off using a hot glue gun to secure it.


Idea #6: The Reader


Using book pages, magazines, or leftover newspaper, use that as your wrapping paper for the person who loves to read! They might not appreciate pages being ripped out of a book so newspaper might be your best bet or find text online and print that out. I used a Mod Podge "podgeable papers" newspaper and it worked great!


Idea #7: The Teacher

This would be creative way to wrap a gift for a teacher (or a student for that matter). No, not with dry erase but with chalkboard liner! That way you can decorate it however you like and if you mess up, that's ok, just erase it and start over! Going Home to Roost's post used a chalk marker to design the packages but I'm old school, I like the feel of chalk dust between my fingers.


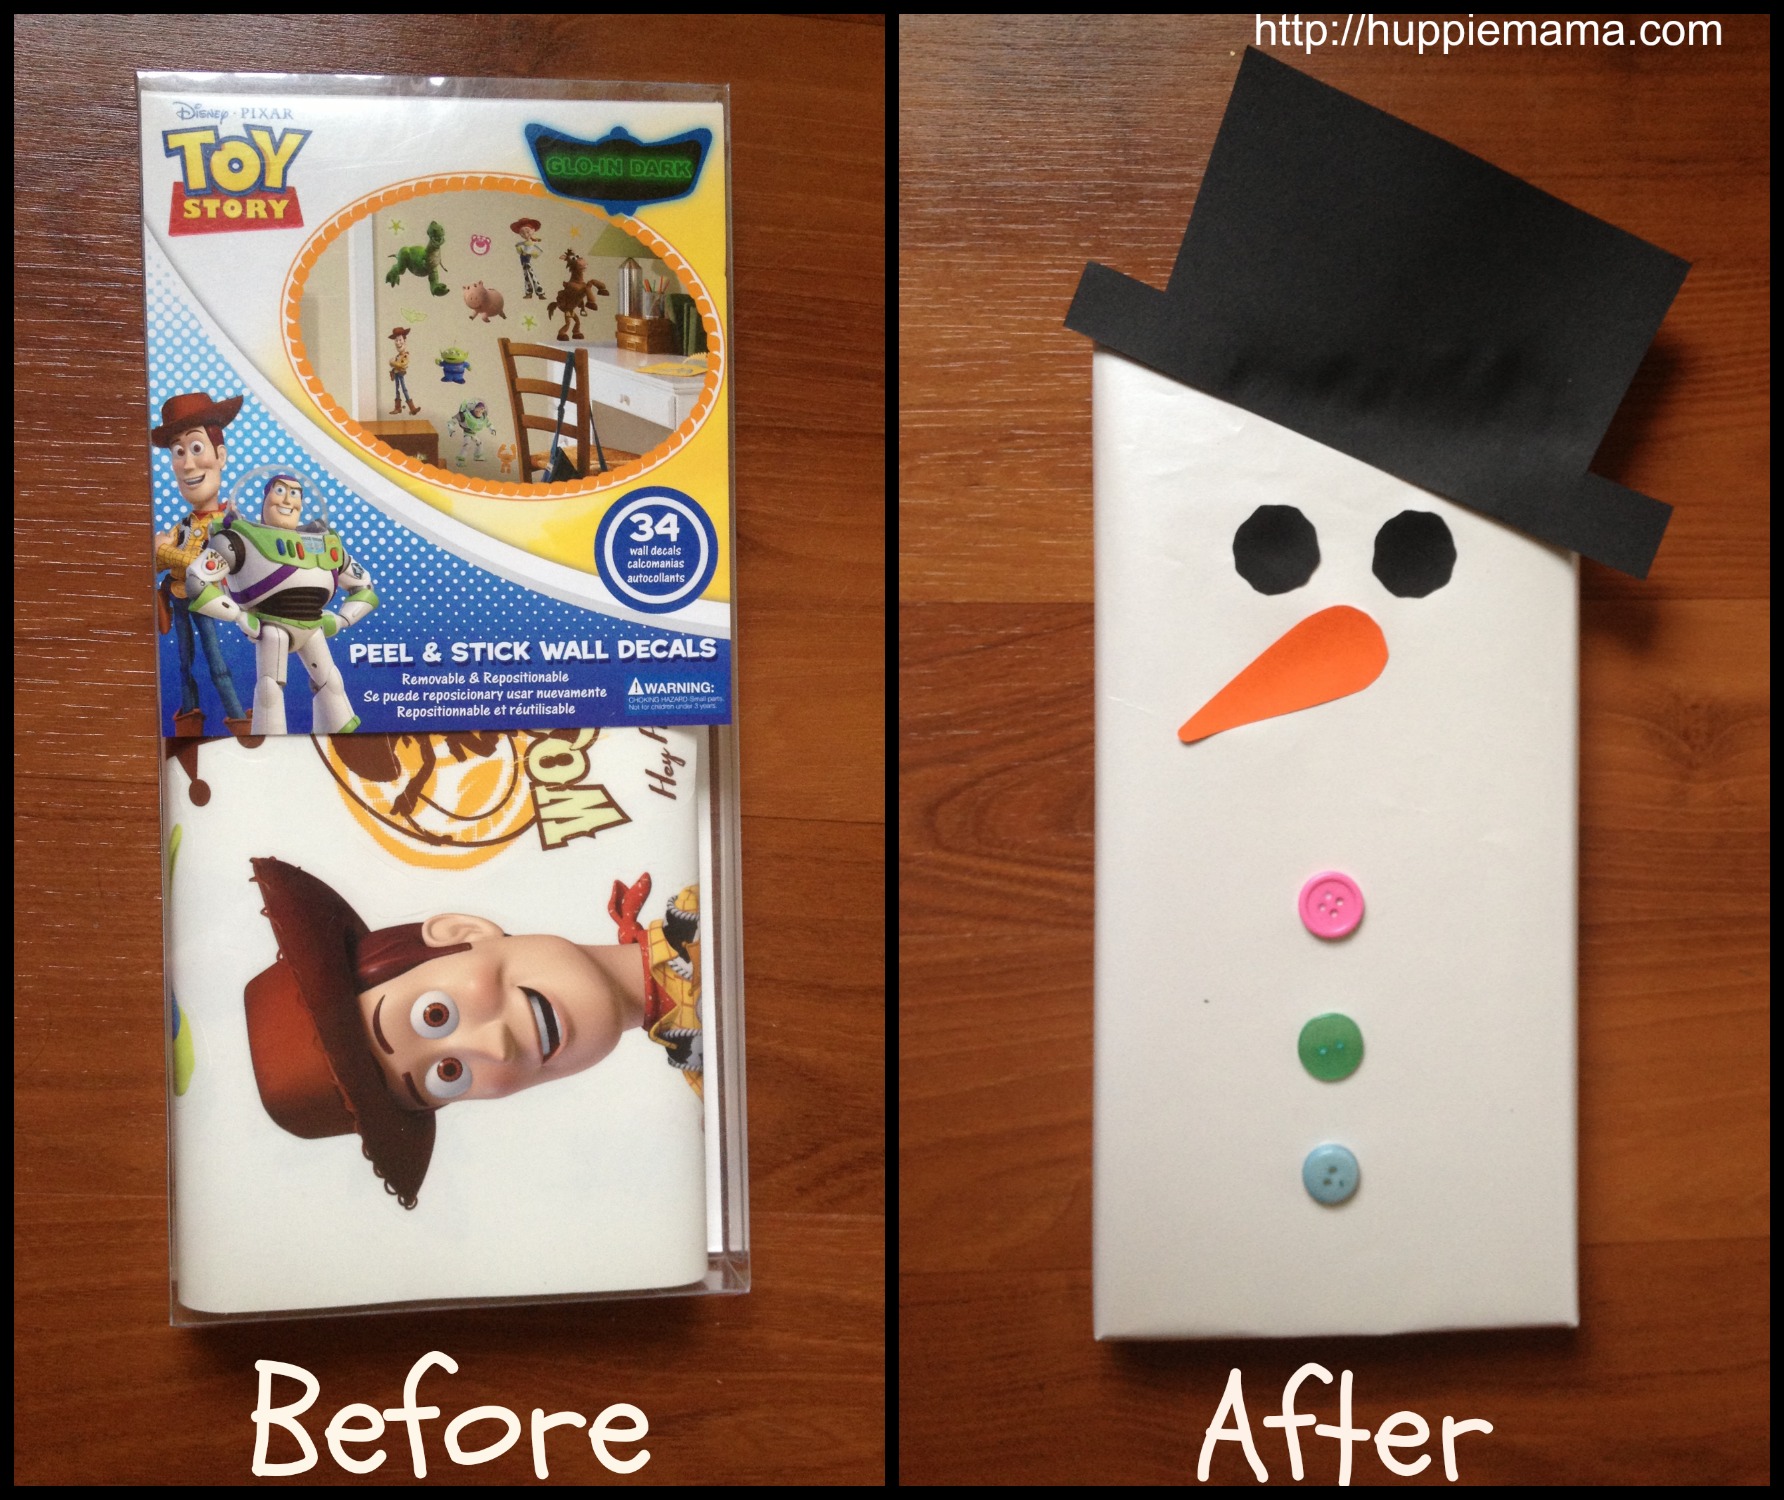
Idea #8: The Recycler


Do you know someone who likes to find multiple purposes for something? Well, here's one way to decorate a gift or wine bag and they can reuse it with a touch of festive flair! I originally saw this post by Huppie Mama, who decorated a box instead of a bag, so it's versatile!


Idea #9: The Noise Maker

Nothing says the holidays like jingle bells! Attach some bells to a gift to make it more festive, though make sure if the gift is for a child there is an adult nearby to make sure the bells aren't ingested. I don't think the ER would be a great place to be on Christmas morning...


Idea #10: The Nerd


Now I am a self-proclaimed nerd, so that word isn't meant to offend. If you're a fan of comic books, then wouldn't you love getting a gift wrapped in your favorite comic? I chose Batman for this one because that's my cat's name. Yep. Big nerd. So just Google image your favorite comic strip, print it out, and use that as your wrapping paper!


Idea #11: The Photographer

On Minted.com, you can pay $15 to have wrapping paper with your own photographs on it... OR, you could just print out your own photos and use that paper to wrap your gifts! Seems like a no-brainer to me! I just opened up a Word doc, inserted a bunch of different photos, and then printed it out.


Bonus tip #1: How to make a traditional bow out of paper
This comes to us from Studio Calico. Cut four long strips of paper (mine were 12" x 1/2" but you experiment with the width).

Cut three of those strips in half and mark an x in the middle of those 6 strips.


Then take one end of a strip and twist and glue it on top of the x.

Take the other end, twist and glue it on top, almost making a figure 8.

Do this for 4 strips. For the final two, cut them 1/2"-3/4" shorter and twist and glue, just like you did the others.

Then start stacking! Glue one on top of the other, until all are on except there that one long strip. Cut it to a 2.5" long strip, glue it into a loop, and glue it in the middle of your bow. Ta da!

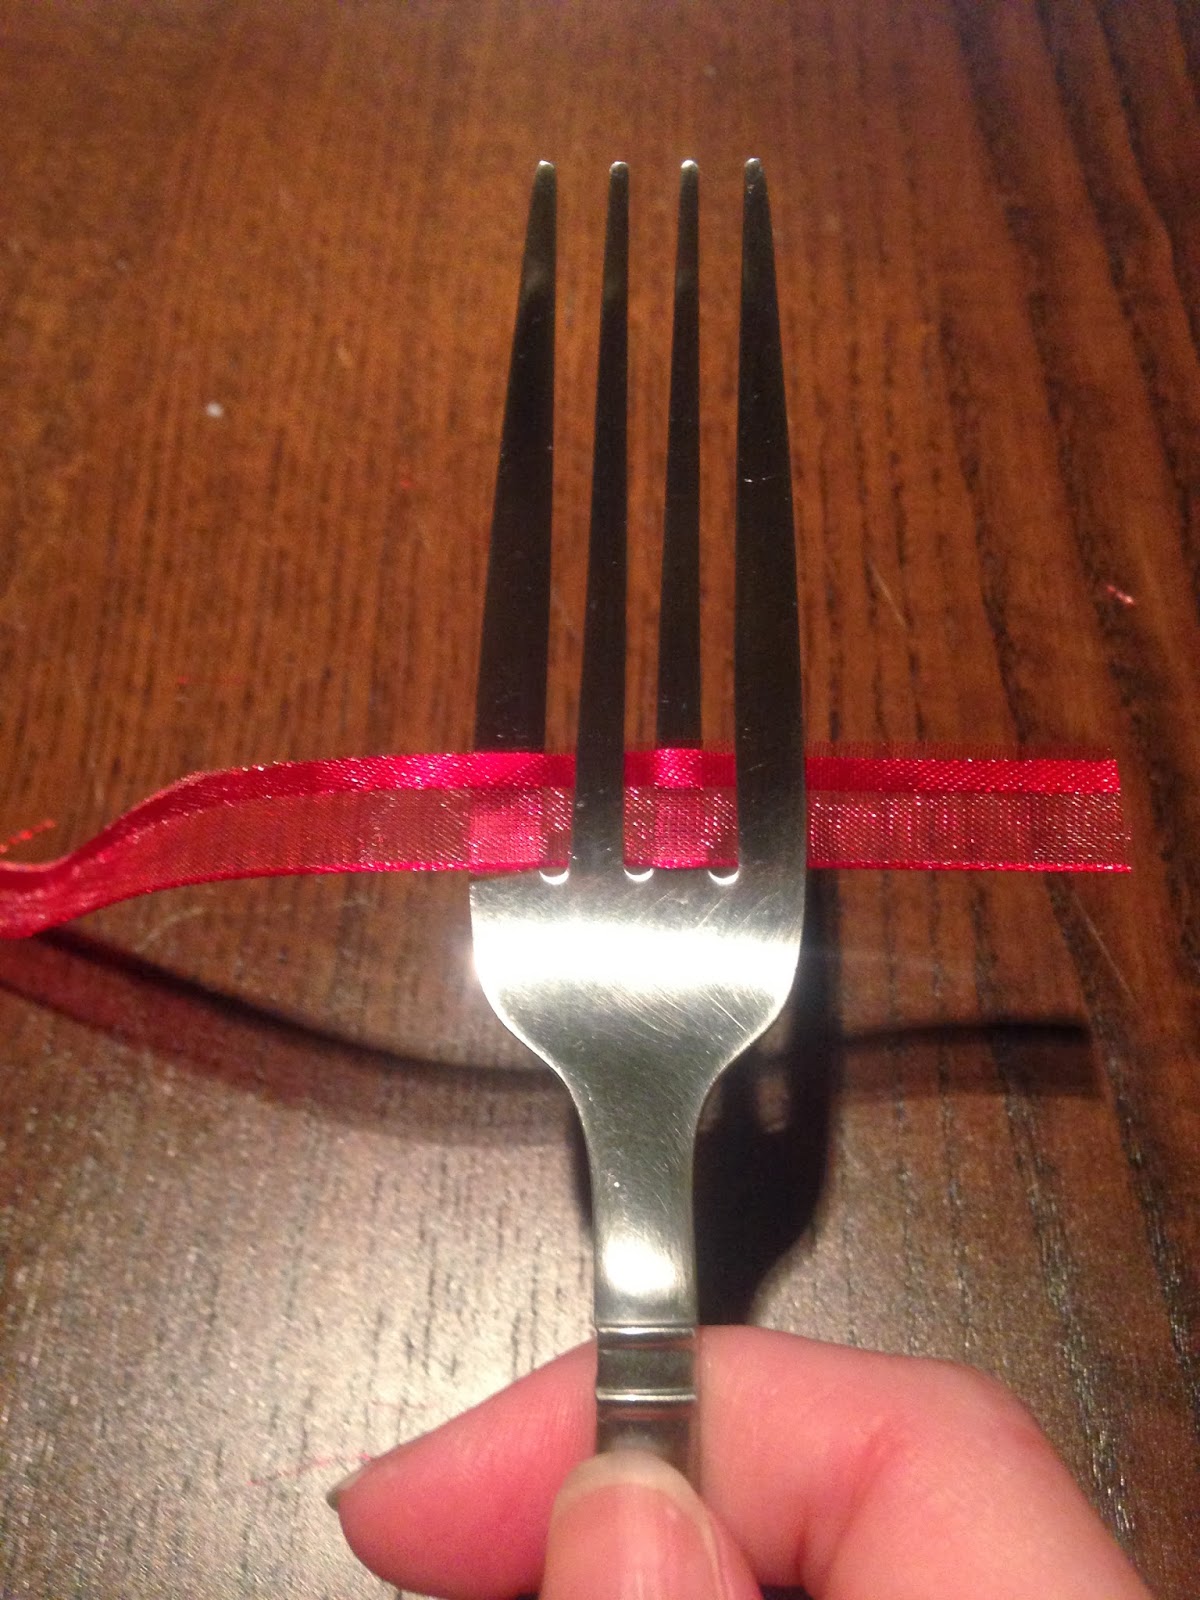
Bonus tip #2: How to make a mini bow
I originally saw the photos here on Fun Substance but since the photos were backwards it was hard for me to follow so hopefully my photos and explanation below will make things a little easier for you!

First, have the short end of the ribbon on your right and the long end on your left. Go over the first and third tongs with the ribbon.

Then, wrap the long end around the first tong and go over the second and fourth tongs.

Keep going back and forth until you have five rows of ribbon on the tongs.

Take another separate piece of ribbon and between the second and third tongs, tie the top and bottom rows together.

Make a knot

Slip the ribbon off, cut of the ends and ta da! You've got a little bow!

TOTAL COSTS: Varies with each wrapping project
You could spend nothing because you have a printer, paper, scissors and tape or you could spend up to $6 on chalkboard liner, $4 on jingle bells, etc.

TOTAL AMOUNT OF TIME: Varies with each wrapping project
Again, it's hard to give you a set amount of time. I can tell you the fastest project was "The Reader" because all it required was newspaper!

EASY-PEASY SCALE (1 super easy - 5 very difficult): Varies with each wrapping project
I found the easiest project was again "The Reader" because it was just wrapping a box with newspaper. The most difficult was probably "The Photographer" only because I had a hard time picking out the right photos! Be creative and have fun!