Showing posts with label glue. Show all posts

Sunday, August 3, 2014

Rose Covered Book

Have you ever been given roses, only to throw them in the trash after they've wilted? Why not save some of the petals for your sketch book, journal, or even a postcard? This post on Craftbits demonstrates how it would look if you used dried rose petals but I opted for fresh ones, just to see how it would turn out!

Start by gathering your supplies. You'll need:

1. Rose petals 
2. Mod Podge or craft glue
3. A foam brush (or you can use your fingers)
4. A notebook/journal/book/etc. to cover

Start by removing the petals from your rose. I found 1 rose = a 6"x8" book.


Place glue on your notebook where you want the petal to sit.


Place your petal and push out any bubbles that might be underneath it. Then apply the same glue to the top of the petal, securing it in place.


Now place more glue and more petals. Do this over the entire book cover. 


Yes, you'll have a lot of white glue but don't worry, if it's not applied in thick globs, it'll dry completely invisible. Here's what it looks like when I was done covering it...


...and here's what it looked like after just an hour!


I let mine dry overnight (about 12 hours) and here's how it turned out. You can see that some of the glue, where it was the thickest, was still visible so I just glued some more petals over it.


Now it was interesting to see how the petals changed over the next few days... the color faded but the texture stayed the same.


 The last picture was taken 5 days after the petals were first glued on. If you want your book to be covered with bright red petals forever, you're better off getting some fake petals from the craft store!

TOTAL COSTS: $3.50
$3.49 for 4oz. of Mod Podge at Michael's
Rose petals and journal prices vary per person

TOTAL AMOUNT OF TIME: 20 minutes + overnight
20 minutes to add petals to 6"x8" cover
Overnight to dry

EASY-PEASY SCALE (1 super easy - 5 very difficult): 1 out of 5
If you know someone who loves to write or paint, this would be a nice handmade gift for them - it's something they could use daily for their personal work but would think of you every time they saw it! It's quite easy so if kids wanted to make these for their parents, they definitely could, however I would recommend adult supervision because it can get quite messy!

Saturday, June 14, 2014

Pinterest Fail - Father's Day

I haven't had an epic fail of a project in a while so I was long overdue. And of course, being me, it had to be a gift. AND on a holiday. So I encourage you to sit back, grab some popcorn, and watch as I royally screwed up a sand footprint keepsake, original instructions from this post by PagingFunMums.

It sounded easy enough at first, you just need:

1. Some sand
2. A picture frame
3. Plaster of Paris (I read this article on how to make your own. Big mistake.)

So to start, you take the cardboard and glass out of the frame, put the cardboard on top, flip the frame over, and now you have a nice space to pour your sand into. Note that I tried using plastic bags to cover my workspace.. lets call this Mistake #1: You need to cover the entire surface you're working on. If you're doing it on the floor, cover every inch of the floor. If the table, cover the entire table.


Why cover the entire surface, you ask? Because you're going to get sand everywhere! Sure, you'll try really hard to keep it all in the frame, but the sand will laugh at you and go where it pleases. If you manage to keep it in the frame, try to level it out as best you can. A ruler would be great, however I just used a leftover piece of cardboard.


If you want to use a kid's handprint or footprint, be prepared to use that ruler often. You're going to be smoothing out that sand at least 5-10 times. I tried with both a 1-month old and a 3-year old and both weren't easy. The 1-month old was a two-person process: one person to hold the baby, the other to plant the foot. The 3-year old wanted to play with the sand. You know what? This would be a great project for... fish. Dead fish. Do this with a dead fish.

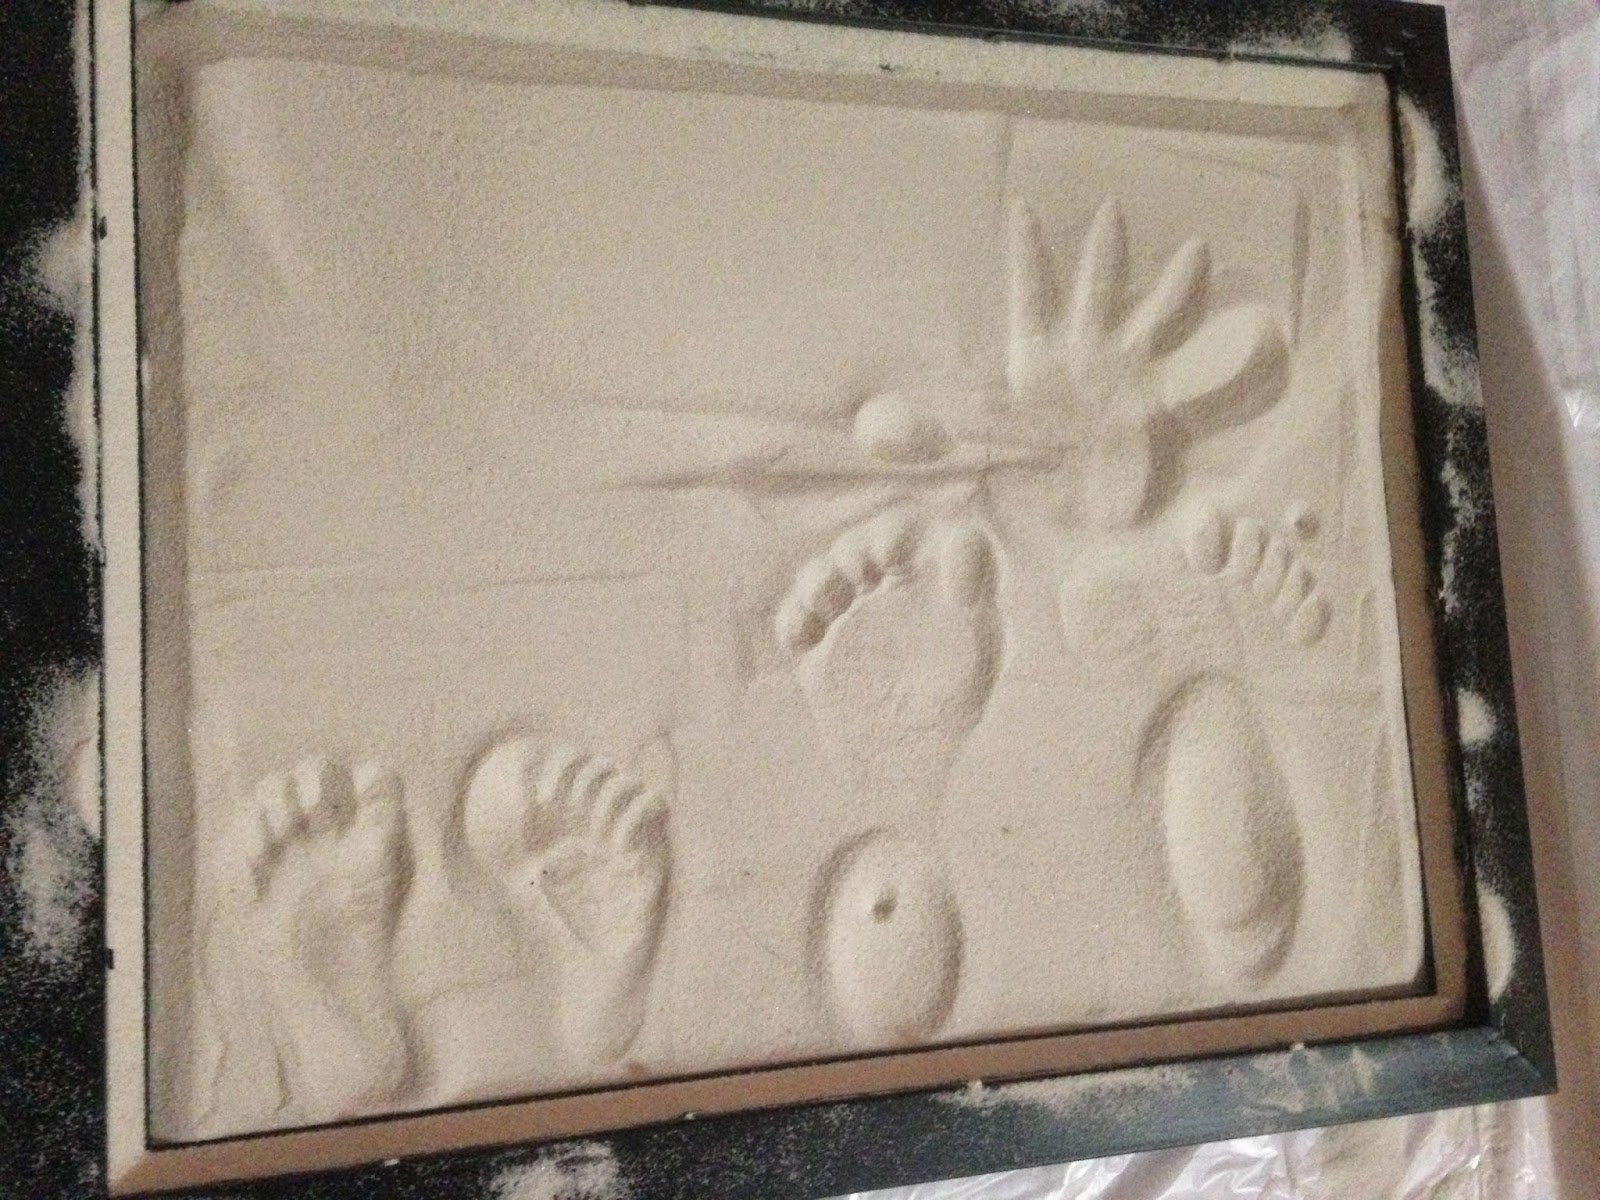
See that hole in the footprint's heel? The frame had a hole.
Don't buy a frame with a hole in it.

So here's where Mistakes #2.. #3... #953 occurred: trying to make DIY Plaster of Paris. Just skip the hassle and go buy some, people. Really. Because the first time, I did two parts water to one part glue, which is made it very runny. The second time I tried one part water to two parts glue but only had 1 bottle of glue, which wasn't nearly enough.


The third time I bought more glue but it still didn't reach the edges and the glue started to seep out, which is why you now see a garbage bag underneath. But really, I should have used a tarp. Because the glue and sand was now everywhere... sigh...


And then you're supposed to wait. And wait. And supposedly, after 24-28 hours, you wipe off the excess sand, spray it with sealer, and ta-da! It's supposed to look like this!


Instead... well... you're not supposed to be able to see the footprints, but you can clearly see the here... in the garbage bag...


But of course, it started to fall apart in my hands once I tried to remove the cardboard. See, this is why DIY Plaster of Paris is not a good idea.


And into the trash it went! Perhaps someday I'll try this again with store-bought plaster, though I think it won't be on a holiday and it won't be a gift. Happy Father's Day!

TOTAL COSTS: About $20 for this fail
$8.00 for frame from Michael's
$6.58 for sand from Michael's
$4.77 for 3 bottles of Elmer's glue from CVS

TOTAL AMOUNT OF TIME: 24 hours +30 minutes of prep
Or in other words, a big waste of time..

EASY-PEASY SCALE (1 super easy - 5 very difficult): 5 out of 5
If I hadn't of used DIY Plaster of Paris, this would have worked out much better. As it was, though, it was a big, grainy, slimy mess. You're better off just buying some sand and playing with that. The 3-year old was right all along!

Tuesday, March 11, 2014

DIY Air Vase Fail

I was perusing Instructables, trying to find an easy project for a lazy Tuesday afternoon, when I came across this beautiful paper vase. It doesn't have a lot of components to it - it's just simple, yet elegant. I figured I could finish it in no time. When will I ever learn?....

If you want to give it a shot, here's wall you'll need:

1. Printer paper for the template (see original post for pdf)

2. Card stock paper for the bottom of the vase. These will need to be 2" circles but what I did was put the vase template underneath the card stock and traced the inner circle. Much easier than trying to find your old compass!

3. An x-acto knife and something to protect your table

4. Glue

Start by printing out the template and cutting everywhere you see a printed line. If you're not careful, you will rip the paper. And yes, it will probably happen.

Get used to seeing these...
If you still have all your fingers and have finished cutting on all the printed lines, you then need to cut in the white space. Now this is where I screwed up. I made too many lines and halfway down, it stopped stretching without ripping. Hopefully you'll have better luck.

This is what you're going for!
Once you're done cutting your lines, cut out the template so you're not still working with a full piece of paper. Glue your base (the 2" card stock circles) to the front and the back of the paper.


And finally, stretch out your vase. If it doesn't fully stretch out, it makes a lovely hat.


As I said, not one of my best project... but hey, ya live and ya learn! Hopefully your attempt will go much better than mine!


TOTAL COSTS: Free!
However I already had printer paper, an x-acto knife, and glue on hand

TOTAL AMOUNT OF TIME: 1 hour
A great chance to catch up on podcasts during the excessive cutting!

EASY-PEASY SCALE (1 super easy - 5 very difficult): 4 out of 5
I rate this one pretty high because:

#1 - it's very hard to cut the paper without ripping it and
#2 - keeping track of which white space to cut and which to leave alone.

However, if it doesn't work out, you can always print out the template and try again!

Monday, October 28, 2013

Slime!

Now here's something the entire family can make AND play with around Halloween - slime! With a few ingredients, you too can make your very own slime whenever you want! I found this post by Domestic Charm who edited the recipe from About.com. I couldn't clearly read her instructions and may have done things a little differently but it still turned out awesome. If you have five minutes and these ingredients, you can make this right now!

4 oz or 1/4C of Clear or Blue Elmer's Glue
2-3 Tablespoons of Glow in the Dark Paint (you can get this at any craft store)
Neon Green Food Coloring (in the baking section of your grocery store)
Borax (in the laundry section of your grocery store)
Warm water
Slime or snot, it's disgustingly awesome!

Ok, here are the steps I took that are a little different than the original instructions:

1. In a large bowl, combine 1C warm water and the Elmer's glue (I only had a 5oz bottle of clear glue so I eyeballed 4oz worth).
2. In the same bowl, I added 2-3 tablespoons of glow-in-the-dark paint (again, I just eyeballed - it will not spread out so you can clearly see how much you're adding and 3 tablespoons did not seem like enough for it to glow). Also, add neon green food coloring - 2 or 3 drops should do the trick.
3. In your measuring cup, measure 1/3 cup of warm water and add to the glass 2 teaspoons of borax and mix
4. Slowly pour the borax solution into your big bowl. You'll notice it immediately starts to solidify. I used the entire water/borax mixture because I thought it would be too watery and it turned out just fine! After a while, you just gotta get your hands in there and play with it!

How much does it make? Well, I filled up an entire 32oz Ball mason jar if that tells you anything!

TOTAL COST: About $14.50
$5.46 for 20 Mule Team Borax on Amazon (realized it was cheaper in the store after I bought it online! Note this is for about 5 pounds worth and you're only using a couple tablespoons in this recipe)

$3.99 for McCormick 4-Pack Neon Food Coloring on Amazon

$1.99 for glow-in-the-dark paint from Michael's

$2.99 for 5oz. of clear Elmer's glue from Michael's

TOTAL AMOUNT OF TIME: 5 minutes

EASY-PEASY SCALE: 1 out of 5
Definitely something the kids can make and perfect for this time of year!