Showing posts with label candles. Show all posts

Tuesday, January 7, 2014

Homemade Flower Pot Heater

Living in Los Angeles, I don't really have to worry about the "polar vortex" that is currently gripping the country. I mean, it has been in the 60s instead of the 70s so sometimes I have to wear a hoodie, but it's nothing compared to the negative wind chill temperatures other places are experiencing. So when I saw RealFarmacy's link going around Facebook about how you can make your own heater using flower pots and candles, I wanted to see how well it actually worked, since my well-being doesn't depend on it right now! Here's what you'll need:


2 terracotta flower pots that can fit inside one another
Tealight candles
1 metal 5x9 bread pan
1 lighter or matches
Tin foil or something to plug one of the holes in the flower pot


First, take four tea lights, put them in the middle of a metal bread pan, and light the candles.


Take your smaller of the two pots (my flower pots were 5 1/2" wide in diameter and 6 1/2" wide) and place it on top of the bread pan directly above the candles with the hole facing up. Plug the hole with something so air does not escape - here's where I used tin foil. Essentially, you want to trap the air so the pot gets hot.


Next, grab your bigger flower pot, place it on top of the smaller pot and voila! You have a... really... small... heat...er...


I may not have a convincing British accent like the original post or live in a cold part of the country, but it seems like you would get more heat by huddling around your toaster! Don't get me wrong, it does get warm (ish) but after 30 minutes of it next to me, I'm only feeling the heat if I put my hands on the bigger pot. Perhaps if your power goes out and:

a.) all you have are tealight candles and you live in a studio apartment or have a small bathroom OR
b.) if you have an infinite supply of tealight candles you want to get rid of

then this would be worth your while. But if you have relatively larger rooms or don't want to be stuck in your bathroom until your heat turns back on, you might want to find alternative heat solutions. Like a fireplace. Or a Starbucks.


TOTAL COSTS: $14
$4 for two terracotta pots at local flower shop
$5 for 100 tealight candles at IKEA
$5 for bread pan at Target
Lighter and tin foil already on hand

TOTAL AMOUNT OF TIME: Less than 5 minutes
Note that times will vary depending on the size of the room and how long it will take to warm it up

EASY-PEASY SCALE (1 super easy - 5 very difficult): 1 out of 5
This isn't difficult to make at all - the difficult part is being patient enough to get any sort of heat from it!

Monday, December 9, 2013

Spa in a Jar

After yesterday's gingerbread TARDIS catastrophe (click here for a good laugh), I decided I needed a blog post to help relax me, take the edge off, and not involve an oven. The answer? The Gunny Sack. She's a blogger who put together a bunch of different ideas of what you can incorporate in a spa-inspired mason jar -- this would be a perfect gift for a new mom, a friend, or even yourself!

She has a lot of different recipes but I decided to go with the peppermint foot soak and the hand scrub. I bought a couple 32 oz. mason jars from Whole Foods, a couple small glass containers from Michael's, and I already had a few 4oz. mason jars left over from my slow cooker apple butter days.

I started with the hand scrub and decided to use lavender hand soap because lavender has been shown to reduce stress (perfect for a spa jar, right?). However, if you decide to use this as well, be aware that you're not going to get much of a color and even one drop of food coloring can be overwhelming. I put in two drops and had to start over because it looked like I had liquified Barney. So you might be better off using a soap that is already tinted, like the original post.

Next, the peppermint foot soak. Now I love the smell of peppermint but if you're not a fan, you might not want to do this recipe because it will make your entire working area smell divine. Once you've mixed together the epsom salt, baking soda, peppermint extract and food coloring (I used two drops of pink food coloring instead of red and it looks lovely!), you need to lay it out on parchment paper for 30 minutes. While you wait, it's a perfect time to print out the free labels she provides, cut them out, and attach them to the jars. By the time you're done, the powder will be ready to put into jars!

Keep in mind, once you put those two jars inside your mason jar, you're not going to have much room to put in much else. I added some peppermint chapstick, 3 Lindor truffles, and 3 tea light candles . If there had been room for more goodies, I would have kept adding but as it was, it was stuffed to the top. If you want to add more, go for a bigger jar than just 32 ounces!


TOTAL COSTS: About $11
$2.49 for 1lb of epsom salts from Whole Foods
$2.99 for peppermint chapstick from Whole Foods
$.99 for 3 Lindor truffles from Vons
$1.50 for 13.5 fl. oz of lavender soap from Michael's
$1.69 for 32oz. mason jar from Whole Foods
$.99 for small glass jar from Michael's
4oz. mason jar, food coloring, sugar, baking soda, and peppermint extract already on hand

TOTAL AMOUNT OF TIME: 1 hour, 15 minutes
This included the 30 minutes of waiting for the foot soak powder to dry and redoing one of the jars of hand scrub because of a food coloring disaster.

EASY-PEASY SCALE (1 super easy - 5 very difficult): 1 out of 5
Have fun with this - it's so easy, you can include whatever you like, and the recipient of such a jar of goodies will be pleasantly surprised!

Friday, November 22, 2013

Thanksgiving Table Runner and Candle Sticks

Want to put together a rustic, yet festive Thanksgiving table? With some scrap wood and string, you easily can. I found this video from Vintage News Junkie and found it a little confusing but eventually figured it out enough to share!

First, you'll a table.
Next, you'll need string. Any kind will do.
Finally, you'll need scrap wood pieces.

Once you have your supplies, take your string and measure out a length longer than the length of the table. I thought "Oh, my table is 55", I'll have the string be 58"." That won't work because you're wrapping the string around the wood so you're going to lose some inches. I could have had a longer table runner had I made my string longer! So to be on the safe side, go for 10" longer than the table, if you can. The more, the better. Once you have your string the length you want, make three other strings that same length. Now you have four strings - tie two together and the other two together.

Next is the annoying part and it probably took me a good 10 minutes to figure it out. Take your wood and one pair of string and stick the wood in the string, so there's a piece of string on top and a piece under.

If you like simple directions: twist the string and place your second piece of wood. Twist the string again and place down another piece of wood. Keep doing this until you run out of string.

If you like complicated directions, watch the video I mentioned.

Once you've done this, do the same for the other side, which felt a lot like weaving (right string goes under, left string goes above, left string goes under, right string goes above, etc.).

Unfortunately because my string wasn't long enough, I was off by about 3" on either side of the table. ::insert sad trombone::

But honestly, no one is going to notice at Thanksgiving when your table is set up.


Now that you have your table runner completed, want some festive candlesticks? Check out how to make apple and twig candlesticks here, otherwise find things around the house! I grabbed some popcorn kernels and candy pumpkins to fit the bill!

TOTAL COSTS: $4.25
$4.25/bundle of 15" scrap wood at Home Depot
String, popcorn kernels, candles, and pumpkins on hand - just find things around the house to decorate your candle holders! Find leaves, find acorns, find pinecones!...unless you live in Hollywood, in which case you won't find any of those things...

TOTAL AMOUNT OF TIME: 35 minutes
20 minutes on the left side
15 minutes on the right side

EASY-PEASY SCALE (1 super easy - 5 very difficult): 3 out of 5
The most difficult part is just getting the string on the wood. It's not impossible, just take a while to get the hang of it. Once you do, it's a piece of cake!

Thursday, November 7, 2013

Hanukkah Candles Picture Frame

So I found this post by Felt So Cute and thought it was very cute and easy... but I'm not a teacher and I don't have kids so a crayon picture frame seemed wrong. So then I thought, "What if I exchanged crayons for Hanukkah candles?" Good Hanukkah decorations are hard to come by so here's something I thought would make a great gift!

I'll let you be the judge.


First, gather your supplies. Hanukkah candles, scissors, a hot glue gun, a picture frame, and a marker (though I used my finger nail). Note: kittens probably won't help in this project.

Then decide how you want to lay out the candles. Do you want to keep the wicks on or off? Measure the candles with either a marker or your finger nail and shorten the candles with a knife or saw but I found scissors to work just fine, as long as you cut fast. If you don't, the wax will chip and break off very easily and it's not pretty...

About halfway through I realized this project might not look as good as I thought it might. But I'm not one to stop halfway through anything so I kept cutting and gluing, cutting and gluing. Note that the candles won't be perfectly aligned so you might see some of the back of the frame.

When it was all done, I showed it to my husband and we both agreed - it looked... ok. Ahh well... I'd say this would be a fun project for kids but considering it involves sharp objects and hot glue, you may be better off just... not... doing it... at all...

Moral of the story: not every Pinterest project is worth doing.


TOTAL COSTS: About $17
$1.99 for 3x5 wooden picture frame from Michael's
$14.99 for 135 hanukkah candles from Bed, Bath & Beyond
Hot glue already on hand

TOTAL AMOUNT OF TIME: 50 minutes

EASY-PEASY SCALE (1 super easy - 5 very difficult): 2 out of 5
It's not a difficult project, you're just shortening the candles to fit on the frame and hot gluing them on. The hard part... is making it look good!

Sunday, October 27, 2013

Sheet Music Candles

As a musician, I thought this was a clever post by Can't Stop Making Things, as it combined two of my favorite things: candles and sheet music. Now, before anyone says anything... yes, the sheet music on the smallest candle is backwards. I even highlighted it in the photos below so that is an example of what not to do. So it was really on purpose. Yeah. That's it. Ahem.
Sheet music candles

The directions are pretty self-explanatory in the post so here's the shorthand: take an 8 1/2x11 piece of white tissue paper, tape it to a piece of cardstock, print off sheet music (pdfs are provided in original post), take said tissue paper off cardstock, cut tissue paper to the size of the candle and glue in place, and adhere via heat until tissue paper has melted.

Here are some things the original post fails to mention:

1. When you are cutting the tissue paper to size, leave 1/4 of an inch off the top of the candle (like the smallest candle). I found when you cut it exactly to the size of the candle, it's harder to melt the very top of the tissue paper to the candle, so leave yourself some breathing room.
Example of what not to do: put sheet music on backwards

2. If you don't have a heat gun, use a blow dryer. I used mine on "High" for 5 minutes for the tall candle, 3 minutes for the medium size candle, and 2 minutes for the small candle.

3. When you're using the heat gun or blow dryer, you'll start to notice the color of the tissue paper fades and the color of the candle come through. That's when you know you're done. If you still see white tissue paper, it hasn't completely melted yet. You've heated it for too long when wax starts to drop down the sides of the candle.

4. Don't touch the candle while you're adhering the tissue paper to it. Instead, put the candle on the cardstock you used and spin the cardstock on the table so you don't have to touch the candle.

TOTAL COSTS: Anywhere between $3-$12
$1.99 for white tissue paper from Vons
$9.99 for a pack of 5 candles (different sizes) at IKEA, though you could find plain white candles anywhere for cheap (probably around $2/candle)
Sheet music was free
Already had glue
TOTAL AMOUNT OF TIME: 45 minutes, almost to the second
EASY-PEASY SCALE: 3 out of 5. Not too difficult but not a cakewalk. Be careful with any heat gun/blow dryer so you don't burn yourself. Also try not to have any wrinkles in the tissue paper or they'll adhere to the candle.

Friday, October 25, 2013

It's Candle Makin' Time!

As we near the holiday season, I keep seeing sites that say, "Make your own candles - great Christmas gift!" or "Give the gift of homemade candles!" ... yeah... hot wax + fire + me = not a brilliant plan. Still, curiosity killed the cat but satisfaction brought it back. I figured it was worth a shot.

The candle making kit
There are plenty of candle-making kits out there. I saw some at Michael's, Something Turquoise recommended this kit on eBay, but I went to trusty 'ol Amazon and bought this kit, based on the reviews and price.

A few days later, I received the package and thought it was very convenient to have everything you need fit inside the pouring pot (which can be used multiple times for future batches). So when I emptied out the supplies, here's what I found:

1 giant bag of soy wax
1 half ounce bottle of pearberry fragrance (I didn't choose it, the company did but it smelled lovely!)
1 color square (kind of an olive green)
Everything they provide you in the kit
1 glass votive flower pot size jar
1 7oz glass jar with a lid
4 metal tea light cups
6 wicks
1 pouring pot
1 set of instructions

Things not included that I didn't realize until after reading said instructions:
1 thermometer (which I picked up at the grocery store shortly thereafter)
1 pot holder (which I never needed)
Covered work space (I didn't cover anything and just spilled 2 drops of wax. Easy clean-up on a kitchen countertop)

Wax pieces
The instructions they provide and pretty self-explanatory. The first step is pouring out the 14oz of wax flakes into the pot. They're not kidding, they really are wax flakes. You then place the pouring pot into a large pot of water, creating a double boiler, as you don't want to heat the wax on a direct flame. Why, I don't know, I'm not a chemist. But bear in mind, that the pot is going to float so you'll want to keep a steady hand on it.

Double burner
While the wax was melting, I put the wicks in the holders (it's nice that they have little stands attached but good luck getting them to be straight up and down!). Then the instructions get very specific. Let the wax melt, then bring up to 150F degrees and add the color square (which turned into a nice emerald color). Once added, let cool until it gets to 120F (which is why the thermometer is handy) and then add the entire bottle of fragrance and "blend vigorously." Well, it felt like an eternity to get the temperature down. After a while, I removed it from the pot of water and held it. No change. I set it down on the stove between burners. No change. I put it on a completely cool burner. That seemed to have cooled it down the fastest. Maybe this was what the pot holder was for. In any case, it eventually does cool down, you just have to have patience. After adding the fragrance and stirring it in with the thermometer, I poured the wax into each candle holder.
Shortly after pouring the wax

Here's what I thought was interesting... it said, "For better results on your glass containers, take a blow dryer and warm the glass." This is definitely not an activity for kids. You've got open flames, hot wax, and now a blow dryer involved! Please oh please be very careful!

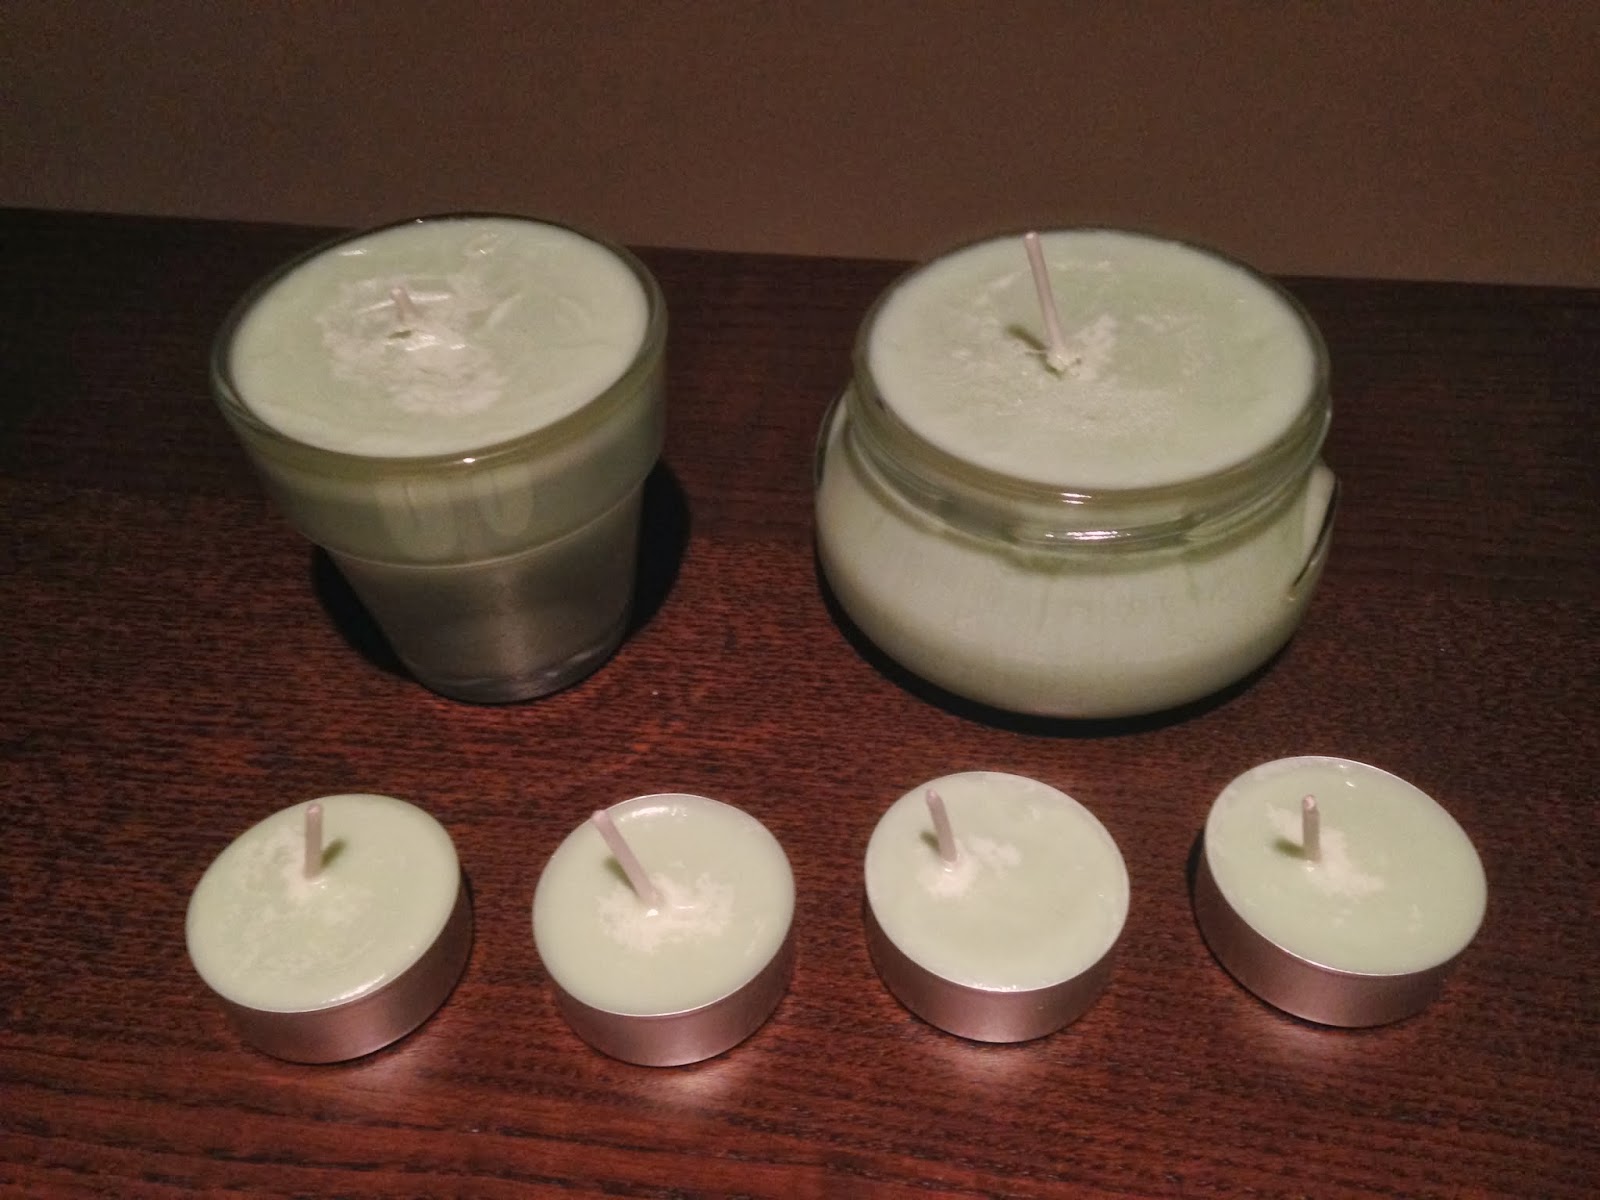
Let me tell you right now - you're going to have SO much melted wax you're going to wish you had extra candle holders and wicks! I started finding any candle I could find around the house and pouring in extra wax because I filled the 4 tea light cups and 2 jars to the brim. So be prepared to have a LOT of extra wax.


Blow dryer vs. no blow dryer
I took a close-up of the two bigger candles to show you the difference between using a blow dryer and not - the candle on the left's wax is completely smooth. The candle on the right has some lines along the sides. I guess the hotter the candle holder, the smoother the wax will be once it hardens! The candle on the right just has stretch marks... nothing wrong with that.

The color isn't completely correct in the photo but it ended up being a mint color - a very pale green. Is it cheaper than buying the candles in the store? No, I don't think so (considering you can buy a pack of 20 tea lights at IKEA for around $5) but now you can give these as a gift and honestly say you made them yourself. And hey, if you ever want to make them again, you just need to buy wax, wicks, holders, color and scents in the future!

Final products

TOTAL COSTS: About $40
$24.99 for the Natural Soy Wax Candle Making Kit from Amazon
$10.99 thermometer from Vons

TOTAL AMOUNT OF TIME: 3 hours, 20 minutes
40 minutes to pour wax in pot, melt the wax, add color and add fragrance
40 minutes for tea lights to cool and harden
2 hours for votive candles to cool and harden

EASY-PEASY SCALE: 3 out of 5
Certainly not an activity for kids but the instructions are easy enough to understand and if you've got time to kill, a fun project to try! Happy candle making!