Showing posts with label powdered sugar. Show all posts

Thursday, June 26, 2014

Strawberry "Cheesecakes"

I don't like cheesecake. Is that weird? I love most desserts but cheesecake I just can't wrap my head around. However, these cheesecakes I devoured almost the second I was done making them. They're easy to make and, dare I say, they're healthy! Ok, they're healthier than an actual slice of cheesecake. These would be a great dessert option for the person who doesn't want a heavy cake or pie on their plate but something light and sweet instead!


To make these you'll want to grab:

* At least a dozen strawberries
* 4 oz. of cream cheese
* 1/4 cup of powdered sugar
* A splash of vanilla extract
* (optional) Chocolate chips for melting
* (optional) Graham crackers for sprinkling on top


Start by cutting off the stems of the strawberries (so they'll be able to stand on their own) and slice an "X" halfway through the strawberry. Do not cut all the way through or you'll have one heck of a mess!


In a mixer, combine the cream cheese, powdered sugar, and vanilla. Once combined, pour it into a plastic bag, cut off a corner of the bag, and fill the strawberries in the "X" you just made.


Melt some chocolate chips in the microwave at 10 second intervals (as you don't want them to burn) and lightly drizzle over the strawberries. I recommend crumbling up some graham crackers too, to act as the "crust" of your cheesecakes.

And that's it folks! Fast, easy, and if you stick them in the fridge until they harden, they're addicting as well!


TOTAL COSTS: About $12.50 to make as many strawberries as you can! (prices from Vons)
$2.99/lb. for strawberries
$1.99 for cream cheese
$2.49 for powdered sugar
$2.50 for chocolate chips
$2.50 for graham crackers
Made my own vanilla extract

TOTAL AMOUNT OF TIME: 20 minutes to make 12

EASY-PEASY SCALE (1 super easy - 5 very difficult): 2 out of 5
It's really quite simple - the only thing you have to watch out for is not burning the chocolate in the microwave. Piping the cream cheese filling into the strawberries would be easier if there was someone holding the strawberries open but I did these by myself without any problems!

Sunday, June 22, 2014

DIY No-Bake Candy Buttons!

If you were a child of the 90's (heck, if you were a child of the 1930s!) you're familiar with candy buttons, or candy dots. They're drops of colored sugar on a piece of paper. While they're a classic of everyone's childhood (ok, most people), they did have a couple of disadvantages:

1. You always had paper stuck to the bottom of them and you subjected yourself to eating paper.
2. You were stuck with the three flavors made - cherry, lime (the blue ones), and lemon.

But did you know you can make your own? With the help of some Jello and wax paper, you can pick any flavors you want (grape, orange, berry blue - you name it) and not have to deal with eating paper anymore!

Here's what you'll need to make your own candy buttons:

1. White card stock paper
2. Wax paper
3. Jello (I chose cherry, orange, and lemon)
4. Powdered sugar
5. An egg white
6. Scissors
7. Double-sided tape
8. Plastic bags (for however many flavors you're making. 3 flavors = 3 bags)


Start by cutting your paper into 2"x11" strips (1 sheet of paper should get you 4 strips).


Do the same for the wax paper - cut four strips of 2"x11" wax paper.


Use double sided tape to attach the wax paper to the card stock.


Mix together 1 1/2 cups of powdered sugar with 1 egg white in a mixer for 3-4 minutes.


Divide the mixture into as many bowls as you have flavors. Add 1/4 tsp. of Jello powder to each bowl.


Put each mixture into it's own plastic bag, cut off a bit of the corner, and squeeze the filling through the bag onto the wax paper. I did four rows of each color but however you want to divide it up is totally up to you.


Let them harden overnight and that's it! Your homemade candy buttons are ready to be eaten! The great thing about choosing the flavors you want is that you can color-coordinate with whatever holiday is nearby (red/white/blue for 4th of July, green/red for Christmas, and the ones I made look ideal for Valentine's Day).

Be warned: you'll have enough to make quite a lot! I made 8 paper strips and probably could have made 9!


TOTAL COSTS: About $12 to make 288 buttons, or 8 strips of 36 buttons
$.99/box of Jello
$2.49 for powdered sugar
$2.49 for a dozen eggs (but you only need 1 egg white)
$4.09 for double-sided tape
$2.09 for box of sandwich bags
Wax paper, card stock, and scissors already on hand

TOTAL AMOUNT OF TIME: About 40 minutes + overnight to harden
15 minutes to cut out the paper and wax paper strips (though I used a ruler and was very exact, which took time)
15 minutes to whip up the powdered sugar and egg white and to add the Jello powder
10 minutes to pipe on four sheets
Overnight to harden

EASY-PEASY SCALE (1 super easy - 5 very difficult): 2 out of 5
The only "difficult" part might be getting even-sized dots, if you're not used to piping. However, the more you do it, the easier it'll be and this project certainly gives you enough to practice with!

Monday, May 26, 2014

Pinata Cookies for Memorial Day or 4th of July!

Ok, you're probably wondering, "What the heck is a pinata cookie?" Well, you know what a pinata is, right? It's something that's decorated and filled with candy that once hit in the air with a stick, candy falls out for children to collect. Well, similar idea... it's a cookie with candy inside that falls out once cracked open! Tablespoon came up with this recipe but I added a few of my own recommendations.

First, gather your ingredients:

1. The original post used 3 tubes of 16.5oz of Pillsbury Sugar Cookie Dough but I found it was cheaper to buy 2 containers of Betty Crocker Sugar Cookie mix and have the eggs and butter for them. It'll come out to 24 cookies total.
2. Mini M&Ms
3. Powdered sugar & milk for the frosting in between the cookies (unless you have cake frosting on hand)
4. Cookie cutters
5. Food coloring
6. (optional) Flour

Start by preheating your oven to 350 and making your dough (or taking the tubes) and splitting them evenly into three bowls.


Color one bowl with red and the other bowl with blue food coloring (so they can be patriotic cookies!)


I recommend adding 1/4 cup of flour into each bowl, otherwise the dough won't have a great consistency for rolling out.


Now there are many ways you could combine these. You could take a little bit from each bowl, ball them up together, and roll it out to make a pretty marble (NOTE: if you do this too much, your dough will just taste like food coloring and come out purple!)


Another way is to take all three colors, set them next to each other, and roll them out.


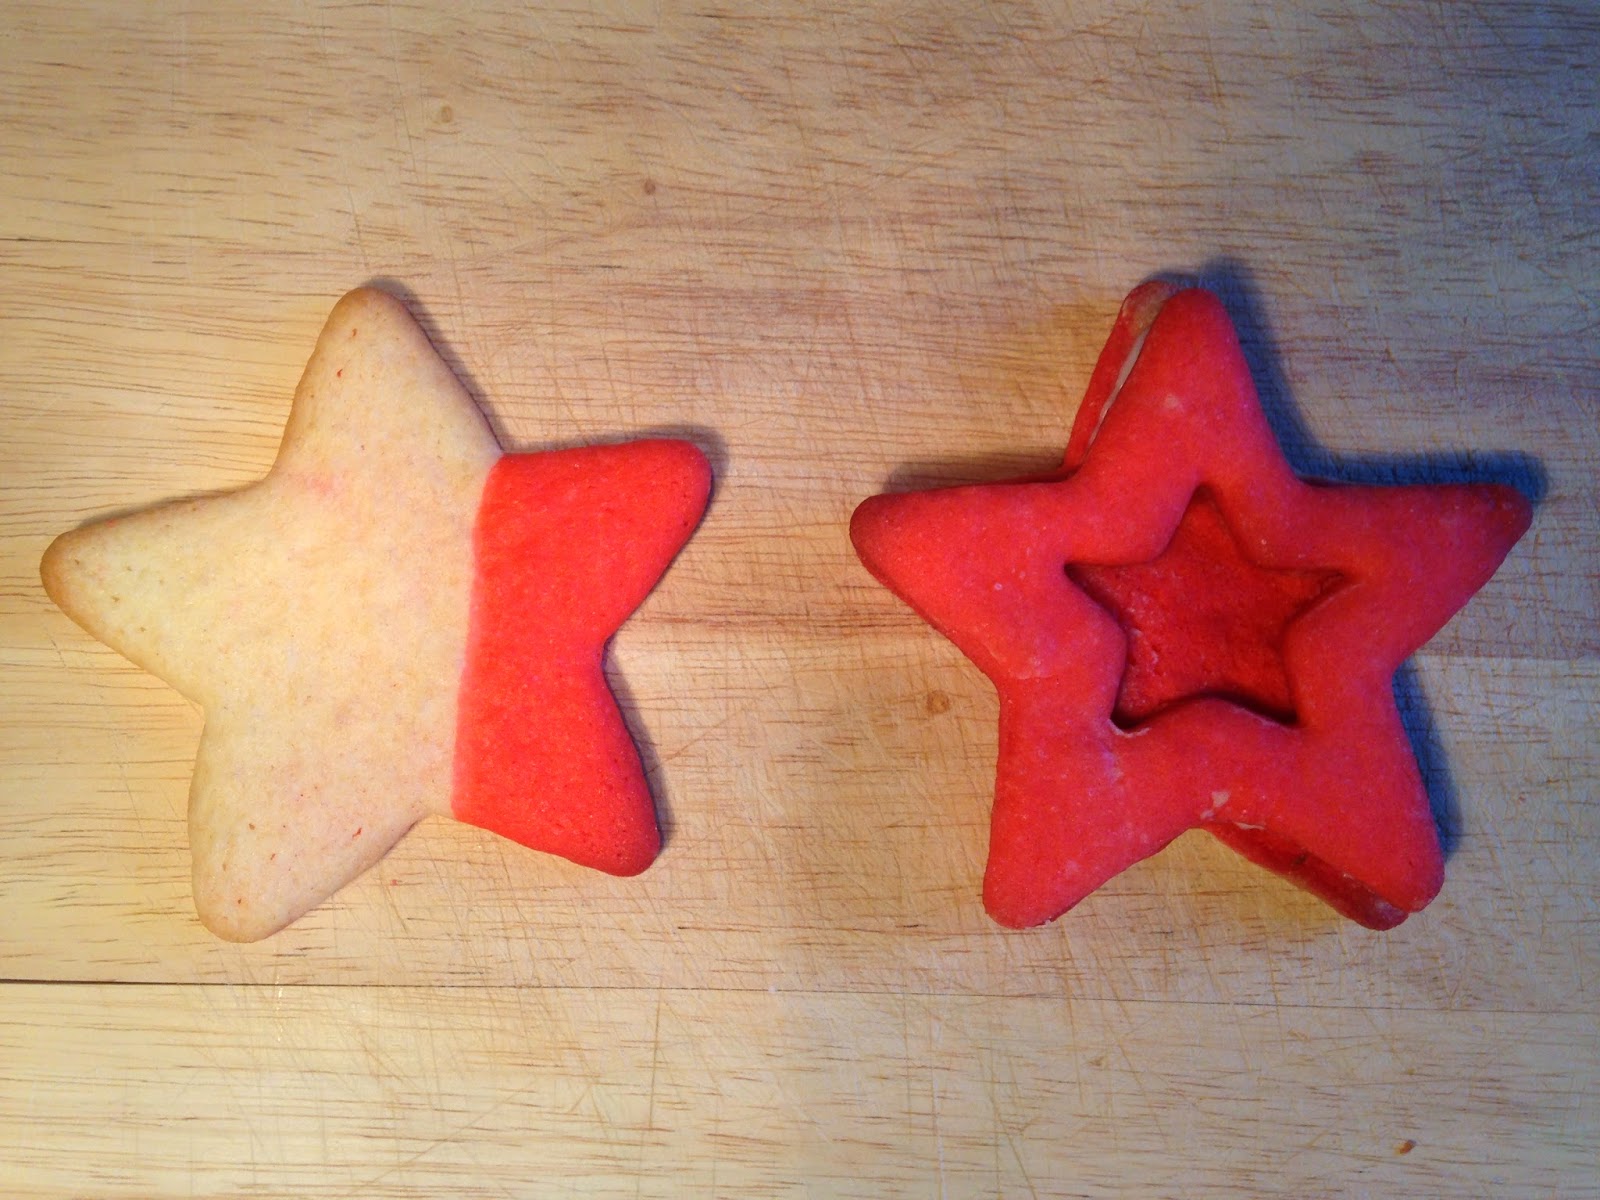
Take your big cookie cutter, cut out your stars, and lay the cookies out on cookie sheets with parchment paper. You'll need 3 big cookies to equal 1 pinata cookie (so there's a top, a middle, and a bottom). For the middle cookie, cut out a piece where the M&M's will eventually be housed. I only had stars so I just cut out a little star but it could be any shape, since no one will see it. The flatter/thinner you can make the cookies, the better!


While these are baking, separate out your blue and red mini M&M's from the rest of the batch.


To assemble the cookies, start by laying out your top, middle and bottom cookies.


Next, flip over the bottom layer cookie so the bottom is facing you.


Add your frosting around the edges (I used 2 cups of powdered sugar with 8 teaspoons of milk which equalled WAY too much frosting so you might want to just use 1 cup of powdered sugar with 4 teaspoons of milk).


 Lay the middle layer cookie on top of the frosting.


Add frosting around the edges again and add your M&Ms to the center.


Place the top layer cookie on top and voila! Your pinata cookie is complete!


Now keep in mind... this is three cookies in one. It's a lot 'o cookie. And you won't be able to get many M&M's in one cookie (the photo below is for presentation only so don't let photos like this fool you!). Still, they're moist and there's candy and really, what more could you want?


TOTAL COSTS: About $13 (if you don't have any of the ingredients - prices from Vons)
$5 for 2 packages of Betty Crocker sugar cookie mix
$3.99 for mini M&Ms
$2.49 for powdered sugar
$2.29 for milk
Cookie cutter and food coloring already on hand

TOTAL AMOUNT OF TIME: 3 hours, 15 minutes to make all 72 cookies or 24 pinata cookies
50 minutes to prep the dough
15 minutes to separate out the M&Ms
1 hour, 50 minutes to bake
20 minutes to assemble them all

EASY-PEASY SCALE (1 super easy - 5 very difficult): 3 out of 5
They take a long time to make, between the mixing of the colors, the separating of M&Ms, the cutting out the stars and the middles... it's only worth it when you see the look on people's faces when they realize they're getting three cookies in one!

Sunday, February 16, 2014

Red Velvet Cinnamon Truffles

Many people really enjoyed my post about Oreo Peppermint Truffles so in the spirit of American Heart Month (and Valentine's Day), I saw this post about red velvet truffles and wanted to try them with a hint of cinnamon on top. Now let me point out this recipe is in no way heart-healthy, I'm simply associating it with American Heart Month because it's red. So, with that being said, let's get started!

You can either make the red velvet cake from scratch, or you can buy mix from the store like I did and save yourself some time and energy. Along with that, you'll need:


* Cream cheese (original post calls for 3oz. but because I bought a cake mix, I used 8oz.)
* White chocolate coating (original post calls for 12oz. but I used 16oz. of vanilla candy coating)
* Powdered sugar (original post calls for 1/2 Cup but I used 2 Cups)
* (optional) Cinnamon imperials for the top of the truffles


Make your red velvet cake first. It doesn't matter how it looks because you're going to be breaking it up into crumbs later. So don't worry if you try flipping the cake onto a cooling rack and you accidentally tear off the bottom of the cake that's still stuck to the pan... like some people... ahem...


Once your cake is baked and cooled, start to combine your cream cheese and powdered sugar in a bowl.


Next, crumble up your cake and start to add it to the bowl.


Using a Tablespoon, scoop out some mix and using the palms of your hands, roll into balls and place onto a plate. Note: your hands are going to get very messy!


Now the original post says to put them in the fridge for at least 4 hours... well, I did 30 minutes in the fridge and about 20 in the freezer and they were fine. During this time, melt your chocolate so it's ready by the time you take your cake balls out. Shouldn't take too long to melt at all.


Dip your cake balls into the chocolate and place on a plate.


If you like, you can decorate each with three cinnamon imperials. Note that even with 16 oz. of chocolate, I was only able to cover 28 of the 45 truffles.


Place back in the fridge to harden and take out when you're ready to devour!


TOTAL COSTS: About $13 to make 45 truffles (all prices are from Vons)
$1.99 for cake mix
$1.99 for powdered sugar
$1.99 for Cream cheese
$4.49 for CandiQuik
$1.99 for cinnamon imperials

TOTAL AMOUNT OF TIME: About 2 hours, 45 minutes
35 minutes to make the cake
20 minutes to let cake cool
40 minutes to make balls
30 minutes to let balls harden in fridge
20 minutes to let balls harden in freezer
20 minutes to put chocolate and cinnamons on balls

EASY-PEASY SCALE (1 super easy - 5 very difficult): 2 out of 5
It's practically a cake walk (har har) - the only "difficult" thing is to keep an eye on the chocolate so it doesn't burn. Other than that, they're as delicious as they look!

Sunday, February 9, 2014

Scrabble Cookies

While trying to find unique Valentine's Day sweets, I came across this post on Instructables and thought, "That's perfect! It looks so easy and with so few ingredients needed, I'll give it a shot!" Little did I know this was a lot harder than it looked... still, if you want a unique treat, here's what you'll need:


1. Sugar Cookie Mix (or you can make them from scratch if you're fancy like that!)
2. 1 stick of butter
3. 4 eggs (1 for the cookie mix, 3 for the icing)
4. Flour (for the table)
5. 4 cups of powdered sugar
6. 1 t of vanilla
7. Black icing

First, make your sugar cookies, either from scratch or following the recipe on the back of the cookie mix. Once made, roll out the dough onto a floured surface to 1/4" thick. Make sure to flour your rolling pin, as it will get sticky.


Cut your tiles as small as you like. Regulation Scrabble tiles seem to be 3/4"x3/4" but I made some smaller and some larger than that. Totally up to you how big to size your cookies.


Once they're all cut, I recommend placing them on parchment paper, though you certainly don't have to. I was able to make 114 cookie squares.


Place them in the oven for 8-9 minutes at 375 degrees. Once they're done baking, let them cool and start on the icing. I decided to follow this recipe for royal icing and you will have a LOT of leftover icing so I recommend cutting the recipe in half. However, if you want to make the full recipe and save some icing for later, mix 3 egg whites in a mixer until they're frothy. Then add 1 cup of powdered sugar at a time.


Once all the sugar is added, place the mixer on high until the icing peaks. It'll take a little while, about 5 minutes, so don't be discouraged if it's too runny at first.


Now frosting these little squares as perfectly as the original post was not easy. I tried different methods, to see what worked best:

Worst method: trying to frost X's on a bunch, then going back and spreading them with a toothpick. The reason this didn't work was because the frosting hardened so fast that it ended up looking like a mess.


OK method: frosting one at a time and using a toothpick to smooth it out. It was really time consuming but it did the job.


Best method: Frosting thick outlines and then the inside of the squares all in one swoop.


Once the frosting hardens, which doesn't take long at all, best of luck in piping on the letters and numbers. You need a really steady hand, especially if your tiles are small. And I only ended up piping a quarter of the tiles because it was so time-consuming.


Play a round of Scrabble with your friends, your partner, whoever you like and try not to eat your hand!


TOTAL COSTS: About $18 to make 114 cookies (if you don't own any of the ingredients - prices from Vons)
$2.50 for sugar cookie mix
$1.99 for powdered sugar
$2.99 for black icing gel
$2.39 for eggs
$.99 for butter
$4.99 for vanilla
$1.99 for flour

TOTAL AMOUNT OF TIME: About 2 1/2 hours
1 hour and 30 minutes to make dough, cut into tiles, and bake
15 minutes to make icing
30 minutes to frost all the tiles
15 minutes to pipe on letters (though I only got through a quarter of the tiles)

EASY-PEASY SCALE (1 super easy - 5 very difficult): 4 out of 5
If you don't have a steady hand, the letters and numbers will come out uneven and your lines won't be straight. If you go in not expecting this to look exactly like the original post, then you'll have fun and will make something your friends and family will enjoy!