Showing posts with label cream cheese. Show all posts

Saturday, September 6, 2014

Penne Pasta with Spinach Sauce

I'm not a big proponent of vegetables but this penne with spinach recipe I found on CookingChannelTV is one of my favorite dishes and I had to share it. It's super easy to make, it feeds a lot of people, and doesn't take much time to put together. Plus, if it's wicked hot outside, it doesn't require an oven so it won't turn you into a pool of sweat.

Here's what you'll need (and what I recommend):

1 box/pound of whole wheat penne pasta
3 garlic cloves
2 ounces of goat cheese
1 ounce of cream cheese
3/4 teaspoon of salt
1/2 teaspoon of pepper
6 ounces of spinach leaves
Parmesan cheese for topping (optional)

And while it's not listed, I recommend adding 1-2 ounces of pesto sauce!

Start by boiling your water for your pasta.


Once the water is boiling, add your pasta and let it cook for about 12 minutes.

While the pasta is cooking, prepare your other ingredients. If you have a food processor, add your garlic, goat cheese, cream cheese, salt, pepper, and half of your spinach and blend until it's smooth (if you have pesto, now would be the time to add it!). I don't have a food processor so I just chopped up the garlic and spinach by hand and then added everything into a bowl.


At this point, your pasta should be ready to be drained, however you will want to save a cup or so of your pasta water. You might need it later.


Put the other half of your spinach in a bowl and place your pasta on top.


Add the spinach sauce and toss to coat, adding enough of the pasta water to moisten (I ended up only using about a 1/4 cup). I find it helps to toss it by putting a bowl on top and shaking the two bowls. If that doesn't work, a wooden spoon will do the trick!


Add a little parmesan cheese and there you have it kids - a quick, delicious, and (somewhat) healthy meal you can put together in no time!


TOTAL COSTS: About $10
$1.49 for a box of whole wheat penne pasta
$.69 for garlic
$3.99 for 4 ounces of goat cheese
$.79 for 2 ounces of cream cheese
$.99 for salt
$1.99 for 8 ounce bag of spinach
Parmesan cheese and pepper already on hand

TOTAL AMOUNT OF TIME: Almost exactly 30 minutes

EASY-PEASY SCALE (1 super easy - 5 very difficult): 1 out of 5
You don't have to worry about burning, sautéing, brining, anything really technical. If you can boil water, you can make this dish!

Thursday, June 26, 2014

Strawberry "Cheesecakes"

I don't like cheesecake. Is that weird? I love most desserts but cheesecake I just can't wrap my head around. However, these cheesecakes I devoured almost the second I was done making them. They're easy to make and, dare I say, they're healthy! Ok, they're healthier than an actual slice of cheesecake. These would be a great dessert option for the person who doesn't want a heavy cake or pie on their plate but something light and sweet instead!


To make these you'll want to grab:

* At least a dozen strawberries
* 4 oz. of cream cheese
* 1/4 cup of powdered sugar
* A splash of vanilla extract
* (optional) Chocolate chips for melting
* (optional) Graham crackers for sprinkling on top


Start by cutting off the stems of the strawberries (so they'll be able to stand on their own) and slice an "X" halfway through the strawberry. Do not cut all the way through or you'll have one heck of a mess!


In a mixer, combine the cream cheese, powdered sugar, and vanilla. Once combined, pour it into a plastic bag, cut off a corner of the bag, and fill the strawberries in the "X" you just made.


Melt some chocolate chips in the microwave at 10 second intervals (as you don't want them to burn) and lightly drizzle over the strawberries. I recommend crumbling up some graham crackers too, to act as the "crust" of your cheesecakes.

And that's it folks! Fast, easy, and if you stick them in the fridge until they harden, they're addicting as well!


TOTAL COSTS: About $12.50 to make as many strawberries as you can! (prices from Vons)
$2.99/lb. for strawberries
$1.99 for cream cheese
$2.49 for powdered sugar
$2.50 for chocolate chips
$2.50 for graham crackers
Made my own vanilla extract

TOTAL AMOUNT OF TIME: 20 minutes to make 12

EASY-PEASY SCALE (1 super easy - 5 very difficult): 2 out of 5
It's really quite simple - the only thing you have to watch out for is not burning the chocolate in the microwave. Piping the cream cheese filling into the strawberries would be easier if there was someone holding the strawberries open but I did these by myself without any problems!

Saturday, March 15, 2014

Girl Scouts Thin Mint Truffles

Ok, the title should have done the trick to get you to try this recipe. I found this post on SixSistersStuff and it's nothing short of amazing. Who needs drugs or alcohol when there's Girl Scouts cookies in the world?! And to make them St. Patrick's appropriate, they're green! To make these oh-so-delicious treats for your little leprechauns, you'll need:


1 box of Girl Scouts Thin Mint Cookies

4 oz. of cream cheese (though to be honest, I probably used 6oz)

Candy coating

Green food coloring

The original post also used green mint chips but I couldn't find any so I left them out of the recipe.


If you own a food processor, go ahead and put the two package of Thin Mints from the box in there and pulse until they're crumbs. If you're like me and don't own anything that fancy, grab a plastic bag and a hammer and get to pounding!


Once the Thin Mints are but mere crumbs, add your cream cheese. Now as I said, I had to add more creme cheese than what was recommended because there were so many crumbs, but I didn't want to have to throw any away!

Using your hands, take the Thin Mint/cream cheese mixture, roll it into a ball, and place on a cookie sheet lined with wax paper. I was able to make 18 truffles of various sizes. Once they're rolled up and on wax paper, stick them in the fridge for 30 minutes to harden.


Meanwhile, melt your candy coating (I usually do this in the last 5 minutes of waiting for the truffles to harden).

Now you can dye the chocolate, add peppermint extract, do whatever you like! I dyed half of it white and half green, drizzled some on top, and added sprinkles. Place them back in the fridge to harden and voila! Your very own Thin Mint truffles!


TOTAL COSTS: About $10
$4 for a box of Girl Scout Thin Mint Cookies
$4.49 for CandiQuik
$1.99 for 8oz. of cream cheese

TOTAL AMOUNT OF TIME: 1 hour
20 minutes to make the truffles
30 minutes to let harden in the fridge
10 minutes to cover in candy coating/chocolate

EASY-PEASY SCALE (1 super easy - 5 very difficult): 2 out of 5
It's a no-bake recipe so it's not difficult at all, it can just get a bit messy when you're making the balls and you have to be careful not to burn the chocolate, but other than that they're....ummm... well, now in my stomach. Oops.

Sunday, February 16, 2014

Red Velvet Cinnamon Truffles

Many people really enjoyed my post about Oreo Peppermint Truffles so in the spirit of American Heart Month (and Valentine's Day), I saw this post about red velvet truffles and wanted to try them with a hint of cinnamon on top. Now let me point out this recipe is in no way heart-healthy, I'm simply associating it with American Heart Month because it's red. So, with that being said, let's get started!

You can either make the red velvet cake from scratch, or you can buy mix from the store like I did and save yourself some time and energy. Along with that, you'll need:


* Cream cheese (original post calls for 3oz. but because I bought a cake mix, I used 8oz.)
* White chocolate coating (original post calls for 12oz. but I used 16oz. of vanilla candy coating)
* Powdered sugar (original post calls for 1/2 Cup but I used 2 Cups)
* (optional) Cinnamon imperials for the top of the truffles


Make your red velvet cake first. It doesn't matter how it looks because you're going to be breaking it up into crumbs later. So don't worry if you try flipping the cake onto a cooling rack and you accidentally tear off the bottom of the cake that's still stuck to the pan... like some people... ahem...


Once your cake is baked and cooled, start to combine your cream cheese and powdered sugar in a bowl.


Next, crumble up your cake and start to add it to the bowl.


Using a Tablespoon, scoop out some mix and using the palms of your hands, roll into balls and place onto a plate. Note: your hands are going to get very messy!


Now the original post says to put them in the fridge for at least 4 hours... well, I did 30 minutes in the fridge and about 20 in the freezer and they were fine. During this time, melt your chocolate so it's ready by the time you take your cake balls out. Shouldn't take too long to melt at all.


Dip your cake balls into the chocolate and place on a plate.


If you like, you can decorate each with three cinnamon imperials. Note that even with 16 oz. of chocolate, I was only able to cover 28 of the 45 truffles.


Place back in the fridge to harden and take out when you're ready to devour!


TOTAL COSTS: About $13 to make 45 truffles (all prices are from Vons)
$1.99 for cake mix
$1.99 for powdered sugar
$1.99 for Cream cheese
$4.49 for CandiQuik
$1.99 for cinnamon imperials

TOTAL AMOUNT OF TIME: About 2 hours, 45 minutes
35 minutes to make the cake
20 minutes to let cake cool
40 minutes to make balls
30 minutes to let balls harden in fridge
20 minutes to let balls harden in freezer
20 minutes to put chocolate and cinnamons on balls

EASY-PEASY SCALE (1 super easy - 5 very difficult): 2 out of 5
It's practically a cake walk (har har) - the only "difficult" thing is to keep an eye on the chocolate so it doesn't burn. Other than that, they're as delicious as they look!

Monday, January 27, 2014

Green Grape Salad - Can 450 People Be Wrong?

So I came across this recipe on AllRecipes and though, "My gosh, that sounds disgusting." However, I checked out the reviews and 455 people gave it four or five stars. I was shocked. Comments like, "This recipe is a crowd pleaser!", "This was awesome!" and "This is the best grape salad" are just a handful of complimentary comments on the recipe's website. However, listen to the ingredients:

* Sour cream
* Cream cheese
* Grapes
* Sugar
* Vanilla
* Brown Sugar
* Pecans

Well, maybe it won't be so bad after all. So here's what you do (note: I adjusted the measurements to be for 2 servings):

1. Mix together 8 oz. of cream cheese and sour cream, 2 Tablespoons of sugar and 1/4 teaspoon of vanilla.

2. Next, add in 1 lb. of freshly-washed seedless green grapes until they're all covered.


3. Add in your ounce of chopped pecans and 1 1/2 teaspoons of brown sugar and you're done!


And there you have it, kids... green... grape... "salad"...


Ok, what am I missing here? I'm with the .0001% of commenters when they say, "I thought this salad was terrible and looked awful." I would also like to mention it smells terrible, but that's because of the sour cream.

So I need your help: make this recipe and tell me what you think. Did you like it? Did you hate it? What would you change? Me personally, I would cut the sour cream and cream cheese in half... you really don't need to douse those poor grapes. More pecans and more brown sugar couldn't hurt, either. Or, better yet, just drop the whole shebang and just eat grapes as they're intended to be eaten. Raw. Without crap on them.

TOTAL COSTS: About $20 (prices from Vons)
Grapes - $2.27
Cream cheese (8oz.) - $2.39
Sour cream (8oz.) - $1.99
Sugar - $2.69
Brown sugar - $2.49
Vanilla - $4.99
Pecans - $2.99

TOTAL AMOUNT OF TIME: 15 minutes

EASY-PEASY SCALE (1 super easy - 5 very difficult): 1 out of 5
It's super easy to make - you just combine the 8 ingredients - however eating it and enjoying it might be a 5 out of 5...

Friday, December 6, 2013

Oreo Peppermint Truffles

Oreo. Peppermint. Truffles. Three of my favorite things rolled into one! They're perfect for a cookie exchange or a holiday party you might be hosting, they don't require an oven, and they're super easy to make! This recipe comes to us from Cooking Classy.

Ok, so here's what you'll need:

1 Package of Oreo's (NOT double-stuffed)

16 oz. of white chocolate (I realized after I bought them I had CandiQuik, a vanilla candy coating, instead of white chocolate. It still worked!)

8oz. cream cheese (the "whipped" kind worked great!)

1 t peppermint extract

Crushed peppermints (I used 10)

Plastic bags & a hammer or rolling pin (or a food processor if you have one)

Wax paper and cookie sheet

So the first mistake I made was using a VitaMix blender to try and crush the Oreos. Big mistake and big waste of time. I ended up transferring the Oreos to a plastic bag and using a rolling pin to crush them instead.

Once the Oreos are crushed, mix the cream cheese and peppermint extract in a bowl. Now I know the instructions say to add the cream cheese mix to the Oreos but I did it the other way around and it worked just fine. 

Once you've mixed it thoroughly, then it's time to get your hands dirty! I used a big spoon to scoop out the mixture and the balls were formed quite easily. Put them on the wax paper that's on the cookie sheet and stick 'em in the freezer for 10 minutes. The original post claims you can make 36, I was lucky to get 24.

While they're in the freezer, get out your peppermints and start crushing those as well. It's times like this I wish I had a food processor. Instead, I have two plastic bags and a hammer. Double bag those suckers (incase you make a hole in the bag like I did) and crush those bad boys! It's also a nice stress reliever.

Once those are crushed, it's time to melt your chocolate. Now here's the second mistake I made: I burned the chocolate. While I was able to melt it in two minutes on the stove, I was also able to slightly burn it, which resulted in some chunks in the chocolate. However, once you dunk the Oreo balls in the chocolate and sprinkle with peppermint pieces, you can't even tell!

And voila! A yummy peppermint chocolate treat!


TOTAL COSTS: About $16 (assuming you need all ingredients - prices from Vons)
$3.99 for Oreos
$4.49 for CandiQuik
$2.99 Peppermint extract
$1.99 for Cream cheese
$3 for 2 packs of peppermints

TOTAL AMOUNT OF TIME: Almost an hour to make 24
10 minutes with the blender (that didn't work)
5 minutes with rolling pin after that to crush Oreos
5 minutes mixing in cream cheese, peppermints, and Oreos
10 minutes to roll into balls
10 minutes in the freezer (which was enough time to melt chocolate and crush peppermints)
15 minutes to dip in chocolate and cover in peppermint

EASY-PEASY SCALE (1 super easy - 5 very difficult): 2 out of 5
The only difficult thing was crushing the Oreos and the peppermints but it wasn't that hard, just tedious. It's worth it in the end, though, I assure you!

Thursday, October 24, 2013

5 Minutes or Less Halloween Ideas

If you just found out you're hosting a Halloween party and you only have 20 minutes to get ready (I don't think that would actually happen but lets pretend, shall we?), here are four 5-minute ideas to get your place ready! And all of this didn't cost me a thing because I already had all the supplies so hopefully you do too!

Mmmm...bloody bandaids....
#1 - The food

Cookies take too long to make and you don't have time to run to the store. What do you do? Grab some ingredients out of your cupboards and fridge and make these Band-Aid Appetizers from Likes.com.

INGREDIENTS: Graham crackers, cream cheese, and jelly
TOTAL AMOUNT OF TIME: 4 minutes, 45 seconds to make 9.
Notice that I didn't flatten out the cream cheese and make it square but if you get your kids to make these, they probably won't either!
EASY-PEASY SCALE: 1 out of 5. They're so easy to make and they'd be a fun project for the kiddos! Now whether they taste any good... well... that's up to your taste buds.

#2 - The mood

Pumpkin silhouette
So you don't have any fake cobwebs laying around? No zombies? That's ok, you can still make your space spooky! Cut out black paper, or print on black ink and cut out, different designs like jack o'lantern faces or bats! If you want to be really fancy, you could cut out one of these templates from Martha Stewart but it would take more than 5 minutes. Anyone else wish there was a face of Martha Stewart template to cut out? Maybe I'd only be spooked by that...
Bat silhouette

SUPPLIES NEEDED: Paper, scissors, tape (I recommend double-sided but if you don't have any, just make loops) and tape to the front of the design and the inside of the lampshade. Remember not to show the tape outside of the design or it will show through!
TOTAL AMOUNT OF TIME: 4 minutes, 25 seconds
2 minutes, 25 seconds for the bat, 1 minute 30 seconds for the jack o'lantern, and 1 minute to tape them inside of lampshades
EASY-PEASY SCALE: 2 out of 5. It depends on how difficult of a design you're cutting out but again, something the kids could do and looks great! Just remember not to have paper too close to the hot lightbulb or you might have another kind of scary night!

#3 - The oooed (just go with it)

Mummy
What if the electricity has gone out? Well, put those candles to good use! This post from Thrifty Decor brings to "light" two different ideas and they're super quick and easy!
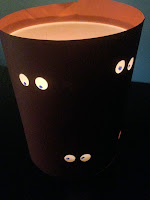
Creepy eyes
SUPPLIES NEEDED: For the mummy: Gauze or cheesecloth, googly eyes (I used Wilton Candy Eyeballs but you could easily cut eyes out of paper), candle, mason jar, glue. For creepy eyes: dark paper, scissors, tape, marker, hole puncher, candle, and candle holder
TOTAL AMOUNT OF TIME: 2 minutes, 25 seconds for the mummy and 2 minutes, 30 seconds for the creepy eyes
EASY-PEASY SCALE: 2 out of 5. Again, very easy and very quick to put together. I didn't even tape the gauze for the mummy, I just tucked it in in the back and I didn't glue the eyes on but you certainly can. And while the original creepy eyes calls for strips of paper with eyes cut out, I opted for one sheet of paper wrapped around the candle holder to save on time, taped the paper to the holder, then punched out eye holes. I probably should have drawn the pupils bigger, though.

Tissue ghosts
#4 - The booed

I used to make these as a kid and when I saw this post, I was so happy to see Jen Banks at A Busy Mommy does it for her kids as well! This is probably my favorite but for sentimental reasons.

SUPPLIES NEEDED: Tissues, string or yarn (I used black thread which is harder to see from far away), and a marker
TOTAL AMOUNT OF TIME: 1 minute per ghost (I made three), and 30 seconds to hang per ghost...unless you have a really difficult chandelier
EASY-PEASY SCALE: 1 out of 5. As I said, I used to make these as a kid so they're really easy to make. The most tissue ghosts, the better!

Happy Halloween!

Friday, October 18, 2013

Killer Cleaver Cupcakes

I was invited to a pumpkin carving party and thought, "What would be a good, easy, and cheap dessert that would impress but also scare folks?" And then I came across this post and thought, "Those cupcakes are AWESOME! I can do that!" And so can you. It's a lot easier than you might think!

I may have cut my finger one too many times...
Here's what you need:

#1 - Red Velvet Cake Mix

#2 - Cream Cheese Frosting (either store bought or you can make it from scratch - I used this recipe)

#3 - Meat cleavers (found on Amazon - they were $7.99 when I bought them, now $10.11)

#4 - Red food coloring

I couldn't find any website that explained how to make the blood splatter so I had to improvise... I used my breath. After frosting all the cupcakes (I made 2 dozen), I dropped 1 drop of food coloring onto the middle of the cupcake and blew in whichever direction the drop wanted to go, and then blew in the opposite direction to keep the bead of liquid going.

One suggestion? Put the cleavers on AFTER the "blood" is on, otherwise you'll be blowing around it and the design won't be as cool (you can tell by the photo which were successful and which weren't).

The success of these cupcakes has gotten me involved in a decorating contest provided by Duff's Cakemix ("Ace of Cakes", anyone?). If you have Pinterest, please oh please repin my cupcakes (I'm not hesitant to beg!) - http://www.pinterest.com/duffscakemix/halloween-online-decorating-contest/


TOTAL COSTS: About $17.50

Ingredients = $7.61 at Vons in Los Angeles ($4.79 for 16 oz. cream cheese, $2.82 for Duncan Hines Red Velvet Cake Mix, and all other ingredients I already owned such as butter, oil, powdered sugar, eggs, and vanilla)


Foil baking cups = $1.93


Meat cleavers = $7.99 on Amazon


TOTAL AMOUNT OF TIME: About 1 hour
This includes the 25 minutes of baking time for the cupcakes, the making of the frosting from scratch, and the decorating!

EASY-PEASY SCALE: 1 out of 5
This is super easy, especially if you're not making the cupcake mix from scratch. Heck, you don't even have to make the frosting from scratch if you don't want to! Grab your friends, your kids, that stranger in the creepy house, and make these creepy cupcakes that'll definitely make an impression for Halloween!