Showing posts with label bread. Show all posts

Wednesday, July 30, 2014

Simplified Lemon Poppy Seed Bread

Why do I call this "simplified" lemon poppy seed bread? The original post goes into such excessive detail, you begin to wonder if author lives in a white home with padded walls. I'm telling you, it's on the side of ridiculous. So I'm going to take this post from CookingClassy and try to simplify it for you. It's delicious bread so I don't want instructions like, "Allow to cool 5 minutes in loaf pan (and no longer than 8 minutes)" to deter you from trying it out yourself because of how annoyed you are by their instructions!

Here's what you'll need:

1 2/3 cups of flour
2 Tablespoons of poppy seeds
1 teaspoon of baking powder
1/2 teaspoon of salt
1 cup of sugar
2 Tablespoons of lemon zest (they say 3 lemons, I used 2 without any problems)
1/2 cup of unsalted butter at room temp.
3 eggs
1/2 teaspoon of vanilla extract
1/4 cup + 2 Tablespoons of sour cream (see what I mean?)
1/4 cup of milk
2 Tablespoons of lemon juice

For the glaze:
1/4 cup of sugar
3 Tablespoons of lemon juice

Start by preheating your oven to 350, take your bread pan, coat it with PAM (or butter) and flour the inside of the pan. Trust me, it'll make it a lot easier to get it out of the pan once all is said and done.


Grab a medium size bowl (not your mixer) and whisk together the flour, poppy seeds, baking powder and salt until combined (they say 20 seconds but honestly, who's counting??).


In your mixer, add your sugar and lemon zest.


Here it gets kind of ridiculous but using your fingertips, rub the lemon zest and the sugar together until the sugar becomes pale yellow. Hey, at least your fingers will smell delicious!


Add butter to the mixture and mix until it's fluffy. Be sure to scrape the sides to get it all whipped together. Add one egg at a time and finally, add the vanilla. Note: if you drop an eggshell and then accidentally put it on high instead of turning off the mixer, it's really frustrating getting all the shell pieces out... or... so I've been told... ahem...


In a small bowl, whisk together your milk and sour cream and heat in the microwave until warm (30 seconds and it'll start to curdle!)


Now here is where the instructions really start to annoy me. They want you to add 1/3 of the flour mixture to the mixing bowl, then 1/2 of the milk mixture, then 1 Tablespoon of lemon juice, then another 1/3 of the flour, 1/2 of the milk mixture, 1 Tablespoon of lemon juice, then the rest of the flour mixture. If you want to add all the ingredients this way, it's up to you, but I honestly don't see how this is going to affect the way the bread tastes. My advice? Just don't add the flour mixture all at once or you'll have a big mess to clean up!


Pour the dough into the bread pan and smooth out the top.


Bake for 40 minutes, cover it with foil (making sure the foil doesn't touch the bread), and then bake for another 10 minutes or until a toothpick inserted in the center comes out clean.


Now as I mentioned earlier, they want you to wait 5 minutes before removing the bread from the pan. While it's cooling, add your lemon juice and sugar in small bowl and heat for 15-30 seconds, or until the sugar has dissolved. This will serve as your "glaze".


Take the bread out of the pan and brush the top with the glaze. Give it a few seconds to absorb the first coat, and then add on another coat of glaze. The more glaze, the better (considering it's not very thick).


And there you have it, folks. The simplified version of lemon poppy seed bread! Try not to devour it all at once before your drug test...


TOTAL COSTS: About $25 (if you don't have any ingredients - prices from Vons)
$3.29 for flour
$6.29 for poppy seeds
$1.99 for baking powder
$.99 for salt
$2.69 for sugar
$.99 for 2 lemons (used lemon juice from lemons)
$.99 for butter
$2.79 for eggs
$1.99 for sour cream
$2.29 for milk
Used homemade recipe for vanilla extract

TOTAL AMOUNT OF TIME: 1 hour, 30 minutes
30 minutes to prep the dough
50 minutes in oven
5 minutes to cool
5 minutes to glaze

EASY-PEASY SCALE (1 super easy - 5 very difficult): 2 out of 5
Making bread isn't difficult, I assure you, it's just instructions like the original that make it sound more complicated than it actually is. The hardest part is making sure you don't burn the darn thing. Keep an eye on it and you'll do just fine!

Tuesday, April 15, 2014

Grilled Cheese Rolls

Let's be honest - there are only so many ways you can make grilled cheese. Places like The Melt and Heywood have made a name for themselves in gourmet grilled cheese and everyone in LA knows about the Grilled Cheese Food Truck, however when you're at home and it's time to face the grill, your options are limited. Sure you could add interesting ingredients like tomatoes or avocados, but it's still a sandwich, right? One night my husband told me about grilled cheese rolls and after doing a little Googling, I found RecipeSweet had a great take on an old classic and I figured, why the feta not?

To get started, it's quite simple. Bread. Cheese. A knife. A rolling pin.


Start by flattening all of your bread. I used a nut & grain bread which wasn't that easy to flatten, so white or wheat bread might be your best bet.


Next, cut off all the edges and lay a piece of cheese on top. I used American, since that's what the original post used, but feel free to change it up!


Very carefully roll up your bread with the cheese inside. I found it helped to press down once it was rolled up so it could keep its shape.


Place in a pan with olive oil, butter, whatever you choose, just so long as it allows the bread to be toasted. This was the hardest step for me - keeping the rolls in tact AND trying to grill them evenly. Since they're rounded, it's much more difficult to keep them evenly cooked.


Serve up a side of tomato soup and dunk those bad boys into the soup for a no-mess snack!


Now would I recommend this method over the traditional way of serving grilled cheese? No. The cheese didn't melt completely and if I turned up the heat, they ended up being slightly burnt. I'll stick with my traditional method, however this is definitely a fun way to serve up an old classic.

TOTAL COSTS: About $4
$1.99 for a loaf of bread
$2.99 for Kraft cheese singles

TOTAL AMOUNT OF TIME: 15-20 minutes
However, I made 8 slices

EASY-PEASY SCALE (1 super easy - 5 very difficult): 3 out of 5
In order to get the cheese to completely melt and the bread not to be burned, you have to use the right amount of olive oil or butter, keep a keen eye on it, and try not burn yourself throughout the process. I managed 2 out of 3 of those...

Monday, February 17, 2014

Cinnamon Pull-Apart Bread (or Elephant Ears Bread)

When I saw this post by RecipeSnobs, my mouth immediately started to water. I love cinnamon sugar, I love bread, but to actually make the loafs... I'm "meh"... so this was such a great alternative and trust me, it's an addicting one too. It's elephant ears without being fried, it's bread without the loaf, it's... it's... just... so... freaking... good...

Here's what you'll need:

For the dough:
2 3/4 cup plus 2 Tbsp. all-purpose flour
1/4 cup sugar
2 1/4 tsp. active dry yeast (1 packet)
1/2 tsp. salt
4 Tbsp. butter
1/3 cup whole milk (I actually used 2%)
1/4 cup water
2 eggs (original post recommends at room temperature but mine were straight from the fridge)
1 tsp. pure vanilla extract (I only had enough for half and it was fine)
For the filling:
1 cup sugar
2 tsp. cinnamon
1/4 tsp. nutmeg
4 Tbsp. butter, melted (though I only used about 3Tbsp.)
First, combine only 2 Cups of flour, the sugar, the yeast, and the salt.


While those are mixing away, melt your butter and milk in a small pan.


Once melted, add your water and vanilla. As I said, I only had 1/2 tsp. of vanilla and it still turned out amazeballs.


Put the pan off the burner and let sit for 5 minutes. While that's cooling, whisk together two eggs in a separate bowl.

Once the butter/milk mixture has cooled, slowly add it to the mixer with the dry ingredients.


Then add the eggs and 3/4 C of flour.


When the dough is sticky, place it in a greased bowl, cover it, and let it rise for 30-45 minutes (however long it takes to double in size). Mine took about 40 minutes to rise.


While the dough is rising, combine your sugar, cinnamon, and nutmeg in a small bowl.


During this time, I recommend:
1. preparing your workspace (i.e. - cleaning the area where you'll be rolling out the dough and laying down flour) 
2. melting 4T of butter in a bowl and
3. greasing your bread pan

Once the dough has risen, add 2 Tablespoons of flour and knead it in. Cover the dough and let it rest for another 10-15 minutes.


Once the dough is ready, roll it out on a floured surface to the thickness you desire and cover the dough with the melted butter. As I said, 3 Tablespoons was plenty for me, 4 was excessive.


Next, take that sugar/cinnamon/nutmeg combo and sprinkle it all over the dough. Trust me, there's no such thing as too much!

Once covered, take your knife or pizza cutter and make approximately 2" squares. It's not an exact science so don't be worried if it's not perfect.


Stack your squares on top of one another and make a few piles so it's easier to put them in the bread pan.


Put your squares in the bread pan and cover with whatever excess cinnamon sugar might be on the table. Cover the dough and let it rise for a final 10-15 minutes before putting in the oven. Heat your oven to 350 degrees and place a baking pan underneath, in case any juices come out during the baking.


Bake for 30-35 minutes until the bread is golden brown. I baked mine for 30 minutes and while the outside was done, the inside was a bit doughy so be mindful. Pull apart and enjoy!


TOTAL COSTS: Free!
I already had all the ingredients
TOTAL AMOUNT OF TIME: About 2 hours
1 hour to make dough and let rise
25 minutes to make dough squares and let rise

30 minutes in oven
EASY-PEASY SCALE (1 super easy - 5 very difficult): 2 out of 5
The only "difficult" thing I found was making sure it wasn't doughy in the middle but if you just keep an eye on it, you should be fine!

Thursday, January 9, 2014

Almost No Fat Banana Bread = Tasty Treat or Terrible Trick?

If you want to stick to a resolution to eat healthier AND enjoy some comfort food on the side, grab those bananas you keep telling yourself you're going to eat (and still haven't) and try this banana bread! I'm not a big fan of things that say "low fat", "zero calories", or "no trans fat" because that's where the flavors are but when I saw this recipe... and my aging bananas... I figured it couldn't hurt, right? Either it'll be "almost no fat" and taste terrible or "almost no fat" and taste good. Here's what I found:

First, preheat your oven to 350 and grease a bread pan. The original post called for a 8" x 4" pan but I only had a 9" x 5" pan and it worked fine.

Next, grab the following 8 ingredients:

Dry ingredients -
1 1/2 C of flour
3/4 C of white sugar
1 1/4 t of baking powder
1/2 t of baking soda
1/2 t of ground cinnamon

Wet ingredients -
1/4 c of applesauce (I used cinnamon applesauce because I can't have enough cinnamon!)
1 C of smashed bananas (I found this equaled to about 2 bananas)
2 egg whites


Next, mix all the dry ingredients together and then add the wet ingredients. It's going to look like the cat vomited in your bowl. You have been warned.


Pour the mixture into your bread pan.


Put in the oven for 50-55 minutes. I put mine in for 50 minutes and I knew it was done when I put a toothpick in the bread and it came out clean.


Let it cool for at least 30 minutes before cutting into it and tell me what you think. Me personally, it lacked any sort of flavor. Nutmeg, vanilla, almond extract... SOMETHING would have been a nice addition but as it stands, this bread has:

Nutrition

  • Calories
  • 127 kcal
  • 6%
  • Carbohydrates
  • 29.5 g
  • 10%
  • Cholesterol
  • 0 mg
  • 0%
  • Fat
  • 0.2 g
  • < 1%
  • Fiber
  • 1 g
  • 4%
  • Protein
  • 2.4 g
  • 5%
  • Sodium
  • 100 mg
  • 4%
* Percent Daily Values are based on a 2,000 calorie diet


I mean, it's kinda hard to argue with those numbers when it's semi-healthy... but again, it's also like eating cardboard.


TOTAL COSTS: About $18 (if you don't own any of the ingredients - prices from Vons)
$1.99 for flour
$2.69 for white sugar
$1.59 for baking soda
$1.99 for baking powder
$4.69 for ground cinnamon
$1.99 for applesauce
$.69/pound for bananas
$2.59 for eggs

TOTAL AMOUNT OF TIME: 1 hour, 30 minutes
10 minutes to mix ingredients
50 minutes in oven
30 minutes to cool

EASY-PEASY SCALE (1 super easy - 5 very difficult): 1 out of 5
It's not hard to bring the ingredients in a bowl, then in a pan, then in your mouth but remember, it's "almost no fat" because it's "almost no flavor." Now if you'll excuse me, I've got some bread that needs to be slathered in butter...

Tuesday, December 3, 2013

Holla for some challah!

What better way to celebrate Hanukkah than with the smell of warm, delicious bread coming out of your oven? Even if you're not Jewish, you have got to try challah at least once in your life. So put away that bread maker, give your self some time, and make this delicious bread recipe I found on AllRecipes.com.

Why do I say to give yourself some time? Well, because there's a lot of sitting and waiting but good things come to those who wait, I promise!

Things that you'll need (other than the ingredients listed on site):
1. 2 cookie sheets
2. PAM or something to grease said cookie sheets
3. Clean counter space
4. Flour to put on said counter space

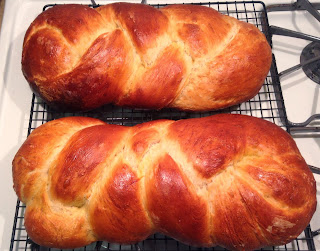
After you've made the dough, waited for it to rise, cut in half and then into thirds to make the braids, I can't recommend enough the 1 hour resting period before putting the bread in the oven. Look at what a difference it made:

Before

After 1 hour

However, here's one change I'd make (because we all knew I had to make a mistake somewhere): the recipe says to leave it in the oven for 40 minutes but after 25 minutes, I smelled burning and yes, I did burn a little off the bottom so keep an eye on your bread and note that 40 minutes is way too long! I knocked and got the hallow sound under both loaves so they were definitely done baking!


TOTAL COSTS: Free!
Assuming you have yeast, honey, vegetable oil, flour, eggs and salt

TOTAL AMOUNT OF TIME: About 3 1/2 hours
This includes the waiting times to let the dough rise

EASY-PEASY SCALE (1 super easy - 5 very difficult): 2 out of 5
The only "hard" thing might be the braiding but if you know how to braid, it should be easy-peasy for you to do!