I'm back from the holidays! I hope everyone had a great time with their friends and family, wherever they may be. I gave this personalized Monopoly game as a gift to my parents and they thought it would be a great blog post, in case anyone else wanted to make one! This is great if you're family a.) has a lot of inside jokes and b.) loves playing games. Note that while you can purchase some on Etsy for $200, you can just as easily make your own for almost a quarter that price if you have access to the following:
1.) Adobe Photoshop and Microsoft Word
2.) A Kinko's nearby
3.) A lot of patience and creativity
If you have those three things handy, you can make one yourself for anywhere between $50-$100!
STEP 1: Making the Board
Start by going to BradFrostWeb's site to download his Monopoly
template. From here, you'll be able to download the entire Photoshop template and edit the names of the tiles, add photos, customize the pricing, do anything and everything you like to personalize the board. FYI: this will be the longest step. You'd be surprised how nit-picky you'll get and which jokes to include/leave off the board.
Note that if you want it to be completely authentic to the original, you may have to scour the internet to find similar fonts for free like
KabobLight for the property names and
KabaleMedium for the "OPOPLY" name in the middle, but with a little Google searching, you should be able to download the fonts for free.
STEP 2: Making the Cards

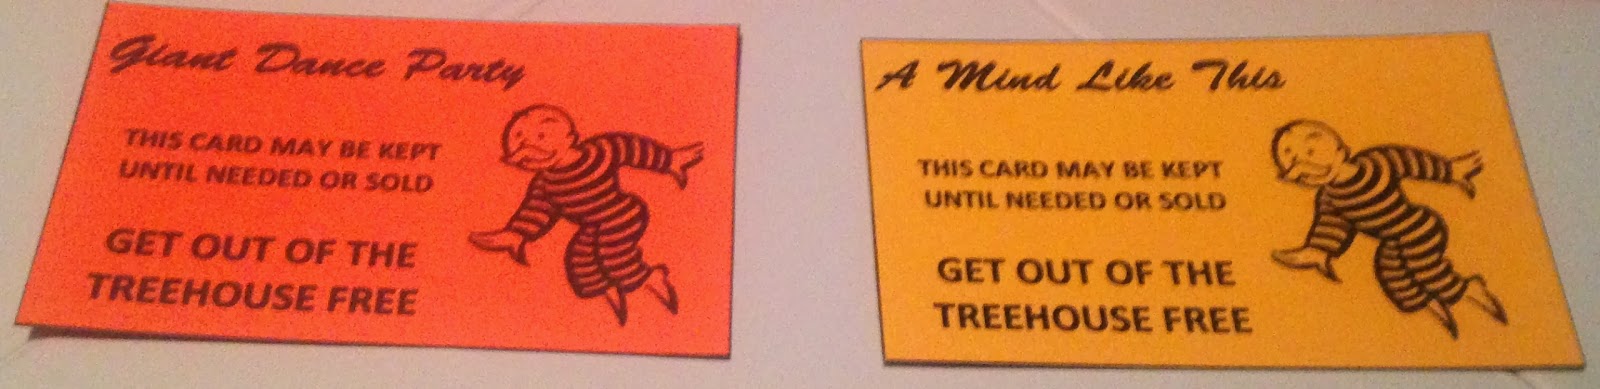
Once you have your board completed, next comes the community chest/chance cards. In this example, I used titles of books my mother and sister wrote this year ("A Mind Like This" by
Susan Blackwell Ramsey and "Giant Dance Party" by
Betsy Bird). I recommend using orange and yellow card stock paper and making the templates in Word. I fit 8 squares of 1.75" x 3" onto a sheet (only 6 pictured here) and for the text, I used Brush Script Std in size 18 for the title and Calibri for main font text, however the size changed depending on how much I wanted to write. I Google-searched as many images of "Mr. Moneybags" as I could find, then copy and pasted them into a Word doc to look authentic.
Note: you'll want to print on the front AND back of the cards. Keep this in mind, as one side will need to say the name of the card, the other side will have the juicy details. I probably went through 6-8 pieces of paper, just to make sure the title was evenly lined up on the other side of the paper.
STEP 3: Making the Deeds
If you have already decided what colored properties will be for what, then it won't be too difficult for you to make the property cards. These also come from the template you downloaded. A few things to note:
1. If you choose to go with a thick, white, semi-shiny card stock paper, make sure your template is not near the edge of the paper. I found, after multiple trials and errors, that the closer the template was the edge (like if I wanted to try and print 8 deeds on one sheet), it was harder for the printer to catch the paper and therefore print correctly.
2. If you print these at home, chances are the white font of "Title Deed" might not be legible. Perhaps if you bold the font it will be clearer, but otherwise it's very hard to read.
3. I didn't print on the backs of these cards but you certainly can if you like. The main reasons I didn't were because it says how much the mortgage is on the front of the card AND I didn't want to deal with the front and back printing like the community chest/chance cards.
STEP 4: Assembling the Board
You'll need to find an 18"x18" game board - I found one for cheap on eBay and after scouring the internet, I don't think you'll find anything cheaper! Next: find a Kinkos in town. Take your Photoshop file, put it on a thumb drive, and take that thumb drive to Kinko's and ask for an 18" x 18" sticker. It'll take 24 hours to make but well worth it! Very carefully, apply the sticker to the game board. This may take several attempts and you might see bubbles but try to rub them out as soon as you can so they don't stay. If you have someone to help you, that might make things easier, but I did it by myself so it's not impossible to do alone.
STEP 5: Acquiring Remaining Game Pieces
You'd be surprised what else is involved in a Monopoly game! There's:
* game pieces (car, dog, thimble, etc.)
* money
* hotels and houses
* dice
* and most importantly, a box to carry the game and its pieces
If you want to make it even more personalized, you can find specific game pieces to match the player's likes/hobbies! As for the box, I simply printing out sections of the game board and Mod Podged them to an existing game box (note: this was not a Monopoly box, as I found I originally couldn't get the board to fit!).
What I later found out, and did do, was cut the board and the sticker so that it was easier to fold into fourths. Don't worry, your board will still look great, just remember to do this with either an x-acto knife or sharp scissors but be careful!
And there you have it kids! Your very own Monopoly game!
TOTAL COSTS: About $70
$9 (including shipping) for game board on
eBay
$50 for sticker to be made by Kinko's
$5 for Monopoly pieces on
Etsy
White card stock, Mod Podge, x-acto knife, PhotoShop, Word, money, hotels/houses, and box already on hand
TOTAL AMOUNT OF TIME: Weeks!
But that's because I had no idea what I was going to call the properties, put on any of the cards, etc. Plus, you'll need 24 hours for the sticker to be made anyway.
EASY-PEASY SCALE (1 super easy - 5 very difficult): 4 out of 5
If you're familiar with PhotoShop (or even if you're not), you'll figure it out fast with help from the original template. Putting the sticker on the board without bubbles isn't easy but with a second person helping it should make it a lot easier. Have fun, be creative, put in as many inside jokes as you can, and hope you land on free parking!